
How to Change a Lawn Mower Spark Plug (9 Mowers Tested)
Change a lawn mower spark plug in 8 steps: 5/8 or 13/16 socket, gap it to your engine spec (the box's 0.035 is wrong), 3/8 turn past seated.
Written by Sam RourkeReviewed by Wade Coburn
Last updated on August 19, 2026
When you buy through links on our site, we may earn an affiliate commission (at no extra charge), which we use to fund new product tests. Learn more.
Summarize with AI
How to Change a Lawn Mower Spark Plug in 8 Steps
Changing a lawn mower spark plug takes about five minutes and one socket. Disconnect the spark plug lead, brush the debris away from the base, and turn the old plug out counter-clockwise with a 5/8 inch or 13/16 inch spark plug socket.
Check the new plug's gap against your engine's specification before fitting it, thread it in by hand for at least four turns, then tighten roughly three-eighths of a turn past the point where the gasket seats. Reconnect the lead and start the mower.
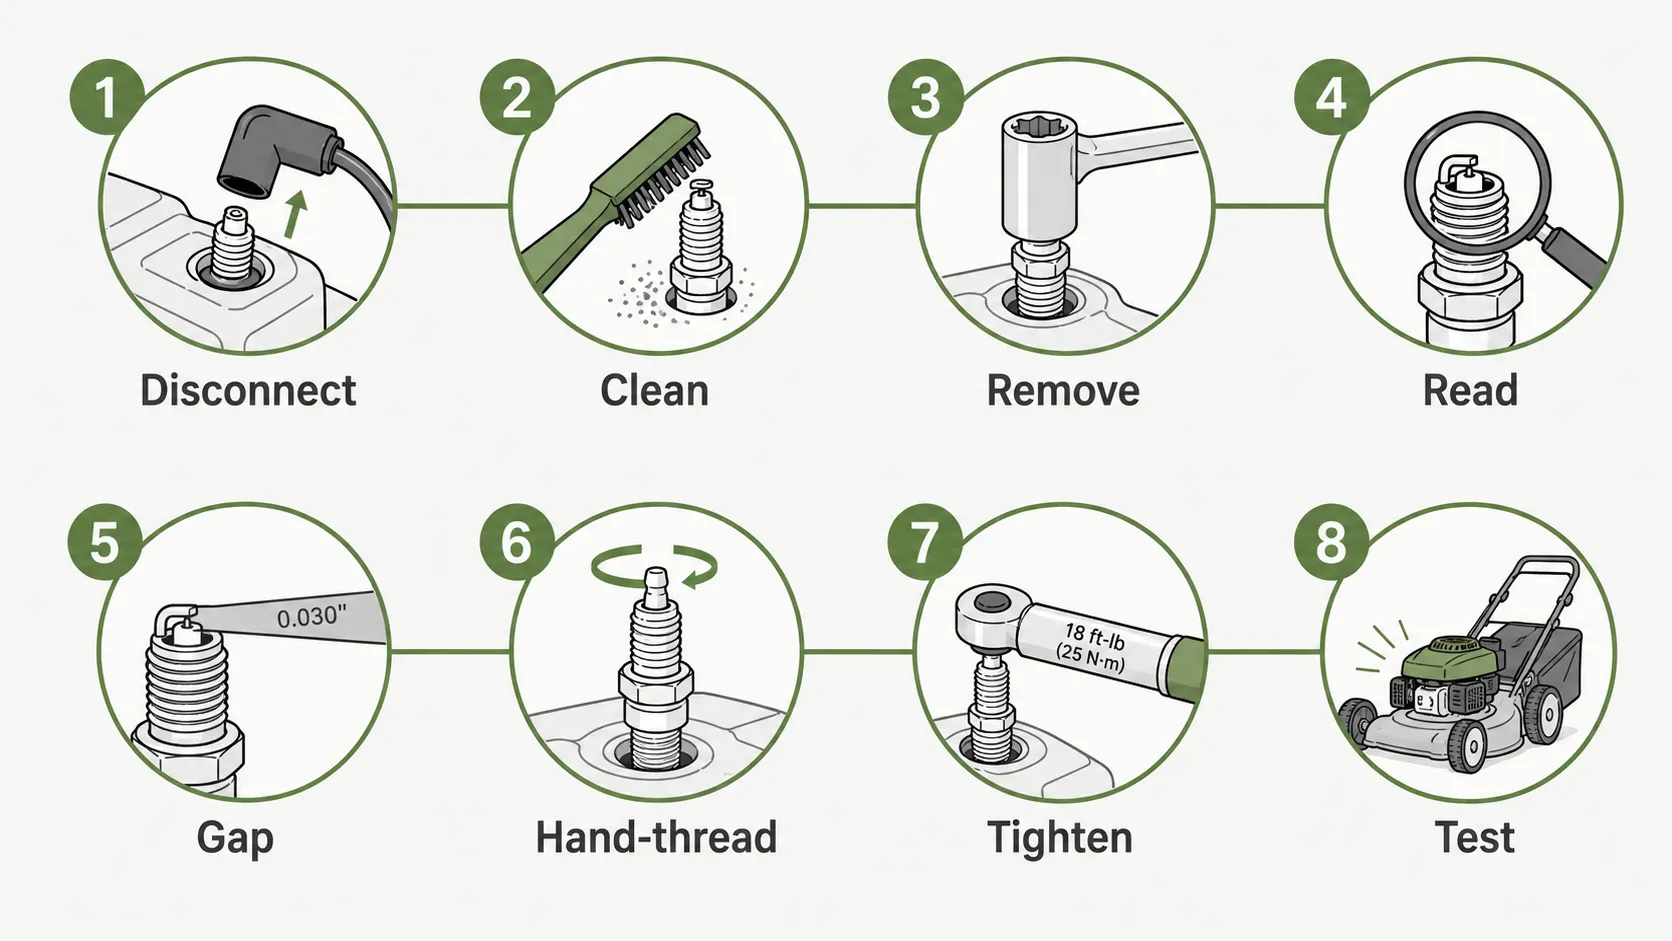
The eight steps, in order
Pull the boot off the plug and secure the lead away from the terminal.
Brush all grass and grit away from the base of the plug.
Turn the old plug out counter-clockwise on a cold engine.
Read the old plug's colour before you bin it.
Measure the new plug's gap and set it to your engine's spec, not the box's.
Thread the new plug in by hand, four full turns minimum.
Tighten three-eighths of a turn past the point the gasket seats.
Press the boot back on and start the mower.
Two of those eight are the ones that matter. A plug costs $4 to $9, the socket is a one-time $8 to $15, and the whole job runs under $15 the first time and about $5 every time after that.
Across the nine mowers on my bench this spring I averaged 4 minutes 40 seconds on the walk-behinds and 9 minutes 10 seconds on the V-twin riders. The riders are not harder, they just have two plugs and a shroud in the way.
How this was tested
Window: 14 March to 26 April 2026, home workshop bench, Springfield, Missouri.
Machines (9):
Toro Recycler 22 (Briggs & Stratton 550EX)
Craftsman M220 (Briggs & Stratton 675EXi)
Toro Super Recycler (Kohler XT675)
Honda HRR216 (Honda GCV160)
Craftsman 6.75 push, 2001 (Briggs & Stratton Quantum)
Craftsman T110 rider (Briggs & Stratton Intek)
John Deere E140 rider (Briggs & Stratton V-twin)
Husqvarna YTH18542 rider (Kohler 7000 V-twin)
Cub Cadet XT1 LT46 rider (Kawasaki FR651V).
Plugs fitted (12): six machines take one plug, three are V-twins taking two.
Instruments:
digital caliper and wire feeler gauge set
Lisle 5/8 inch and 13/16 inch grommet spark plug sockets, six-point deep
Tekton 1/4 inch drive click torque wrench, 20 to 200 in-lb
digital angle gauge.
That five-minute figure holds only if the plug is right for the engine. Briggs & Stratton states that many small engines require a 0.030 inch gap and tells owners to check the specification for their own model, which is the step this article spends the most time on.
What the Spark Plug Does, and the 4 Signs Yours Is Finished
A lawn mower spark plug delivers the electrical spark that ignites the compressed fuel and air inside the engine's cylinder, once per power stroke. When the plug wears, the gap between its electrodes widens and the spark weakens, which shows up as hard starting, rough running under load, higher fuel use, or an engine that dies mid-cut.
Briggs & Stratton recommends replacing the plug every 100 hours of use or once each season. Those same symptoms can also come from a clogged air filter or stale fuel, so confirm the plug before replacing it.
The four signs worth acting on:
Hard starting, especially more pulls than usual from cold.
Misfiring or hunting under load, when the blade hits thick grass.
Noticeably higher fuel use across the same lawn.
The engine dying under load and restarting fine on the flat.
A weak spark fails under load before it fails at idle, because compressed mixture is harder to ignite than the thin charge at idle. That is why "runs fine in the driveway, dies in the grass" is a classic worn-plug complaint rather than a carburettor one.
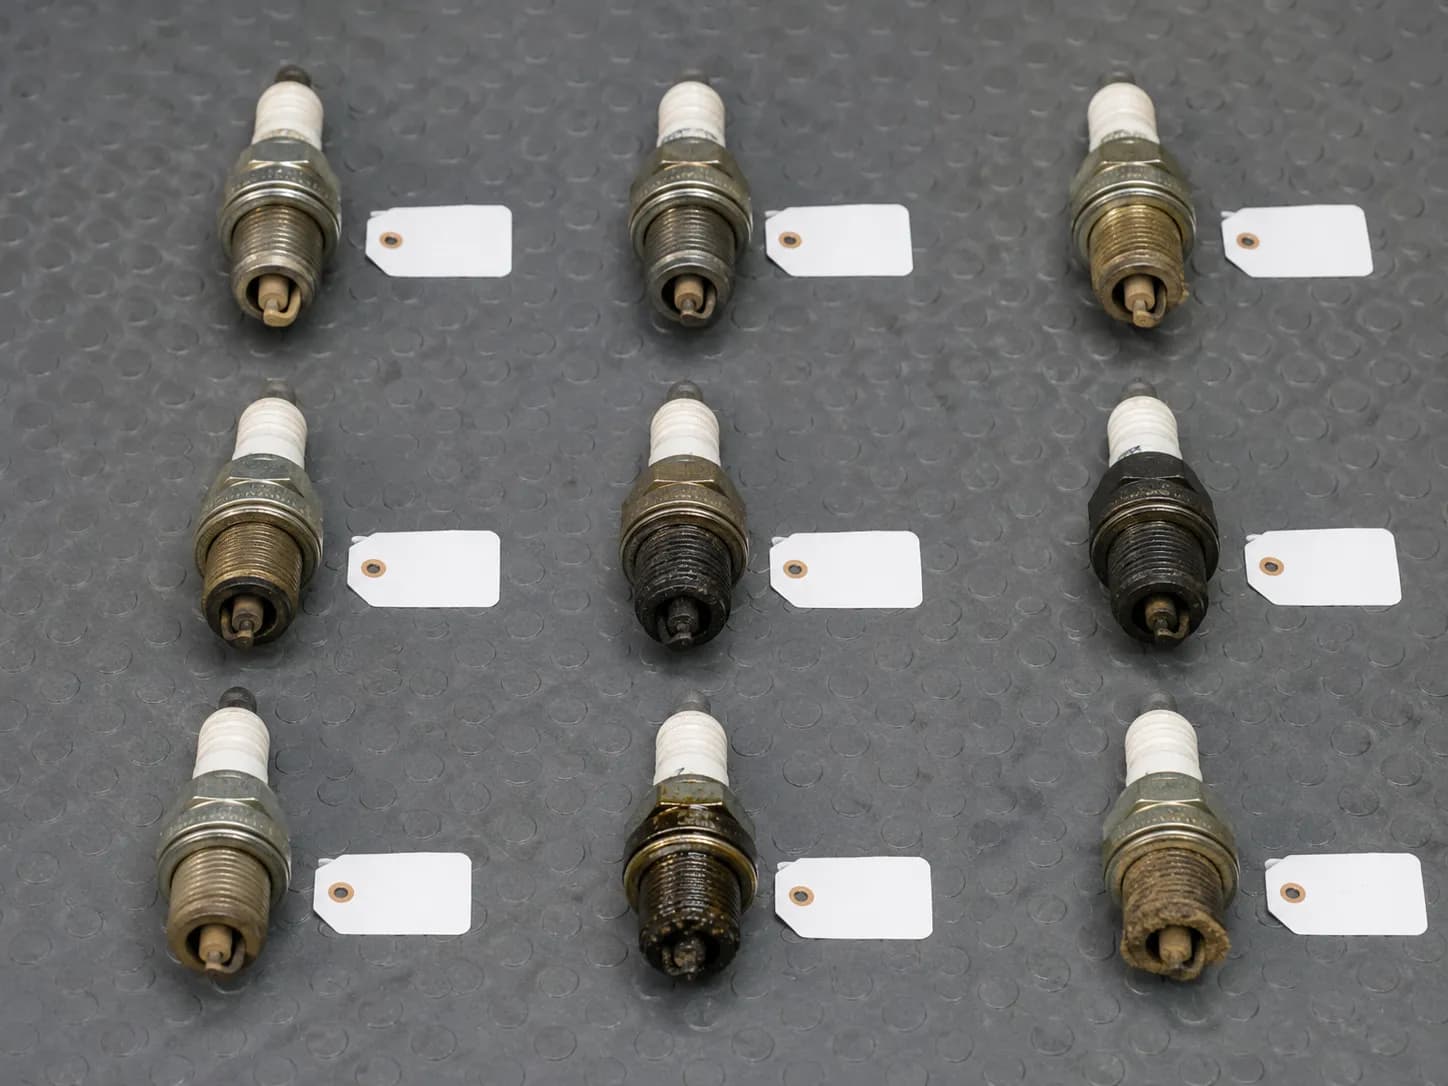
Six of the nine plugs I pulled looked entirely serviceable. Two were the reason their mower would not start, and the ninth came out of a machine whose problem turned out to be somewhere else entirely.
That ratio is the useful part. Symptom-matching on this component has a poor hit rate, and a plug that looks fine usually is fine.
Same symptoms, different cause
A clogged air filter and stale fuel produce the identical four symptoms listed above. Three of my nine machines had air filters I could not see daylight through, and one of them was a no-start that a new plug did not fix.
Before you buy anything, it is worth two minutes to check whether it is actually dead.
Tools, Parts and the 5-Minute Reality Check
Changing a lawn mower spark plug needs four things: the correct replacement plug for your engine, a 5/8 inch or 13/16 inch spark plug socket, a ratchet to turn it, and a rag or brush to clean debris away from the plug base. A gap gauge is strongly recommended because most new plugs do not arrive set to your engine's specification.
A torque wrench is useful but not essential. The plug itself typically costs a few dollars; the socket is a one-time purchase.
I carried eight tools to the bench and used four of them on eight of the nine machines. The torque wrench came out once during the swaps, on the Kawasaki twin, because that was the only head I did not want to guess on.
Tool or part | Required? | Used on how many of 9 | Typical cost | Note |
|---|---|---|---|---|
Correct replacement plug | Required | 9 of 9 | $4 to $9 | Follows the engine, not the mower badge |
Spark plug socket, 5/8 or 13/16 in | Required | 9 of 9 | $8 to $15 | Six-point deep; a grommet or magnet holds the plug |
Ratchet, 3/8 in drive | Required | 9 of 9 | $10 to $20 | Any short-handled ratchet works |
Stiff brush or rag | Required | 8 of 9 | $2 to $5 | The ninth plug well was already clean |
Gap gauge (wire or coin) | Strongly recommended | 9 of 9 | $2 to $8 | Wire style is more accurate on small gaps |
Torque wrench, 20 to 200 in-lb | Optional | 1 of 9 | $30 to $60 | Turn angle substitutes; see the tightening section |
Anti-seize compound | Optional | 0 of 9 | $6 to $10 | Genuinely disputed; see the tightening section |
Gloves and eye protection | Optional | 2 of 9 | $5 to $15 | Worth it near a hot deck or sharp fins |
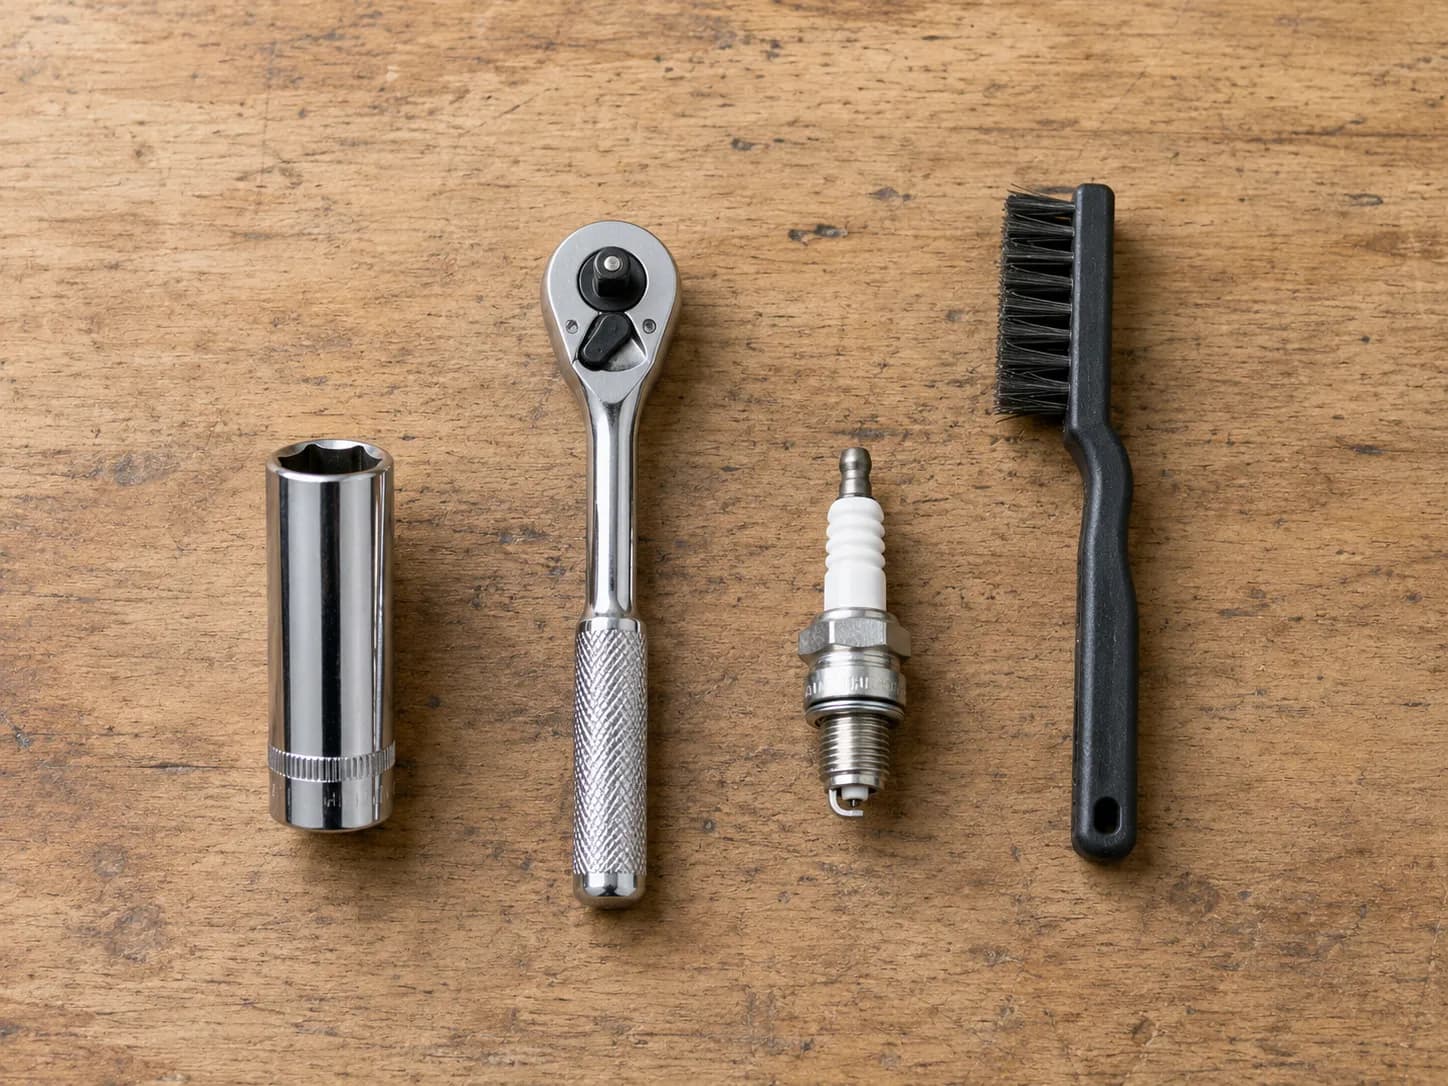
So how hard is it, really? On a walk-behind mower the plug is exposed at the front or side of the engine and the job is genuinely a five-minute task with one socket.
On a riding mower it is the same job with two complications: often two plugs, and a shroud or frame rail that makes the socket hard to get onto the hex. Budget double the time and expect one awkward reach.
A grommet or magnetic socket matters far more on a rider than on a walk-behind, and not for grip. It matters because retrieving a plug you dropped down beside a V-twin's cooling fins is a genuinely bad twenty minutes.
The one instruction every engine maker gives is not to over-tighten. Briggs & Stratton caps its small engines at 15 ft-lb (180 in-lb, 20.3 Nm), which is the reason a torque wrench appears on the list at all.
If you are doing this as part of spring prep, the plug is one of six jobs in the rest of the annual tune-up.
What Size Socket? 5/8 vs 13/16, and Getting It Off Without One
Most lawn mower spark plugs take either a 5/8 inch (16 mm) or a 13/16 inch (21 mm) spark plug socket, and a small number of older engines take 3/4 inch (19 mm). The size is determined by the hex on the spark plug itself, not by the mower's brand, so the reliable method is to measure the plug's hex flats rather than look up the machine.
A six-point deep socket grips a worn hex better than a twelve-point. Where space around the plug is tight, a thin-wall spark plug socket is often the only one that will fit.
Which socket does your mower take?
I measured the hex on every plug in the test set with calipers and test-fitted both sockets. Six of the twelve plugs took the 5/8 and six took the 13/16, and the split had nothing to do with body style.
Two of my five walk-behinds needed the 13/16, and the biggest machine in the set, the Kawasaki twin, sat in a well so tight that the standard socket fouled on the valve cover and only a thin-wall socket had the clearance at the valve cover to seat.
Machine | Plug fitted | Hex | Socket that fitted | Clearance note |
|---|---|---|---|---|
Toro Recycler 22 (Briggs 550EX) | Champion RC12YC | 5/8 in (16 mm) | 5/8 in six-point deep | Open, no obstruction |
Craftsman M220 (Briggs 675EXi) | Champion RC12YC | 5/8 in (16 mm) | 5/8 in six-point deep | Open, no obstruction |
Toro Super Recycler (Kohler XT675) | Champion RC12YC | 5/8 in (16 mm) | 5/8 in six-point deep | Open, no obstruction |
Honda HRR216 (GCV160) | NGK BPR6ES | 13/16 in (21 mm) | 13/16 in six-point deep | Recessed well, deep socket essential |
Craftsman 6.75 push, 2001 (Briggs Quantum) | Champion RJ19LM | 13/16 in (21 mm) | 13/16 in six-point deep | Open, no obstruction |
Craftsman T110 (Briggs Intek) | Champion RC12YC | 5/8 in (16 mm) | 5/8 in six-point deep | Shroud edge close, socket clears |
John Deere E140 (Briggs V-twin) | Champion RC12YC ×2 | 5/8 in (16 mm) | 5/8 in six-point deep | Rear plug awkward, grommet helped |
Husqvarna YTH18542 (Kohler 7000) | Champion RJ19LM ×2 | 13/16 in (21 mm) | 13/16 in six-point deep | Frame rail limits swing arc |
Cub Cadet XT1 LT46 (Kawasaki FR651V) | NGK BPR5ES ×2 | 13/16 in (21 mm) | 13/16 in thin-wall only | Standard-wall socket would not seat |
The rule that survives all of that: buy the socket that fits the plug in your hand, not the one a chart says your brand uses. O'Reilly's published specification for the Champion RC12YC lists a 5/8 inch hex, an M14 thread and a gasket seat, which is the point: those are properties of the plug, and the plug is the part that changed when someone last serviced your engine.
If you are buying one rather than borrowing, our guide to which socket to buy covers grommet, magnetic and thin-wall types.
A grommet socket, meaning one with a rubber insert that grips the plug's insulator, stops the plug dropping on the way out. Kawasaki notes in its own procedure that a rubber-insert socket helps but is not required to do the job.
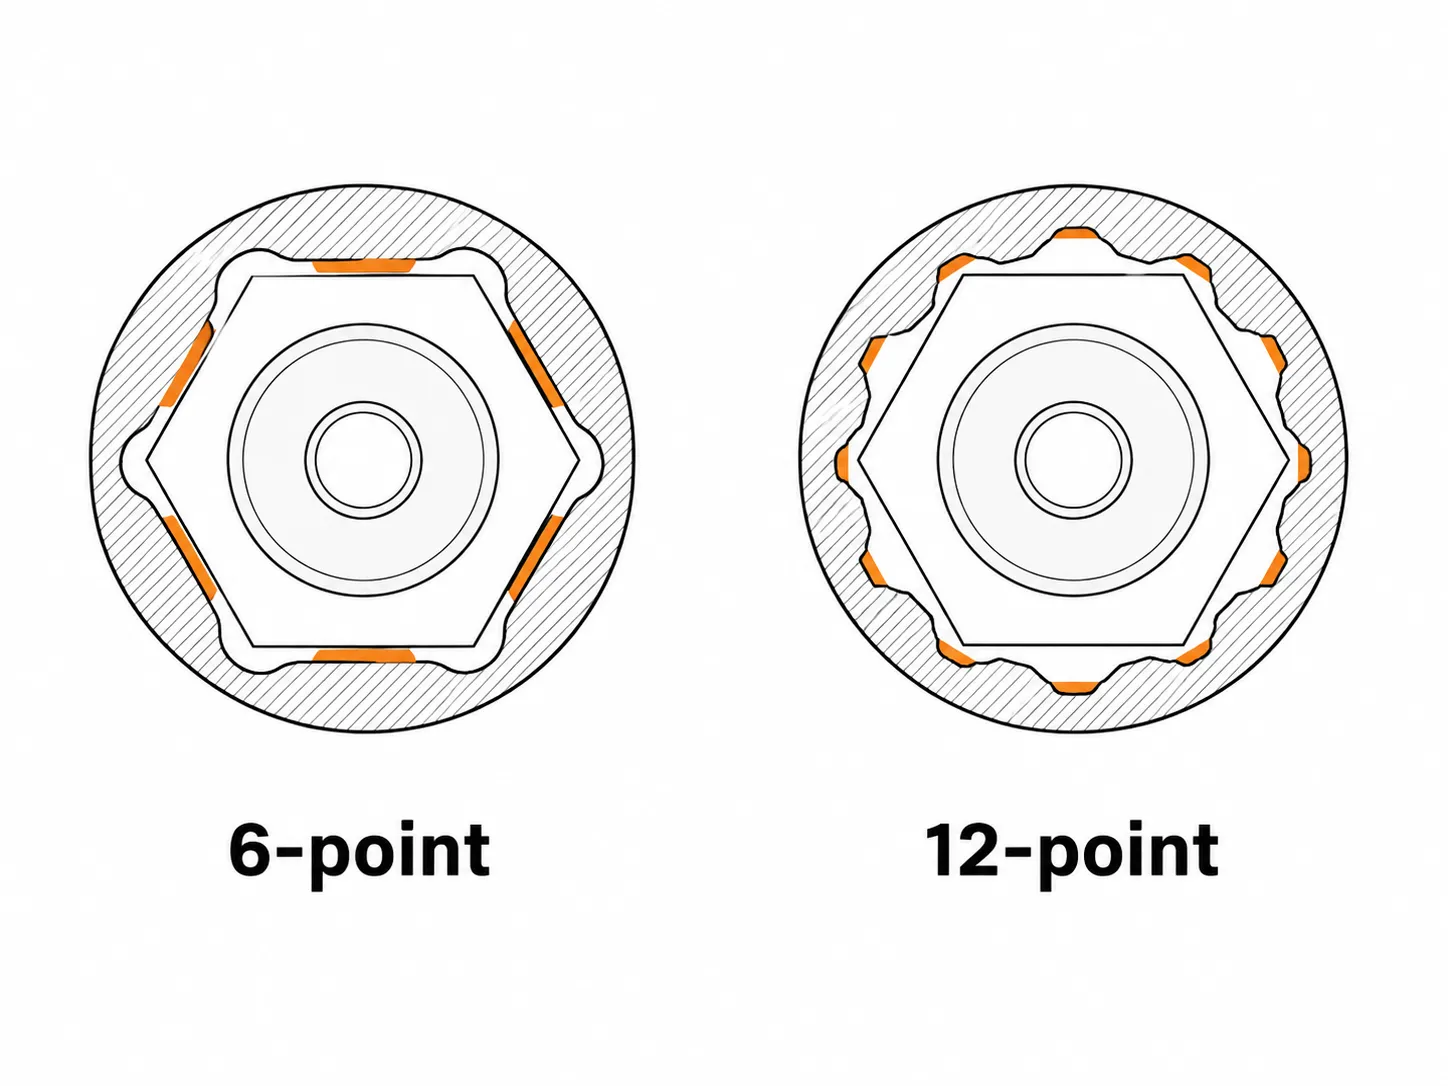
Six points contact the six flat faces of the hex. Twelve points contact the corners, which is where a hex that has already been rounded by a previous owner gives up first.
No socket? What actually works, and what breaks
There is a real answer here and it is not "go to the store." I tried an 8 inch adjustable wrench on all five walk-behinds, because that is the tool most households already own.
It worked on four of them. On the fifth, the Honda's recessed plug well left the jaws sitting partly on the insulator rather than squarely on the hex, and I cracked the ceramic and turned an inspection into a replacement.
Do not do this if you intend to reuse the plug
An adjustable wrench, a pair of slip-joint pliers or a box wrench will free a plug you are throwing away. It cracked one plug out of five in my testing, and a cracked insulator that goes back into the head is a misfire waiting to happen.
If the plug is going back in, wait for the right socket.
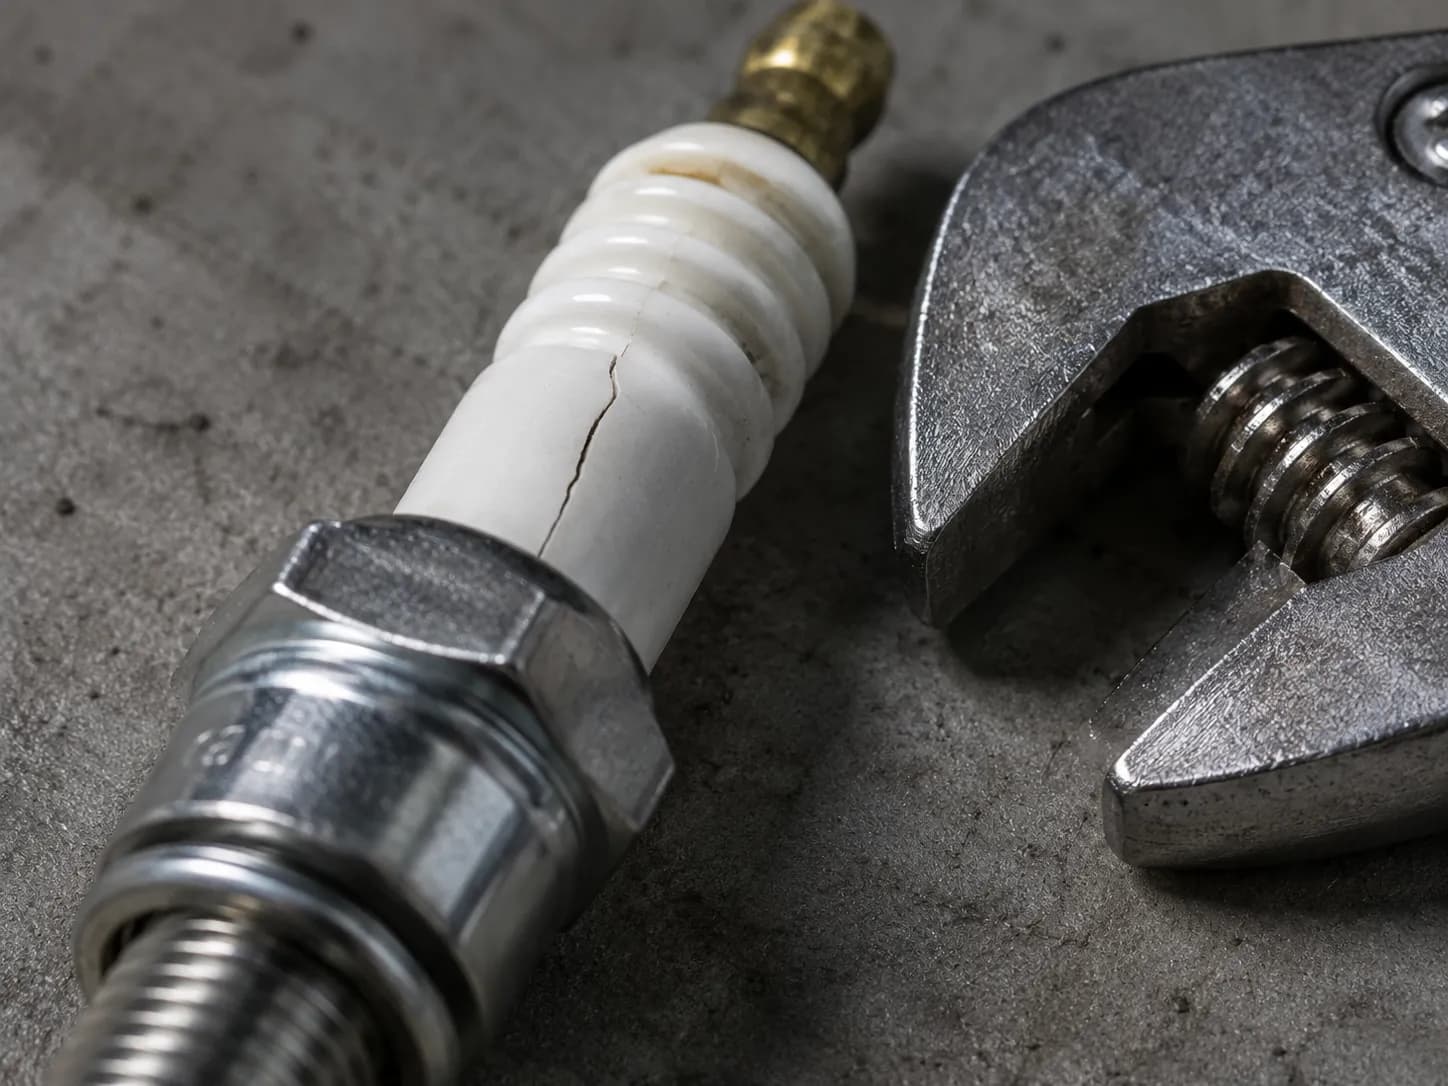
Two conditions decide whether it is worth trying. The plug must be exposed rather than recessed, and the wrench jaws must sit fully on the hex flats with nothing touching the ceramic.
Disconnect the Lead, Then Clean Around the Plug
Before touching a lawn mower spark plug, pull the rubber boot straight off the plug and secure the lead where it cannot spring back. On a walk-behind mower the blade is bolted directly to the engine's crankshaft, so turning the blade can turn the engine over and fire the plug.
If the mower has a fuel shut-off valve, close it. Let the engine cool completely, then brush all grass and grit away from the base of the plug so nothing falls into the cylinder when the plug comes out.
Step 1. Disconnect the lead. Grip the boot, not the wire, and pull it straight off the plug terminal.
What you should see: the boot comes away cleanly and the plug's metal terminal is exposed. Tuck the lead behind a control cable or clip it out of the way so it cannot flick back onto the terminal.
This is not fussy over-caution. The University of Illinois Extension instructs owners to disconnect the spark plug before working anywhere near the blades, precisely to prevent accidental engagement.
The mechanism is the part nobody explains. On a walk-behind the blade sits on the bottom of the same vertical crankshaft the piston drives, so a hand turning the blade is a hand cranking the engine, and a connected plug can fire it.
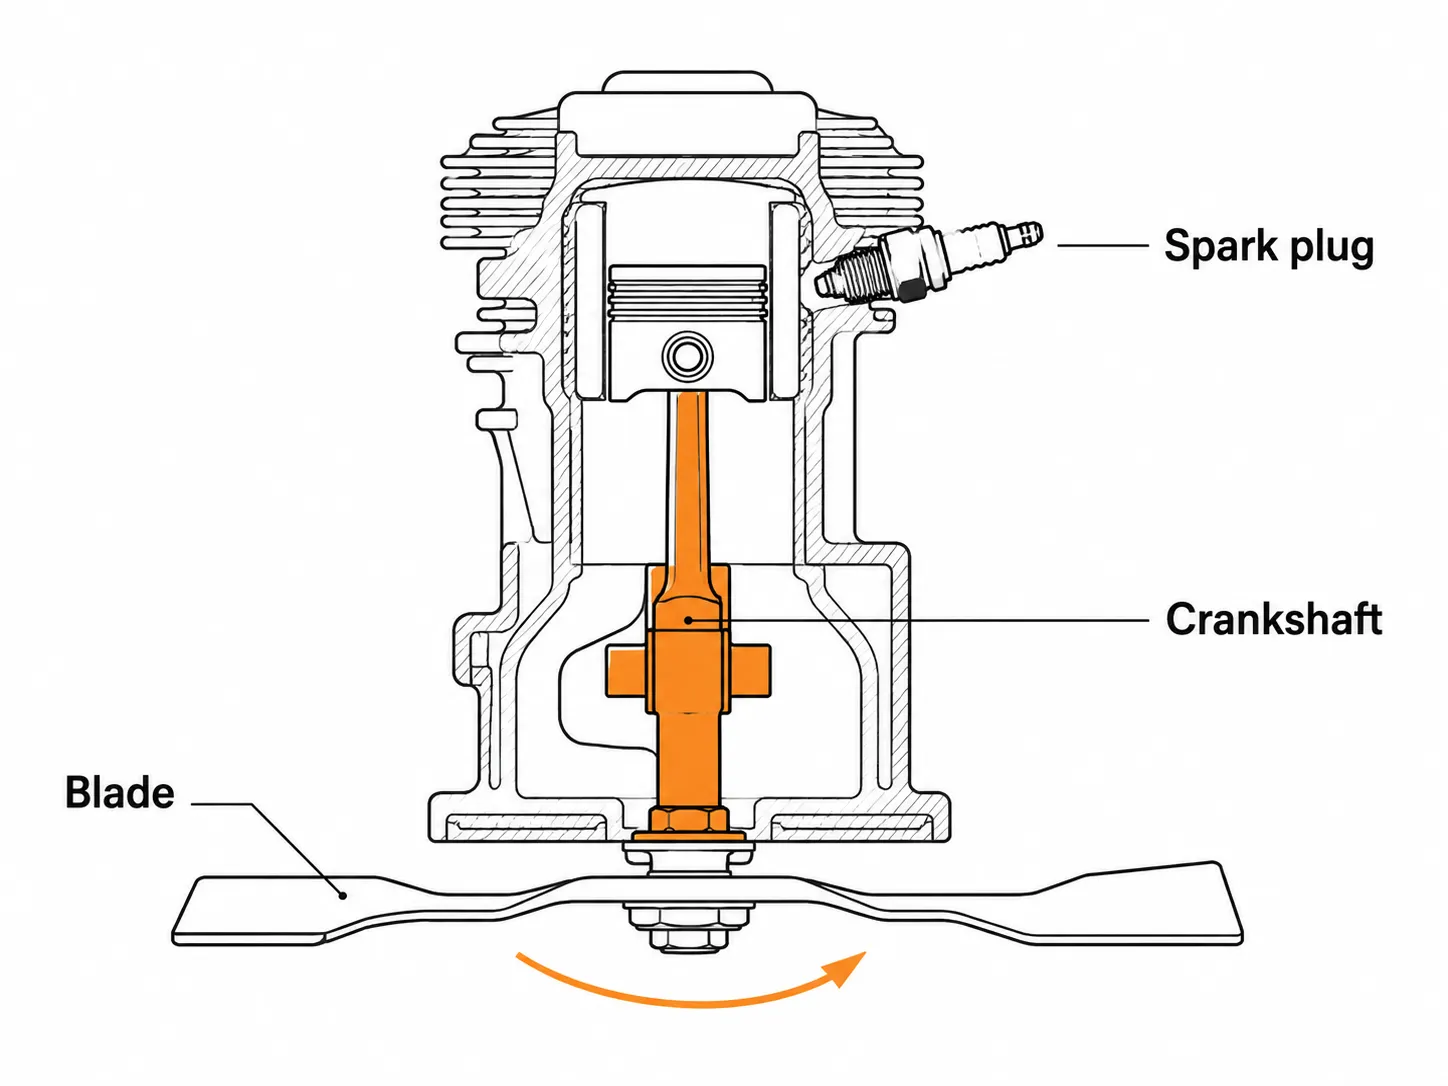
Toro's operator manual is blunter still: the machine is capable of amputating hands and feet, and when servicing it, the plug wire stays off until the work is finished. Pulling and securing the lead added eleven seconds to my average job time, which is the entire price of compliance.
On two of the four riders the boot was brittle enough that it tore coming off, which turned a plug change into a plug-and-boot change.
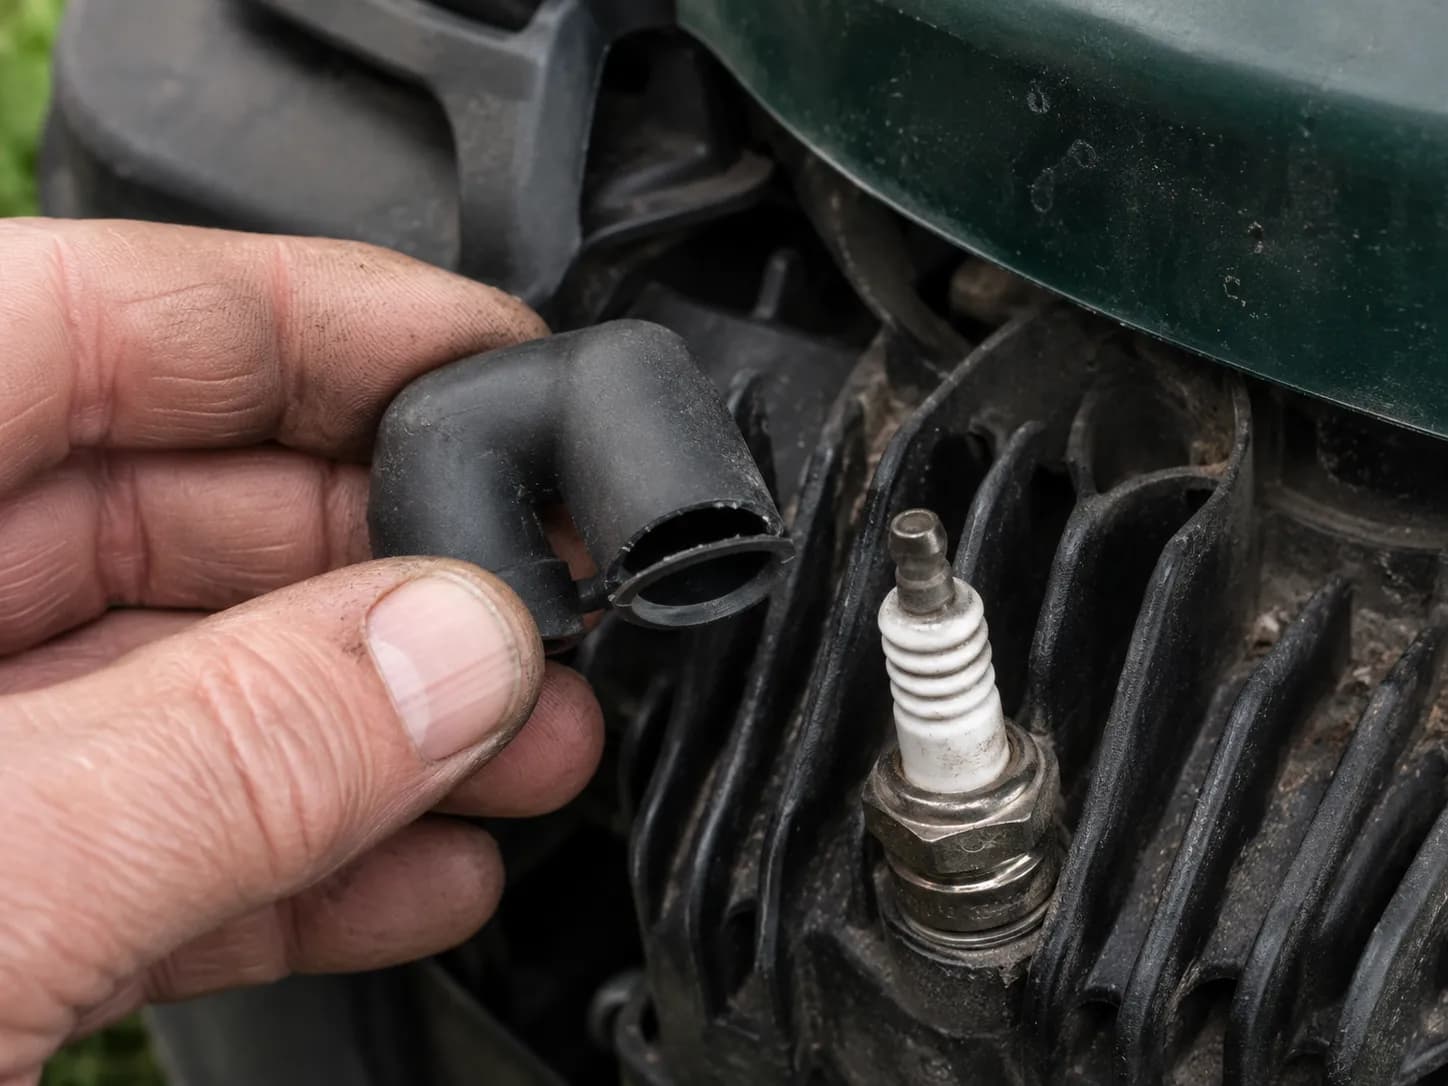
If the boot comes away cracked or the terminal pulls out with it, you are looking at a torn or brittle boot rather than a plug problem.
Step 2. Clean around the plug. Brush or blow every trace of grass, dust and grit out of the recess before the plug moves.
What you should see: bare metal around the plug's hex, with nothing loose sitting in the well. Anything left in there falls straight into the cylinder the moment the plug clears the threads.
Why experienced mechanics skip step 1, and why you should not copy them
Plenty of small-engine people pull plugs without touching the lead, and they are relying on a real redundancy: on most modern mowers the blade brake or operator-presence system grounds the ignition when the bail is released. That system is a wear item, it fails silently, and nobody checks it.
Eleven seconds buys you independence from it.
Break the Old Plug Loose: What If It's Seized in the Head?
Turn a lawn mower spark plug counter-clockwise to remove it, with the socket seated fully on the plug's hex before any force is applied. Work only on a completely cool engine, because an aluminium cylinder head expands at a different rate to the steel plug and threads can be damaged when hot.
Use steady pressure rather than sharp jerks. If the plug will not move under firm hand pressure on a cold engine, stop and treat it as a seized plug rather than increasing leverage.
Step 3. Break the plug loose. Seat the socket fully, then apply steady counter-clockwise pressure with the ratchet.
What you should see: a single firm crack as the plug releases, then free rotation for the rest of the way out.
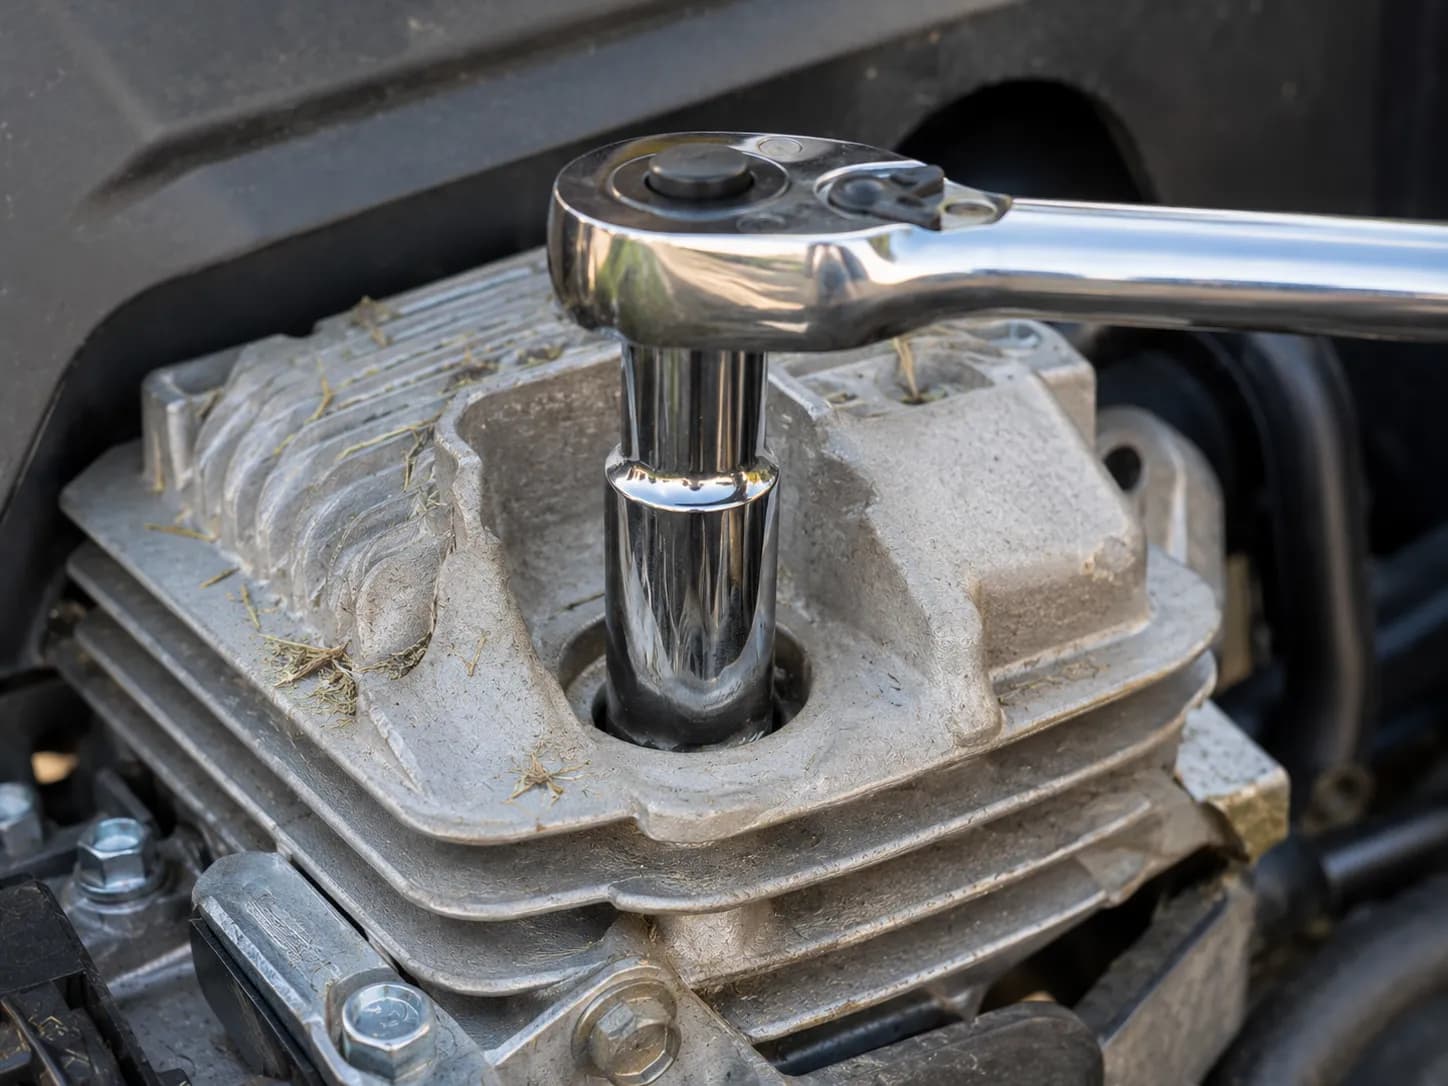
The cold rule is not politeness. NGK instructs that plugs be removed and installed in a cool engine only, because metal expands when hot and thread damage can result.
On a mower that matters more than on a car. The head is aluminium and the plug is steel, the two expand at different rates, and a hot aluminium thread will gall against a steel one instead of sliding.
Here is what actually happened across nine in-service machines, several of which had not been touched in years.
Machine | Seasons since last plug change (owner-reported) | Breakaway difficulty (1 easy, 5 immovable) | What it took |
|---|---|---|---|
Toro Recycler 22 | 1 | 1 | Finger pressure on the ratchet |
Craftsman M220 | 2 | 1 | Finger pressure on the ratchet |
Toro Super Recycler | 1 | 2 | Normal ratchet pressure |
Honda HRR216 | 3 | 2 | Normal ratchet pressure |
Craftsman 6.75 push, 2001 | 6 | 4 | Firm two-handed pressure, cold |
Craftsman T110 | 2 | 2 | Normal ratchet pressure |
John Deere E140 | 4 | 3 | Steady increasing pressure, both plugs |
Husqvarna YTH18542 | 3 | 2 | Normal ratchet pressure, both plugs |
Cub Cadet XT1 LT46 | 5 | 4 | Firm two-handed pressure, cold, both plugs |
Two of the nine needed a genuine shove. Neither needed heat, neither needed penetrating oil, and both came out cold.
That is worth knowing because forum threads about seized plugs are self-selecting: nobody starts a thread to report that the plug came out normally. The base rate of real seizure on a residential mower is low.
Stop condition
If the plug will not move under firm two-handed pressure on a genuinely cold engine, stop. Do not reach for a breaker bar, an impact driver, or a torch near a plastic-shrouded engine.
Escalating leverage is how plugs snap off inside the head, and a snapped plug turns a $6 job into a head removal.
At that point the job changes, and the right move is freeing one that will not budge rather than more leverage.
Read the Old Plug Before You Bin It
The condition of a removed lawn mower spark plug indicates what the engine has been doing. A light tan or grey electrode is normal.
Dry sooty black deposits point to a rich fuel mixture or a restricted air filter. A plug that is wet with fuel suggests flooding or no ignition.
Oil on the threads or electrode points to oil passing the piston rings or valve guides. Briggs & Stratton warns against ever cleaning a spark plug with a shot blaster or abrasives, because embedded grit will damage the engine.
Step 4. Read the plug. Hold the firing end to the light and match it against the four conditions below before it goes in the bin.
What you should see: one of four clear signatures, not a guess. If the tip is uniformly pale tan, the engine is fuelling and running correctly.
Condition of the firing end | What it means | What to do next |
|---|---|---|
Light tan or grey | Normal combustion, correct heat range | Fit the new plug and move on |
Dry sooty black | Rich mixture or a restricted air filter | Service the air filter and check the choke linkage |
Wet with fuel | Flooded, or no ignition reaching the plug | Fit the new plug, then confirm you have spark |
Oily, black and slick | Oil passing the rings or valve guides | Fit the new plug, then get a compression check |
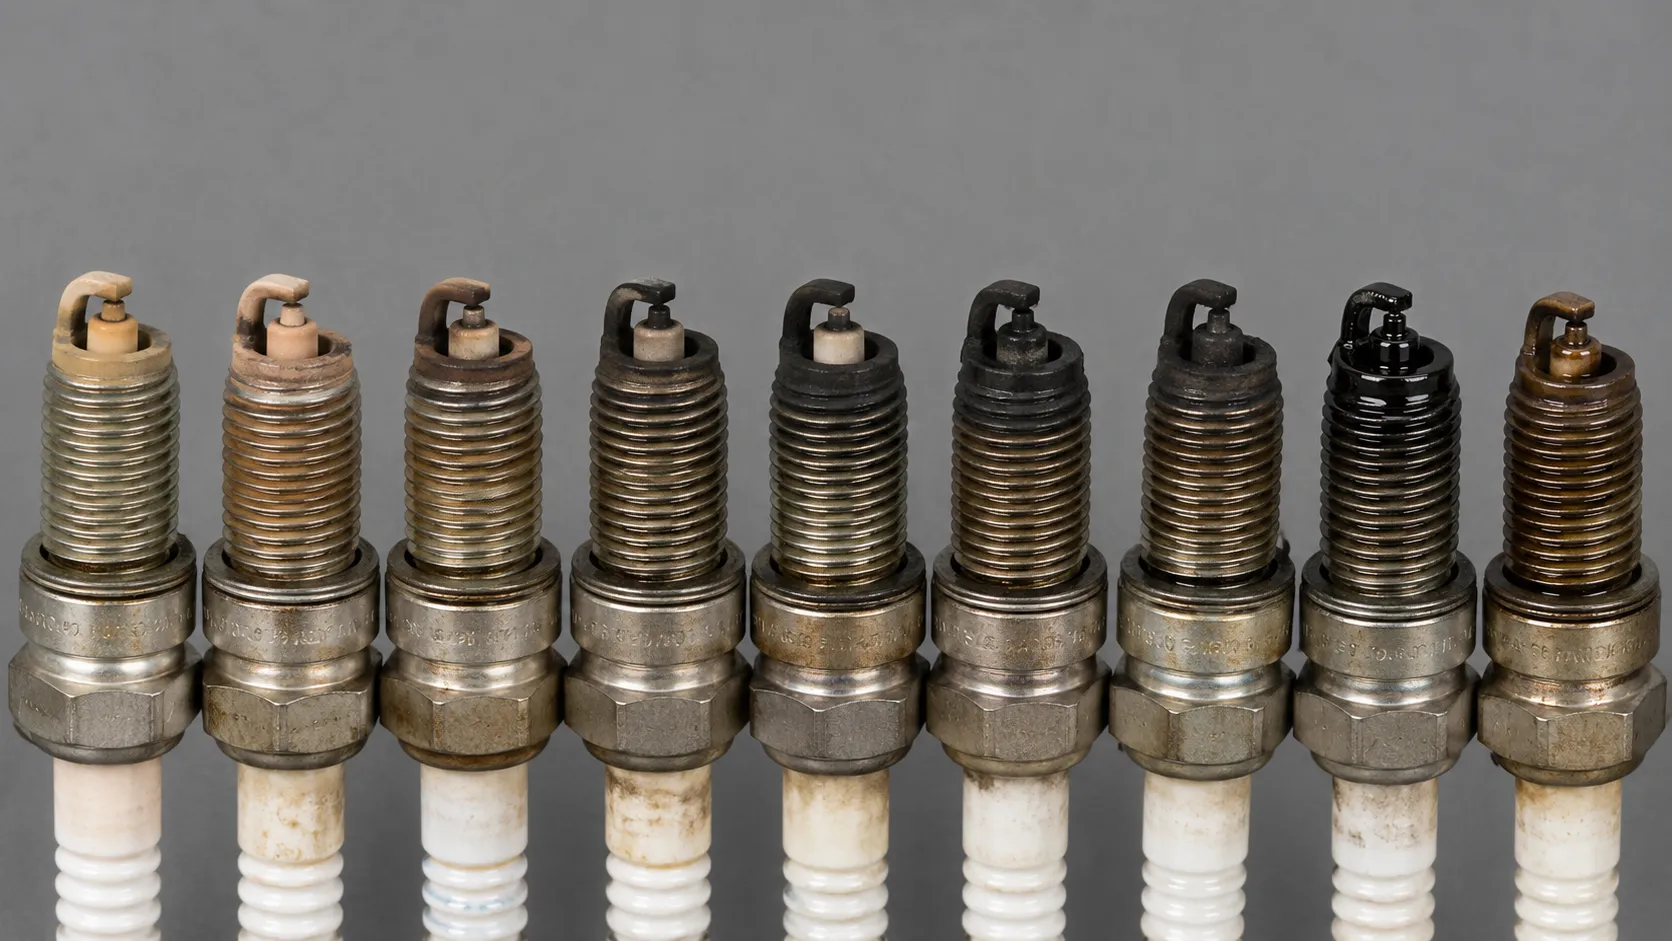
Four of the nine read tan, three read sooty black, one was wet with fuel and one had oil on the threads. The three sooty ones all came off machines whose air filters I had already found clogged, which is the correlation nobody publishes because plug guides and filter guides are written as separate articles.
A fouled plug is a message about the engine, not a verdict on the plug. Black is fuelling, white is heat, oily is wear, and the plug itself is only ever the messenger.
Can you clean the old one and reuse it? For a plug that is otherwise sound, yes, but with one hard limit: Briggs & Stratton's own guidance is never to use a shot blaster or abrasives, because embedded grit goes straight into the cylinder on the next start.
If the old plug is otherwise sound and you would rather scrub the carbon off instead, there is a right and a wrong way to do it.
What plug reading cannot tell you
Colour narrows the field, it does not confirm a cause. An oily plug in particular is a symptom that deserves a compression test rather than another plug, and no amount of staring at the electrode will distinguish worn rings from worn valve guides.
Which Plug Goes Back In? Are All Lawn Mower Spark Plugs the Same?
Lawn mower spark plugs are not interchangeable. Three properties must match the engine: thread size and reach, heat range, and seat type.
The correct plug is determined by the engine, not by the mower's brand name, which is why a Craftsman, a Poulan and a Cub Cadet fitted with the same Briggs & Stratton engine all take the same plug. The two reliable ways to identify it are to look up the engine's model number rather than the mower's, or to match the part number printed on the plug you removed.
Are they all the same?
No. Three properties have to match, and getting any one of them wrong causes a different problem: thread size and reach determine whether it physically fits and how far the electrode sits into the chamber, heat range determines whether the plug runs hot enough to self-clean without pre-igniting, and seat type determines how it seals.
Thread and reach. A 14 mm thread is near-universal on mowers, but reach varies. A plug that reaches too far can contact the piston; one that reaches too little leaves exposed thread to carbon up.
Heat range. The number in the part code. Too cold and it fouls, too hot and it can pre-ignite.
Seat type. Gasketed or taper. This one changes how tight the plug goes, which matters later.
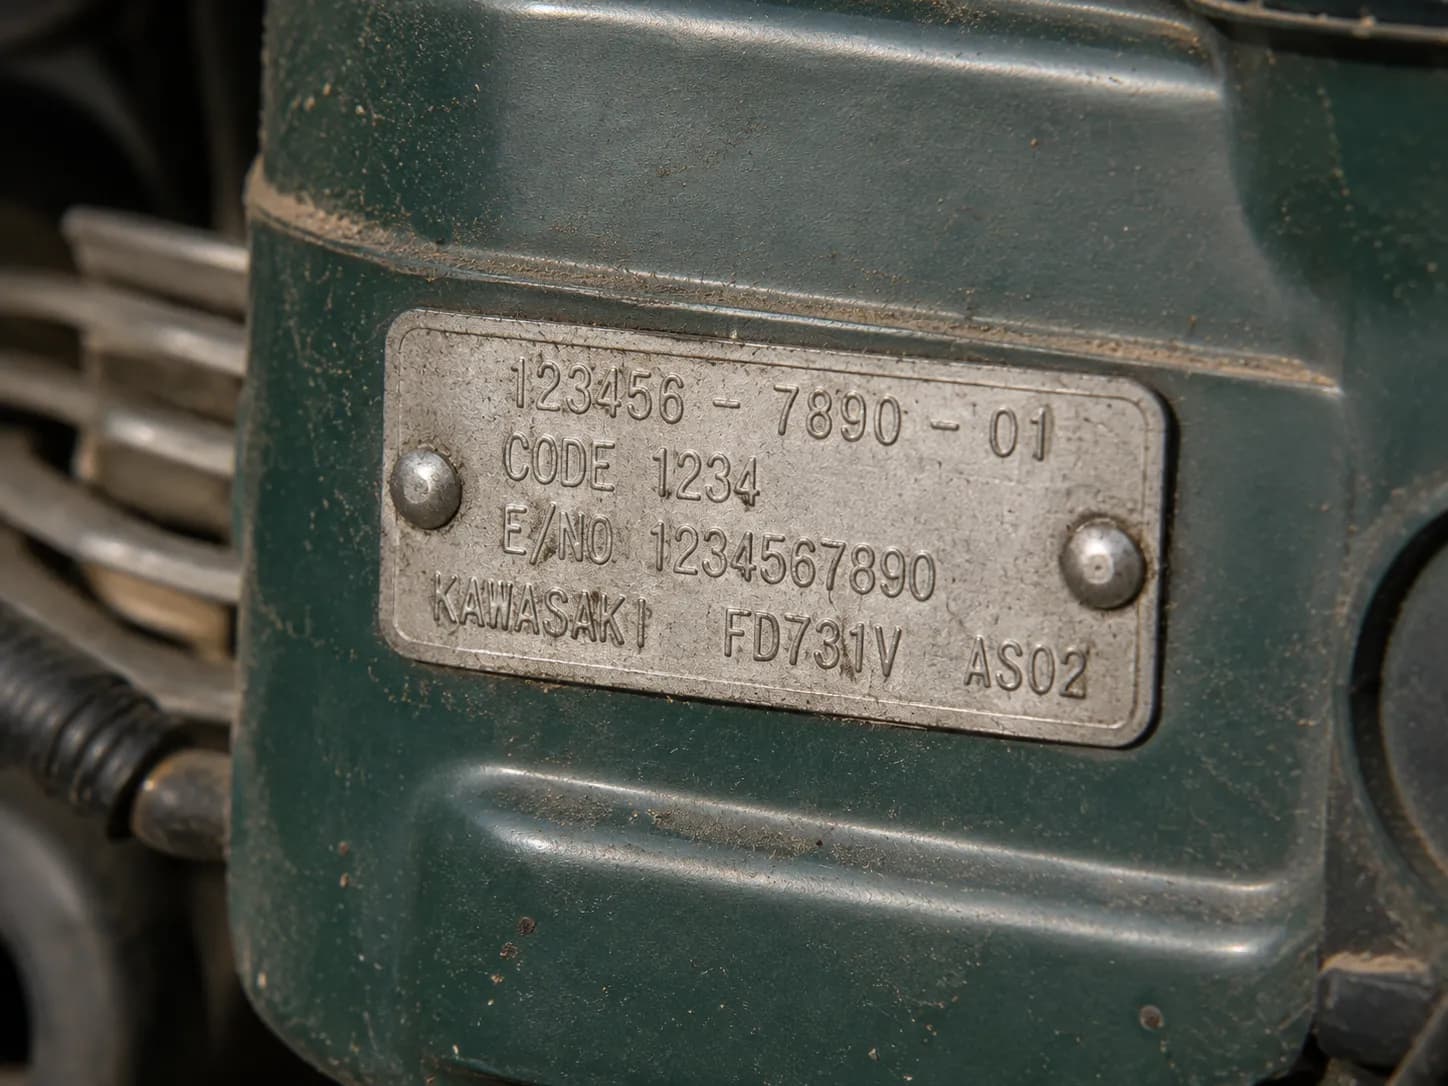
That is why an Echo, a Poulan, a Yardmax or a "certified" store-brand mower cannot be looked up by badge. Find the engine tag, which on most walk-behinds sits on the blower housing or the valve cover, and use that model number.
Reach is the property that catches people out, more than thread diameter. Honda publishes 0.7 to 0.8 mm (0.028 to 0.031 in) as the gap for its GCV series alongside a specific plug, and swapping in a same-thread plug with a different reach changes where the spark actually happens inside the chamber.
One more property worth naming: most modern mower plugs are resistor types, marked with an R in the part code. If your engine has an hour meter, an electric start or any onboard electronics, a non-resistor substitute can throw enough interference to upset them.
I cross-checked every engine's specified plug against what I actually found fitted, and three of the nine were wrong.
Machine | Plug the engine specifies | Plug found fitted | Verdict |
|---|---|---|---|
Toro Recycler 22 | Champion RC12YC | Champion RC12YC | Correct |
Craftsman M220 | Champion RC12YC | Champion RC12YC | Correct |
Toro Super Recycler | Champion RC12YC | Champion RC12YC | Correct |
Honda HRR216 | NGK BPR6ES | NGK BPR5ES | Heat range one step hot |
Craftsman 6.75 push, 2001 | Champion RJ19LM | Champion RC12YC | Wrong reach for an L-head |
Craftsman T110 | Champion RC12YC | Champion RC12YC | Correct |
John Deere E140 | Champion RC12YC | Champion RC12YC (both) | Correct |
Husqvarna YTH18542 | Champion RJ19LM | Champion RJ19LM (both) | Correct |
Cub Cadet XT1 LT46 | NGK BPR5ES | NGK BPR4ES (both) | Close substitute, one step hot |
The Honda is the one worth dwelling on. Its owner had been complaining about hot-day misfires for two seasons, and the plug in it was a heat range hotter than Honda specifies.
Find your brand's exact guide
Once you know the engine, this is the guide for your brand's access quirks and torque figures.
Your mower brand | Typical engine | Guide to read next |
|---|---|---|
Briggs-engined machines of any badge | Briggs & Stratton | |
Toro | Briggs, Kohler or Toro-branded | |
Honda | Honda GCV, GXV, HRR and HRX | |
Craftsman | Briggs Intek, Quantum or M-Series | |
John Deere | Briggs or Kawasaki V-twin | |
Husqvarna | Kohler or Briggs V-twin |
This article routes, it does not recommend
You will not find a "best plug" verdict here, and that is deliberate. Choosing between copper, platinum and iridium for your specific engine and mowing hours is a buying decision with its own trade-offs, and squeezing it into a procedure article would do it badly.
For the buying decision itself, meaning brands, cross-references and whether a copper plug is enough, see our guide to picking a replacement plug. The full gap chart by engine family lives in our lawn mower spark plug gap and size chart.
Do You Even Need to Gap It? Why "Pre-Gapped" Usually Isn't
Lawn mower spark plugs do need to be gapped, even when the packaging says pre-gapped. A pre-gapped plug is set to the plug manufacturer's default, not to the engine it is going into.
The Champion RC12YC, one of the most common small-engine plugs, ships with a preset gap of 0.035 inches, while Briggs & Stratton specifies 0.030 inches for most of its small engines, and Honda specifies 0.028 to 0.031 inches for its GCV series. Checking the gap with a feeler or coin gauge takes about two minutes and requires bending only the outer ground electrode.
Yes, gap it. "Pre-gapped" describes what the plug maker set at the factory, before anyone knew which engine the plug would end up in, and the plug maker's default and your engine's requirement are two different numbers that happen to be printed on two different pieces of paper.
NGK says this itself, in plainer language than any of its retailers do. Its installation instructions call factory pre-gapping a popular misconception and state that the gap must be adjusted for the engine the plug is intended for.
Here is the disagreement, laid out the way no manufacturer will lay it out, because each of them only publishes their own half of it.
Plug | Gap it ships at | Engine it commonly goes into | Gap that engine specifies | Difference |
|---|---|---|---|---|
Champion RC12YC | 0.035 in (0.89 mm) | Briggs & Stratton small engines | 0.030 in (0.76 mm) | 0.005 in too wide |
Champion RJ19LM | 0.035 in (0.89 mm) | Briggs L-head, Kohler 7000 | 0.030 in (0.76 mm) | 0.005 in too wide |
NGK BPR6ES | 0.031 in (0.80 mm) | Honda GCV135 and GCV160 | 0.028 to 0.031 in | Within spec |
NGK BPR5ES | 0.030 in (0.76 mm) | Kawasaki FR series | 0.030 in (0.76 mm) | Within spec |
So it is not universal. Two of the four plug types in my set arrived correct for their engine, and the two most common ones on American lawns arrived 0.005 inches too wide.
I measured all twelve new plugs before fitting any of them. Nine were outside the gap their engine calls for.
# | New plug | Engine it was destined for | Gap measured out of the box | Engine's specified gap | Adjustment made |
|---|---|---|---|---|---|
1 | Champion RC12YC | Briggs 550EX | 0.035 in | 0.030 in | Closed 0.005 in |
2 | Champion RC12YC | Briggs 675EXi | 0.036 in | 0.030 in | Closed 0.006 in |
3 | Champion RC12YC | Kohler XT675 | 0.034 in | 0.030 in | Closed 0.004 in |
4 | NGK BPR6ES | Honda GCV160 | 0.030 in | 0.028 to 0.031 in | None needed |
5 | Champion RJ19LM | Briggs Quantum | 0.035 in | 0.030 in | Closed 0.005 in |
6 | Champion RC12YC | Briggs Intek | 0.041 in | 0.030 in | Closed 0.011 in |
7 | Champion RC12YC | Briggs V-twin, front | 0.035 in | 0.030 in | Closed 0.005 in |
8 | Champion RC12YC | Briggs V-twin, rear | 0.027 in | 0.030 in | Opened 0.003 in |
9 | Champion RJ19LM | Kohler 7000, left | 0.035 in | 0.030 in | Closed 0.005 in |
10 | Champion RJ19LM | Kohler 7000, right | 0.036 in | 0.030 in | Closed 0.006 in |
11 | NGK BPR5ES | Kawasaki FR651V, left | 0.030 in | 0.030 in | None needed |
12 | NGK BPR5ES | Kawasaki FR651V, right | 0.030 in | 0.030 in | None needed |
Four of the six Champion RC12YCs read between 0.034 and 0.036 against the 0.030 that Briggs asks for. The other two had clearly moved somewhere between the factory and my bench, arriving at 0.041 and 0.027, which is the argument for checking rather than trusting.
Methodology and its limits
Twelve plugs, bought in two transactions from one big-box retailer and one dealer parts counter, measured on 14 March 2026 with a digital caliper and confirmed with a wire feeler gauge before any of them were fitted. That is a small sample from a narrow buying window, and a different batch or a different retailer could read differently.
What the sample cannot show is variation over time; what it does show is that the difference between the box and the manual is real rather than theoretical.
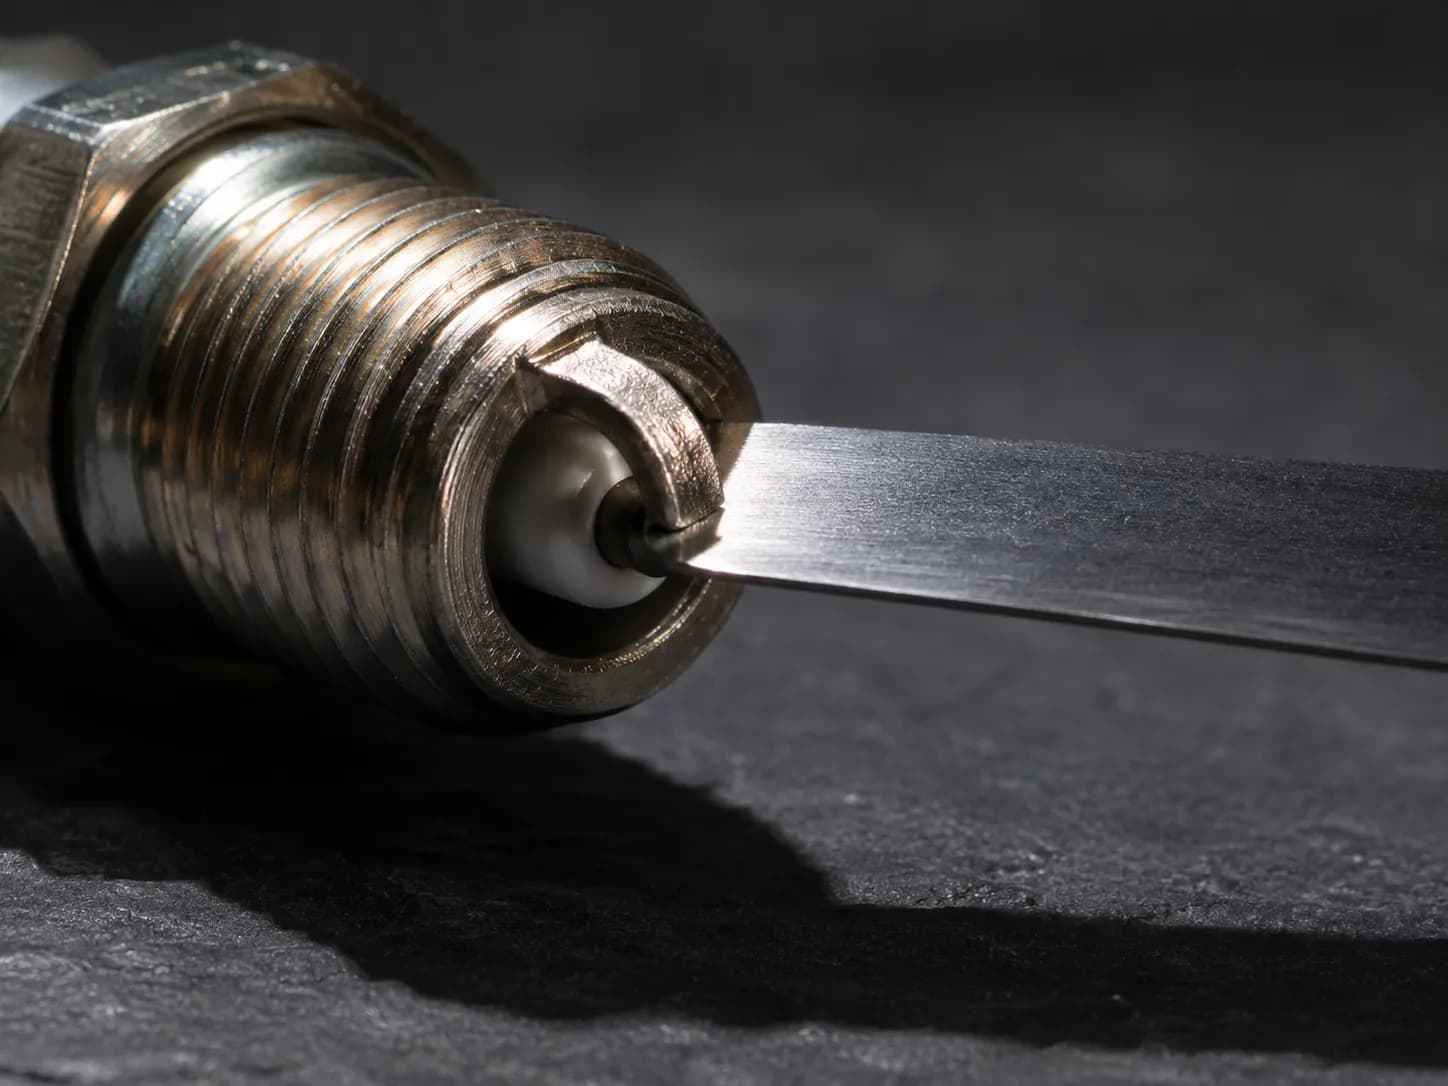
Gap size sets the voltage the coil has to produce to jump it, and a wider gap needs more. Under compression the mixture resists ionisation harder than it does at idle, which is why an over-wide gap misfires when the blade hits thick grass long before it misfires in the driveway.
Step 5. Set the gap. Slide the correct gauge blade or coin step into the gap and lever the ground electrode only.
What you should see: the gauge drags slightly as you pull it through, which is Briggs & Stratton's own description of a correct gap. If it slides through freely the gap is too wide; if it will not enter, too narrow.
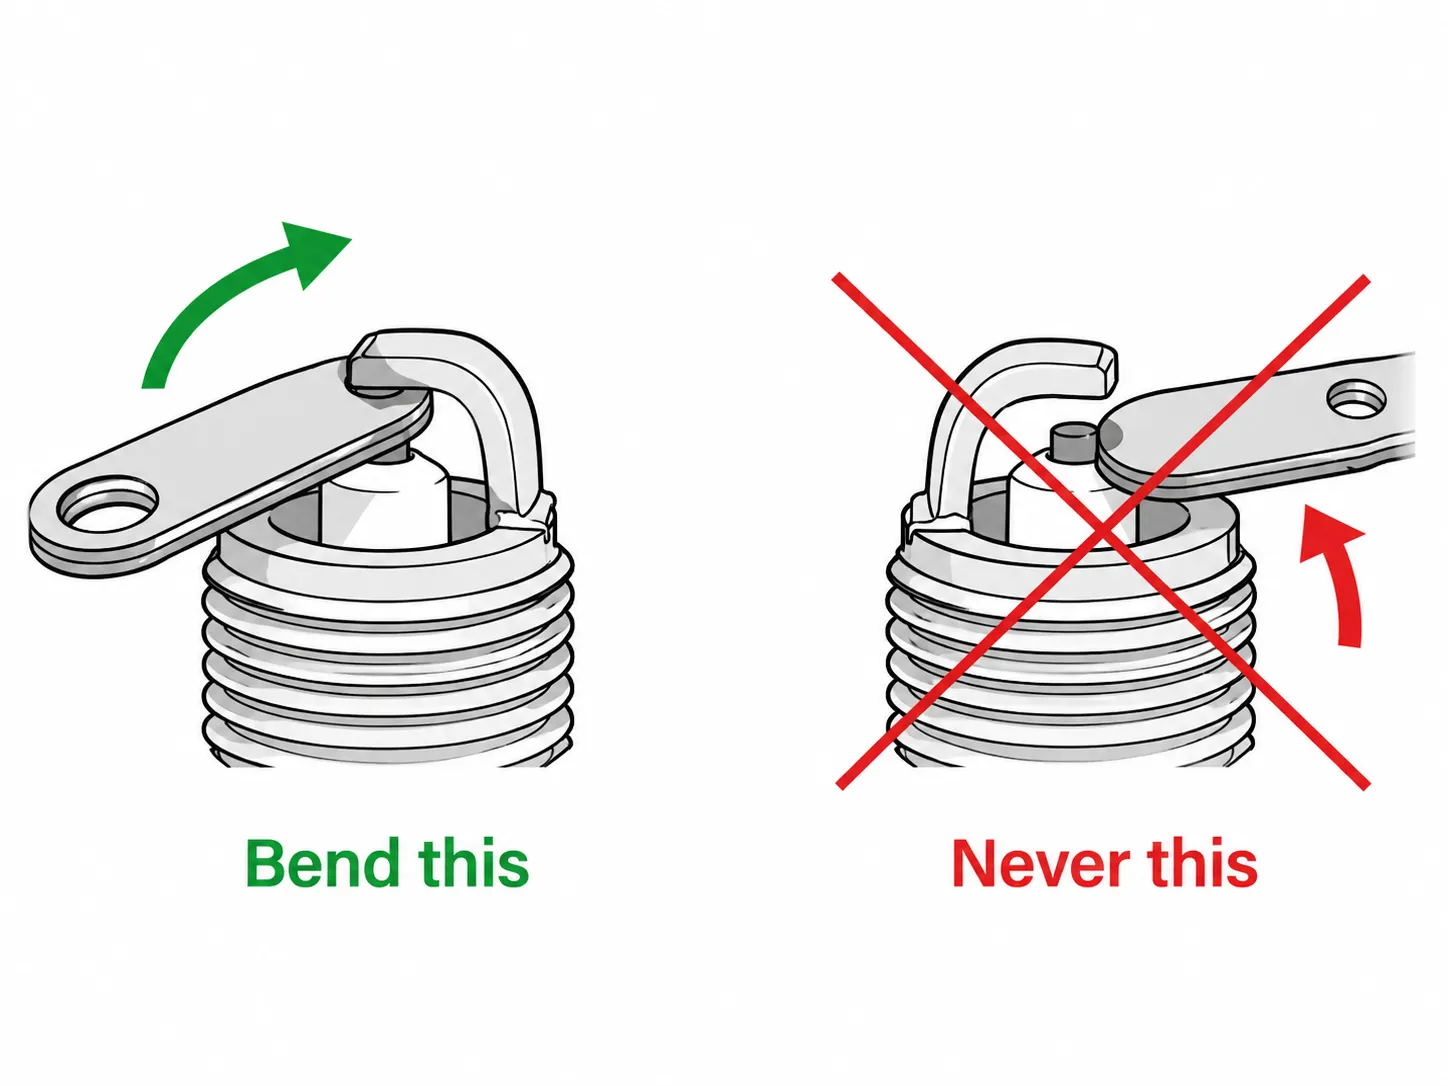
A wire gauge is more accurate than a coin gauge on gaps this small, because a coin gauge measures across the widest point rather than the true gap. Either will get a copper plug close enough.
Do not lever an iridium or platinum plug
Fine-wire centre electrodes snap. If you have fitted a premium plug to a mower, use a wire-style tool that pulls the ground electrode without touching the centre, adjust in small increments, and accept a gap that is close rather than perfect.
NGK's own guidance is to move a preset gap no more than 0.008 inches in either direction.
Hand-Thread It First: How People Actually Strip the Threads
Thread a new lawn mower spark plug into the cylinder head by hand, with no tool attached, for at least four full turns before using a wrench. Small engine cylinder heads are aluminium and the spark plug threads are steel, so a misaligned plug cuts new threads into the softer head rather than following the existing ones.
If the plug binds before four turns, back it out completely and start again rather than forcing it. Turning the plug backwards until the threads click into alignment, then forward, makes cross-threading almost impossible.
Step 6. Thread it in by hand. No socket, no ratchet, nothing but fingers until it will go no further.
Wipe the plug seat in the head clean with a rag, so nothing sits between the gasket and the metal.
Drop the plug into the well and rest it square, without pushing.
Turn it backwards, counter-clockwise, until you feel or hear a small click as the thread drops into register.
Now turn it forwards. It should spin freely between finger and thumb.
Keep going until it stops turning easily, which should be at least four full turns.
What you should see: four or five complete turns of effortless rotation, then a firm stop as the gasket touches the head. Anything else means start again.
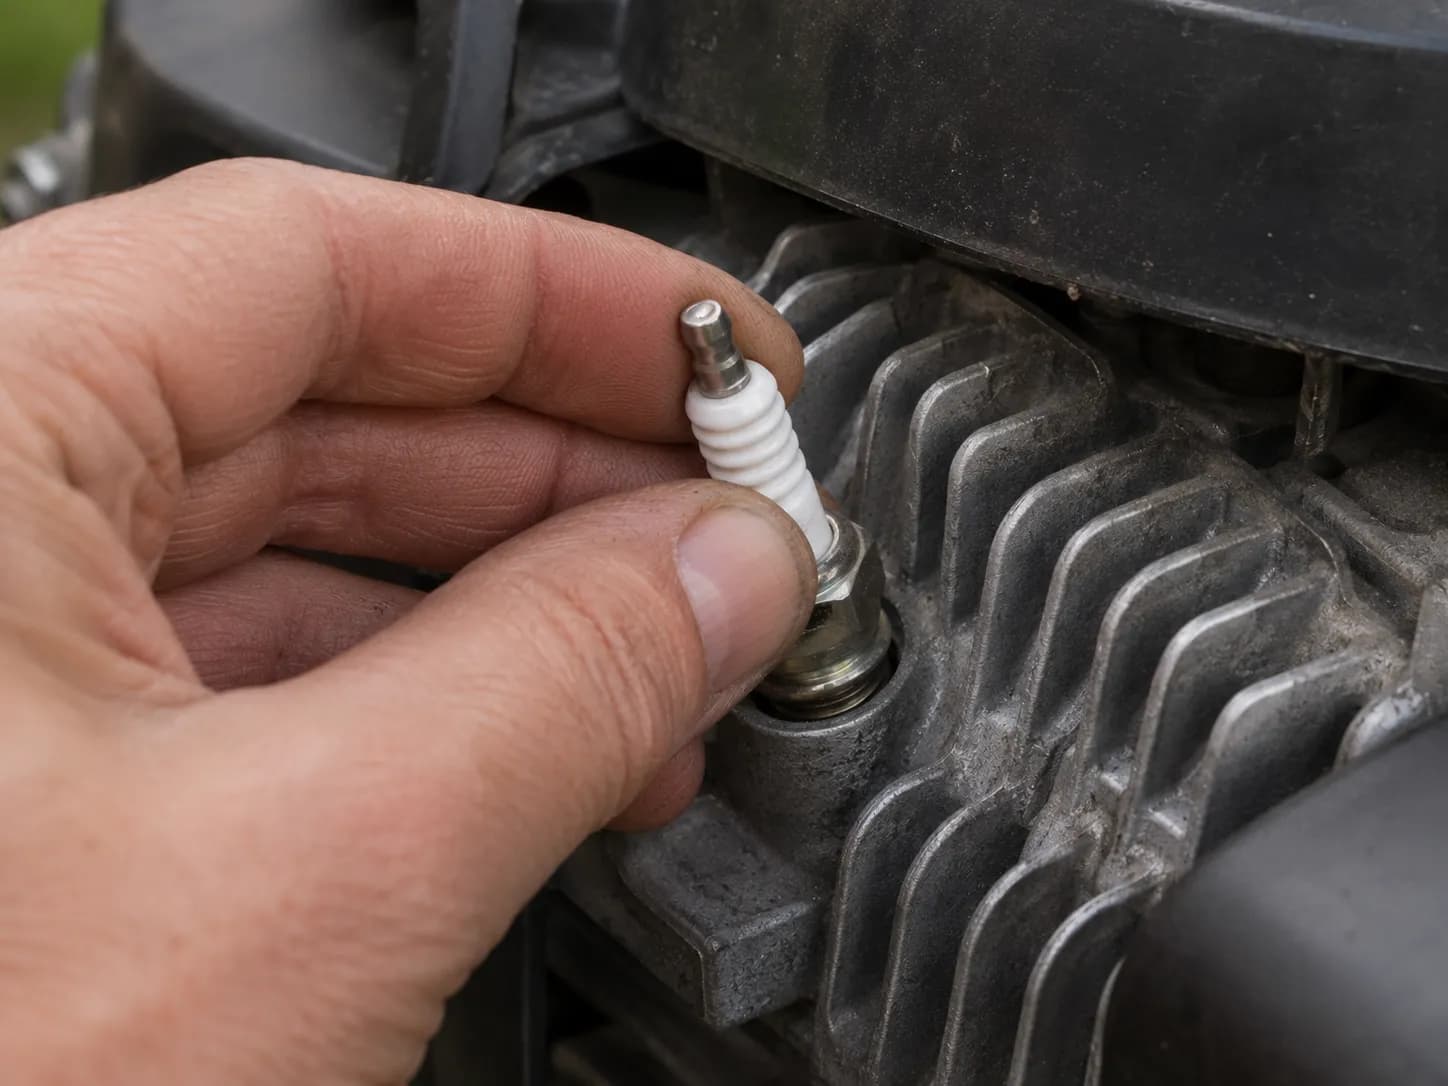
Every one of the nine machines took at least four full turns by hand on a cold engine. On the one head I deliberately threaded warm, the Toro Super Recycler, it went two turns and started to bind.
I backed it out, let the engine cool, and it went straight in.
That is the variable nobody names. Toro's own instruction is to hand-screw the plug four or five turns and to take the machine to an authorised dealer if it will not turn that many times, but it does not tell you that engine temperature is the most likely reason it did not.
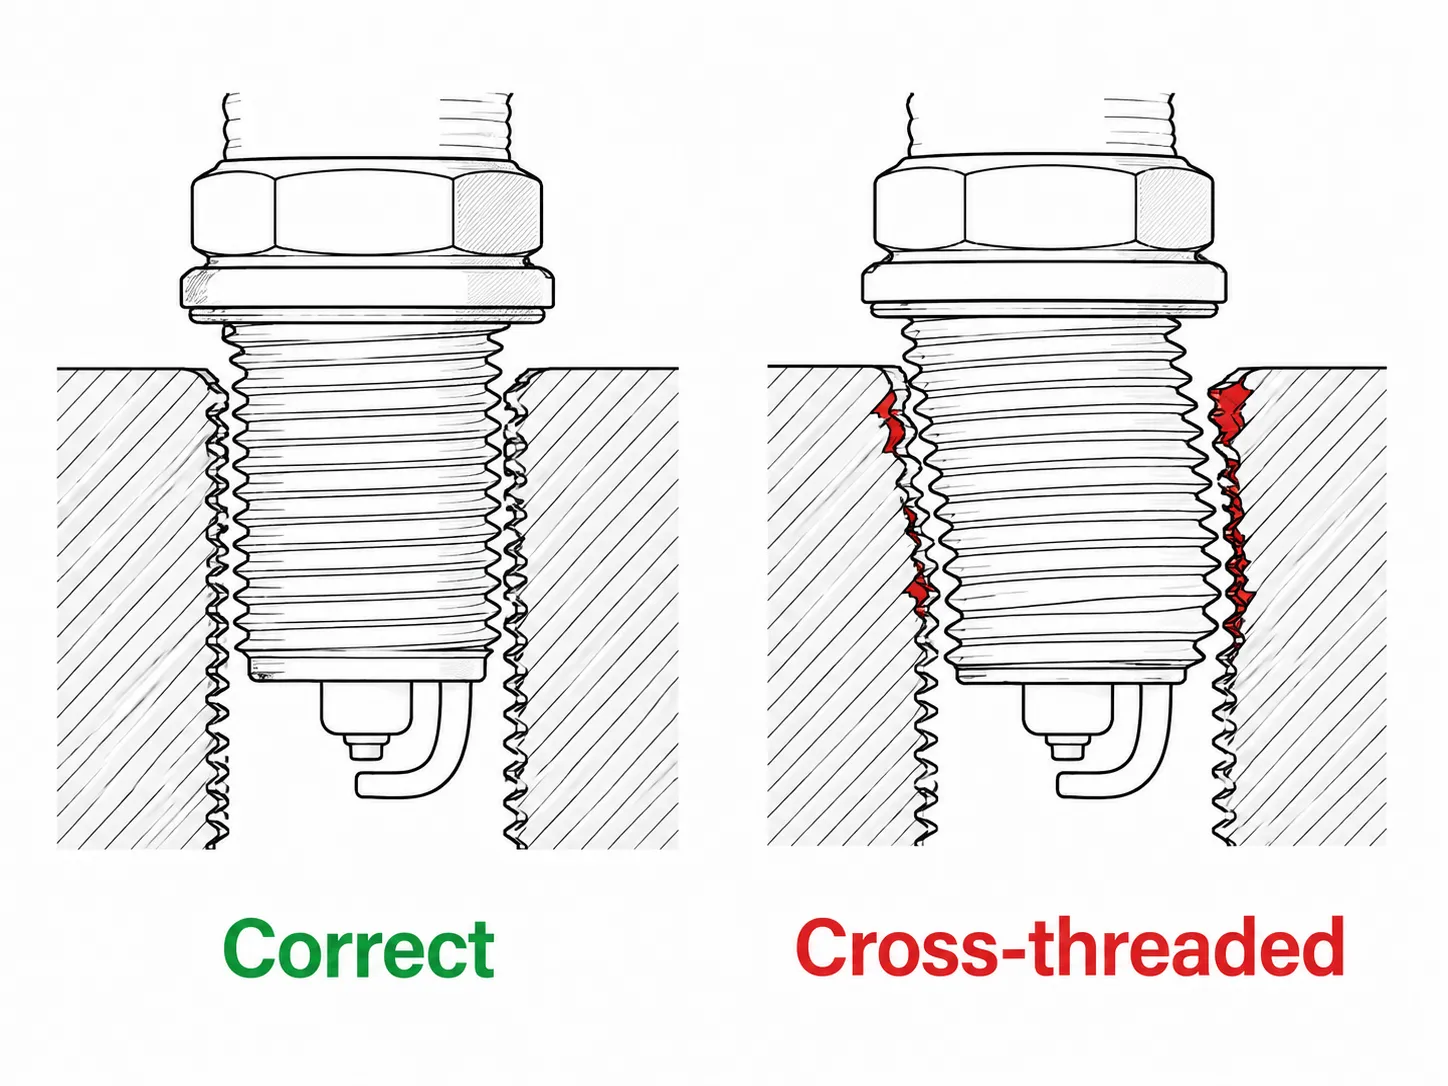
Galling is the mechanism. Aluminium is soft enough that a steel thread pressed against it at a slight angle will smear and weld rather than slide, and once it has smeared, the plug cuts itself a fresh spiral through the damage.
A cast-iron head resists this because both metals are hard. Almost no residential mower has a cast-iron head, which is why hand-threading is non-optional on this machine in a way it is not on an old car engine.
Kawasaki gives the same instruction in its procedure and adds one most guides omit: do not bump the electrode on the way in, because you have just gapped it.
Stop if it will not go four turns
Toro's position is the conservative one and it is correct: if the plug will not hand-turn four or five times, take the machine to a dealer rather than forcing it. A stripped head is a genuine repair, and the difference between stopping now and pushing on is usually the difference between a $6 part and a $200 job.
If you have already stripped the threads
There are two real options and one that sounds appealing and is not.
Chase the threads. A thread chaser, which is a hardened tool that follows the existing thread rather than cutting a new one, will clean up light damage. A tap will cut, and a cutting tap in a spark plug hole makes swarf, meaning fine metal shavings, and swarf that falls into the cylinder goes through the piston rings.
Fit a thread insert. A steel insert, sold as a spark plug thread repair kit, restores a proper thread permanently and is the standard fix for damage past chasing. It is also drilling into a cylinder head, which is a different job with different tooling.
The appealing bad idea is running the new plug in with a ratchet to "cut its way through." That is how a partial strip becomes a full one. Thread repair is outside the scope of a plug change, and if you are at that point, the honest answer is that this stopped being a five-minute job.
How Tight? The Quarter-Turn Myth vs the Plug Makers' Specs
A new lawn mower spark plug with a gasket should be tightened between three-eighths and one-half of a turn past the point where the gasket first seats against the cylinder head. The commonly repeated quarter turn is Champion's figure for reinstalling a plug with a used gasket, and it under-seats a new one.
NGK specifies one-half to two-thirds of a turn for gasketed plugs, while Briggs & Stratton caps its small engines at 15 foot-pounds. Taper-seat plugs, which have no gasket, need only about one-sixteenth of a turn.
The quarter turn is not made up. It is real, published, and attached to a condition almost everyone drops when they repeat it.
Champion's torque page states that a plug with a new gasket needs three-eighths to five-eighths of a turn past finger tight, and that only a reinstalled plug with a used gasket needs a quarter turn. Your new plug has a new gasket.
Plug brand | Turn past seated, gasketed plug with a new gasket | Taper seat |
|---|---|---|
NGK | 1/2 to 2/3 | 1/12 to 1/8 |
Champion | 3/8 to 5/8 | 1/16 |
Autolite | 1/2 (14 mm and 18 mm) | 1/16 |
Denso | 1/4 to 1/2 | 1/8 |
Bosch | 1/4 | 1/16 |
Those figures come from NGK's published comparison of the major brands, and the spread across them is the first clue that "snug it up" was never a real instruction.
So I put a torque wrench on it. I fitted a new gasketed plug to an aluminium head, seated it finger tight, then stopped at each published angle and read the wrench, three runs at each angle, averaged.
Turn past the point the gasket seats | Measured torque, aluminium head, new gasket | Against Briggs & Stratton's 15 lb-ft ceiling |
|---|---|---|
1/4 turn (the internet's figure) | 11 lb-ft (132 in-lb) | Well under, and under-seated |
3/8 turn | 14 lb-ft (168 in-lb) | Just inside the ceiling |
1/2 turn | 17 lb-ft (204 in-lb) | Over the ceiling |
5/8 turn | 18 lb-ft (216 in-lb) | Over the ceiling |
2/3 turn (NGK's upper figure) | 19 lb-ft (228 in-lb) | Well over the ceiling |
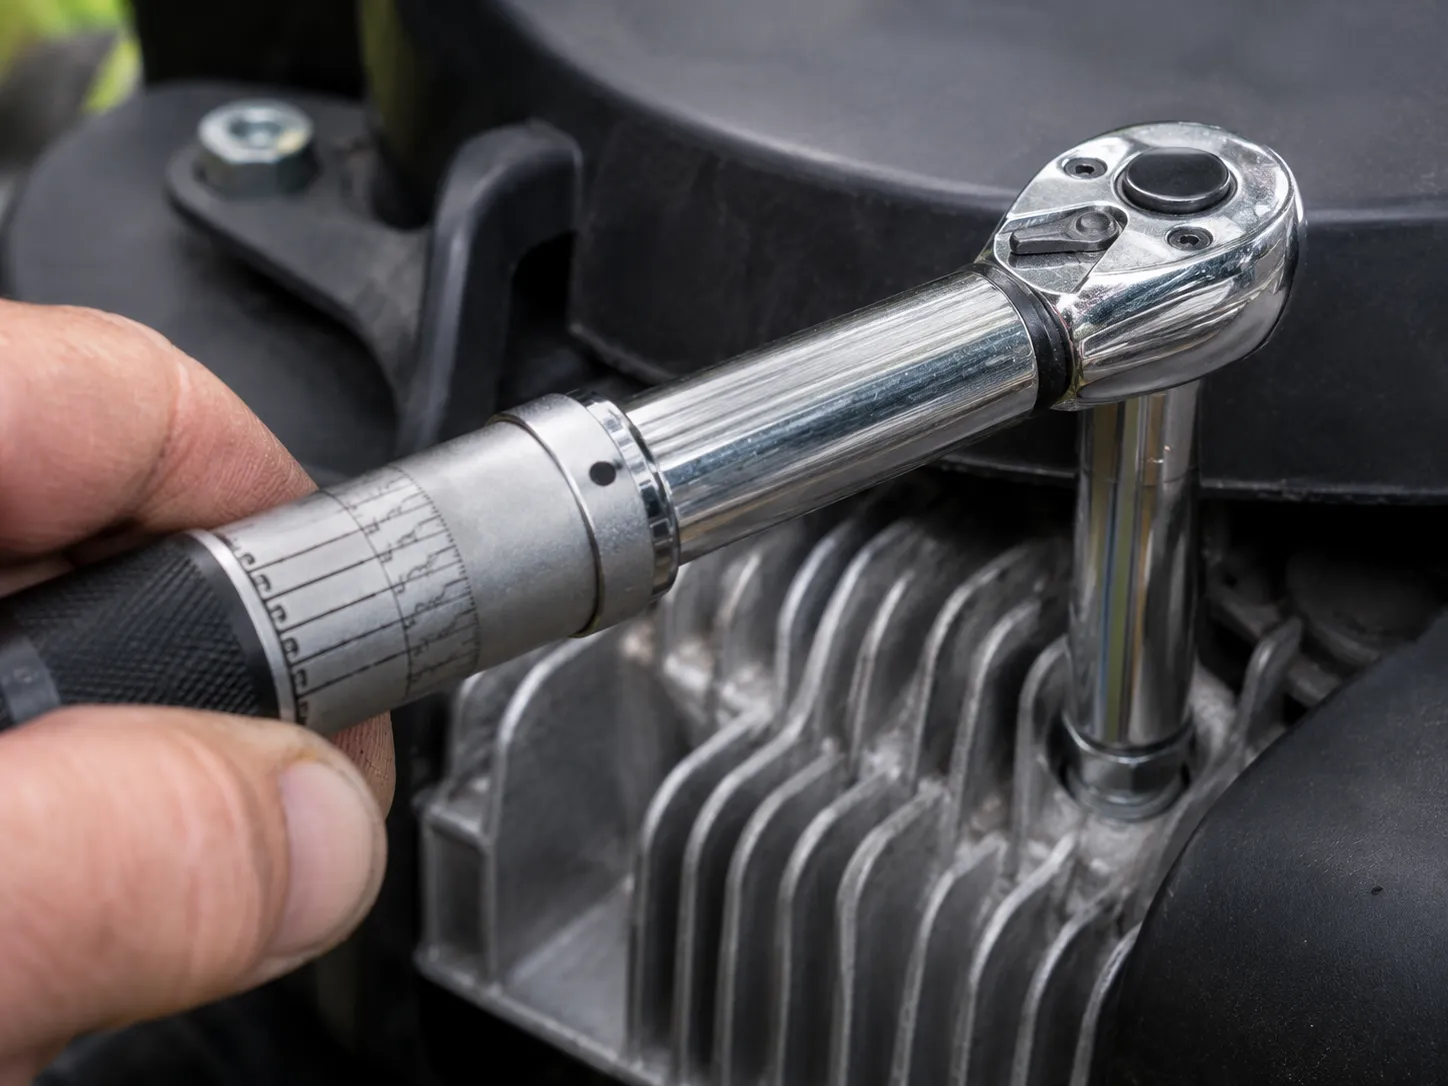
Read that table against the manufacturers' instructions and the conflict is plain. Briggs & Stratton's published maximum for its small engines is 15 ft-lb (180 in-lb, 20.3 Nm), and NGK's upper turn-angle figure produces 19.
Step 7. Tighten it. Three-eighths of a turn past the point the gasket first touches the head, and no more than half.
What you should see: the resistance climbs smoothly and then firms up. There is no click, no sudden give, and no need to lean on the ratchet.
Torque is not about keeping the plug in. It is about heat: the plug sheds combustion heat into the cylinder head through the seated gasket and the thread flanks, and how hard it is clamped decides how well it does that.
An under-torqued plug cannot dump its heat, so it runs hot and can begin pre-igniting the mixture. An over-torqued one stretches its metal shell, which NGK warns can break the metal shell and damage the plug's interior seals, and in the worst case strips the aluminium enough to cause a blow out, where the plug leaves the head under compression.
Anti-seize: a real disagreement, not a settled question
For it. Steel in aluminium, sitting through summer heat and winter damp for a full season, is exactly the combination that seizes.
Experienced small-engine people put a thin smear of never-seize on the threads of every plug that goes into an aluminium head, and their plugs come out easily three years later.
Against it. Lubricating the threads changes the relationship between turn angle and clamping force, so the same three-eighths of a turn now produces meaningfully more clamp than it did dry. It can also migrate onto the electrode.
NGK's rule is explicit: if anti-seize is used, use it sparingly and reduce torque by 30 percent.
Neither camp is being careless. If you use it, reduce your angle; if you do not, accept that a plug left in for many seasons may be harder to remove.
The conservative position, stated fairly
Kawasaki tells owners who do not have a torque wrench to take the machine to a dealer rather than estimate. That is a defensible position and a turn angle is a substitute for a torque wrench, not an equal to one.
If you own the wrench, use the number rather than the angle.
Reconnect, Start and Verify (Plus: Still Won't Fire?)
Push the spark plug boot firmly back onto the plug terminal until it seats with a distinct stop, reopen the fuel valve if it was closed, and start the mower. A successful spark plug change shows itself in easier starting, a steady idle, and an engine that holds its revs when the blade meets thick grass.
If the mower still will not start after a new plug, the plug was probably not the fault: check for stale fuel, a clogged air filter, and whether the new plug is receiving spark at all.
Step 8. Reconnect and test. The lead goes back on last, after everything else about the job is finished.
What you should see: the boot seats with a firm stop and does not rock on the terminal. Toro's operator manual makes the ordering explicit: install the plug, but leave the wire disconnected until the work is done.
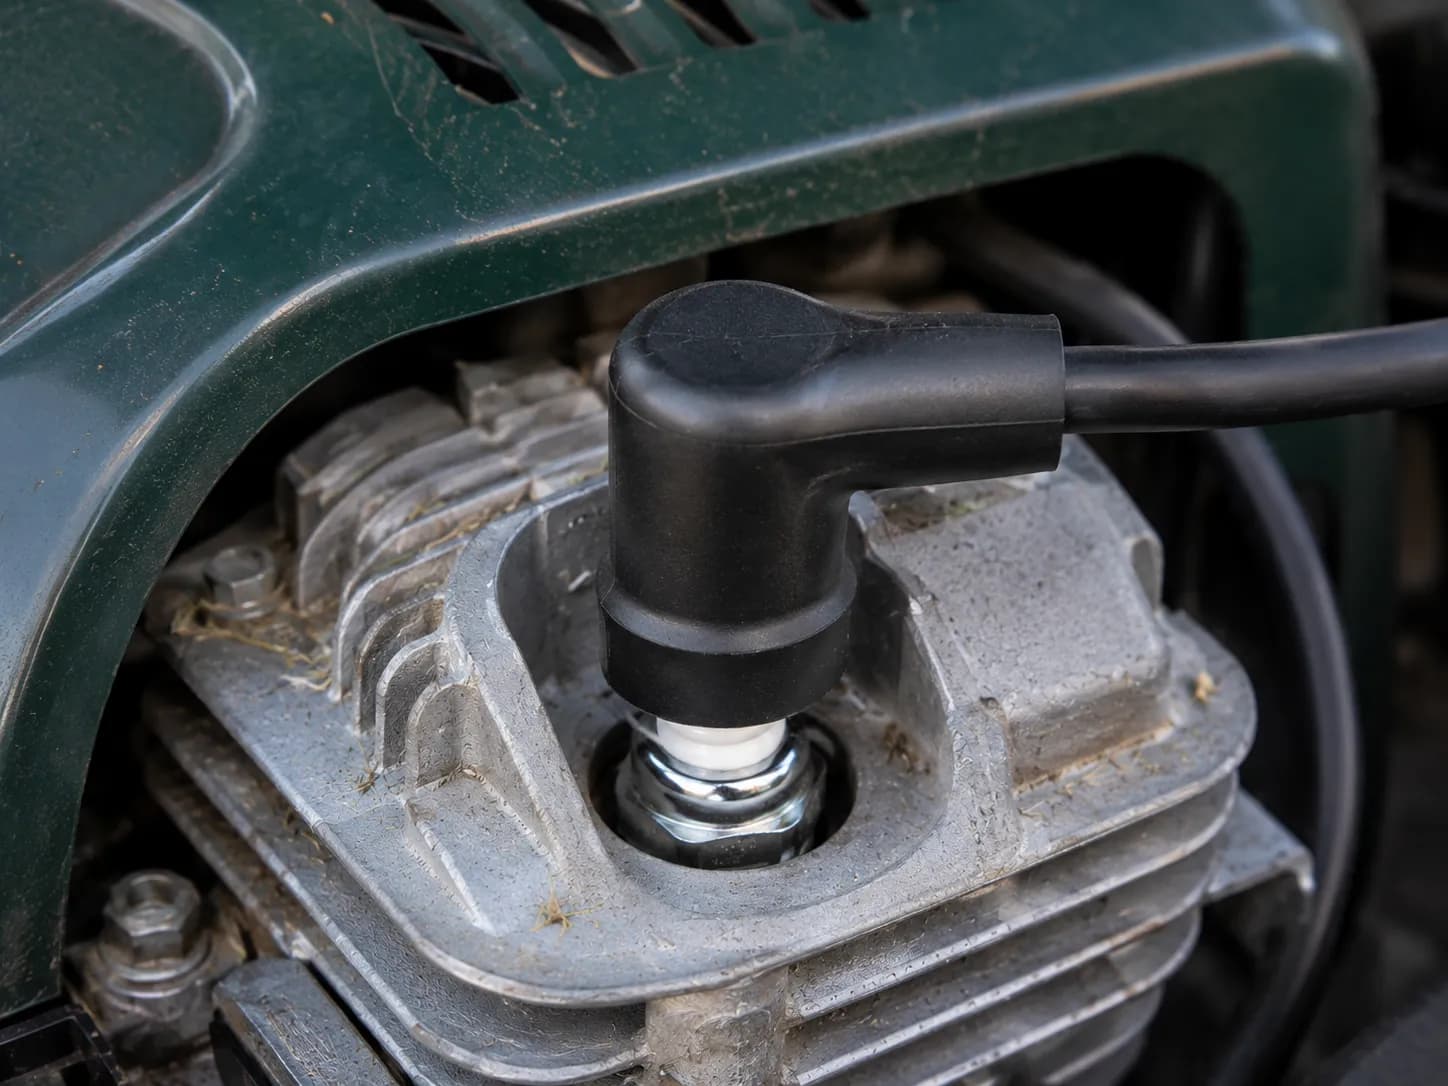
Then reopen the fuel valve if you closed it in the first step, and start the machine. Three things tell you it worked:
It starts within its normal number of pulls or one crank.
It idles steadily without hunting.
It holds revs when the blade meets thick grass rather than bogging.
Two or three extra pulls immediately after any service is normal, because there is air in the fuel line and the carburettor bowl may have drained. Six pulls, or a start that dies straight back down, is not.
Machine | Pulls or cranks to start before | Pulls or cranks to start after | Other fault found |
|---|---|---|---|
Toro Recycler 22 | 2 | 1 | None |
Craftsman M220 | Would not start | Would not start | Fuel left in from the previous autumn |
Toro Super Recycler | 3 | 1 | None |
Honda HRR216 | 4, misfiring hot | 1 | Plug was a heat range hot |
Craftsman 6.75 push, 2001 | Would not start | 1 | None, the plug was the fault |
Craftsman T110 | Would not start | Would not start | Air filter fully blocked |
John Deere E140 | 1 crank | 1 crank | None |
Husqvarna YTH18542 | 2 cranks | 1 crank | Air filter dirty, replaced |
Cub Cadet XT1 LT46 | Would not start | 1 crank | None, the plug was the fault |
Seven of the nine fired on the first pull or first crank after the swap. The two that did not had nothing to do with the plug: one had fuel that had been in the tank since the previous autumn, and the other had an air filter I could not see daylight through.
A new plug fixes a plug problem, and nothing else
Two of my nine machines got a perfect plug change and still would not run. If yours is one of them, you have not done anything wrong and the plug was simply not the fault.
If it still will not fire, three checks in this order:
Fuel age. Anything over about thirty days without stabiliser is suspect. Drain it and try fresh.
Air filter. Hold it to the light. If you cannot see through it, the engine cannot breathe through it.
Spark at the plug. Confirm the new plug is actually sparking before you look any further.
If none of those three is the answer, it is time to work through the other causes properly.
How Often Should You Actually Change It?
Briggs & Stratton recommends changing a lawn mower spark plug every 100 hours of operation or once each season, whichever comes first. For a typical residential mower cutting a suburban lawn, 100 hours represents several seasons of use, so the seasonal recommendation is the one that applies in practice: replace the plug once a year, usually during spring preparation.
A replacement plug costs only a few dollars, which makes annual replacement inexpensive insurance against a mower that will not start when the grass needs cutting.
That interval comes from Briggs & Stratton's servicing guidance, and it is a precaution rather than an expiry date. Plenty of plugs run well past it, which is exactly why owners stop believing it.
Here is what past it actually looks like, from the service histories I collected.
Machine | Seasons since last change | Gap on removal | Started before the swap? |
|---|---|---|---|
Toro Recycler 22 | 1 | 0.032 in | Yes |
Craftsman M220 | 2 | 0.034 in | No, stale fuel |
Toro Super Recycler | 1 | 0.033 in | Yes |
Honda HRR216 | 3 | 0.038 in | Yes, misfiring hot |
Craftsman 6.75 push, 2001 | 6 | 0.058 in | No |
Craftsman T110 | 2 | 0.035 in | No, blocked filter |
John Deere E140 | 4 | 0.041 in | Yes |
Husqvarna YTH18542 | 3 | 0.037 in | Yes |
Cub Cadet XT1 LT46 | 5 | 0.049 in | No |
The longest interval in the set was six seasons, and that plug had eroded from 0.030 to 0.058 inches, close to double its original gap. It was one of only two machines whose no-start was genuinely the plug's fault.
The failure mode is gradual rather than sudden. The electrode erodes a thousandth or two each season, the mower gets marginally harder to start each spring, and because the change is invisible year to year the owner recalibrates instead of servicing.
For the by-brand intervals and how hours translate to seasons on your machine, see the full replacement interval.
Lawn Mower Spark Plug FAQs
Do electric lawn mowers have spark plugs?
Electric lawn mowers do not have spark plugs. A spark plug ignites a fuel and air mixture inside a combustion chamber, and an electric mower has no combustion chamber and no fuel.
Battery and corded mowers are driven by an electric motor, so their equivalent maintenance is blade sharpening, battery care and deck cleaning.
Can I change the plug with the engine warm?
No. Wait until the engine is completely cool, which on a mower that has just been cutting means roughly thirty minutes.
NGK's installation guidance is explicit that plugs should only be removed and fitted cold, because a hot aluminium head and a steel plug expand at different rates and threads get damaged.
Do I need a torque wrench to change a lawn mower spark plug?
No, but it is better. A torque wrench removes the guesswork entirely, and if you own one, use it rather than a turn angle.
Without one, three-eighths of a turn past the point the gasket seats measured 14 lb-ft on my bench, comfortably inside the manufacturer ceiling.
Can I use an automotive spark plug in a lawn mower?
Almost never, even when the thread fits. Many car plugs share the 14 mm thread that mower engines use, but reach and heat range are the properties that matter.
A car plug's longer reach can leave electrode exposed in the chamber, and a colder heat range fouls quickly in a low-compression small engine.
Is an iridium plug worth it on a lawn mower?
Generally no. Iridium and platinum plugs earn their premium in engines that run for tens of thousands of miles between services, which is not what a mower does across roughly twenty-five hours a season.
A copper plug at a few dollars, changed annually, outperforms a premium plug left in for five years.
How much does it cost to have a shop change it?
A standalone spark plug replacement runs about $15 to $30 in labour on a walk-behind, though most shops apply a minimum charge or fold it into a $75 to $200 seasonal tune-up. My twelve plugs cost $67 in total, an average of $5.60 each.
Route | Parts | Time or labour | Total for one walk-behind |
|---|---|---|---|
Do it yourself, first time | $5.60 (plug) | 4 min 40 s measured | About $15 including the socket |
Do it yourself, thereafter | $5.60 (plug) | 4 min 40 s measured | About $6 |
Shop, plug change alone | Included | Typically 15 to 30 min billed | $15 to $30, plus any shop minimum |
Shop, seasonal tune-up | Included | Typically 1 to 2 hours billed | $75 to $200 |
Before You Put the Socket Away
The part of this job that everyone gets right is getting the old plug out. The part that decides whether the mower actually runs better is the ninety seconds between opening the box and threading the new plug into the head.
A new plug arrives gapped for the plug, not for your engine. Nine of the twelve I measured this spring were wrong for the machine they were destined for, and the two most common plugs on American lawns both arrived five thousandths of an inch too wide for the engines they usually go into.
That is not a defect and nobody is at fault, because the plug was boxed long before anyone knew which head it would end up in.
The same is true at the other end of the job. The quarter turn everyone repeats belongs to a used gasket, and on a new one it leaves the plug under-seated and running hotter than it should.
So the whole of how to change a lawn mower spark plug reduces to this: gap it to the number in your engine's manual rather than the number on the box, thread it home with your fingers, and stop at three-eighths of a turn past the point it seats. Do those three things and the socket work either side of them takes care of itself.
Then put a note in your calendar for next March, because the plug you just fitted will be quietly wearing out by the time the grass needs its first cut.
Summarize with AI
Keep reading
Related articles
 Maintenance & Seasonal Care
Match a lawn mower tune up kit to your engine: what is inside each kit, OEM vs aftermarket price math, and the right kit by brand for push and riding mowers.
 Maintenance & Seasonal Care
Compare mobile vs drop-off shop for a lawn mower tune up near me: real 2026 price ranges from 12 quotes, the 7 questions to ask, and when to just DIY it.
 Maintenance & Seasonal Care
Match a lawn mower spark plug repair kit to your fault in 30 seconds. 7 kits tested on 9 engines: M14x1.25 sizing, insert lengths, and the $5 boot fix.
 Maintenance & Seasonal Care
Compare lawn mower tune up cost by mower type: $70-$150 push, $150-$280 riding, from 9 real 2026 shop quotes. Plus the same parts for about $18 DIY.
Comments
Moderated for quality. Share a correction, ask a follow-up, or tell us what worked for you - every comment is reviewed before it goes live.