
Lawn Mower Won't Turn Over With New Battery? Now What
Skip re-checking the battery: if your lawn mower won't turn over with new battery, test grounds, solenoid, interlocks, ignition and starter in this order.
Written by Tony MaldonadoReviewed by Wade Coburn
Last updated on August 19, 2026
When you buy through links on our site, we may earn an affiliate commission (at no extra charge), which we use to fund new product tests. Learn more.
Summarize with AI
You dropped forty-odd dollars on a fresh battery, dropped it in the tray, turned the key, and got nothing. When a lawn mower won't turn over with new battery power sitting right there, the natural next move is to blame the part you just bought, and that is almost always the wrong move.
A new battery is not the same thing as a good battery, and even a genuinely good battery is only the first link in a chain of five more. The fault is nearly always downstream, in a ground, a solenoid, a safety switch, the key, or the starter itself.
This guide walks that chain in one strict order, with the exact voltage you should see at every stop. Follow it and you will find the real fault before you spend another dollar on a part you do not need.
A no-crank after a battery swap is rarely the battery. Confirm the new battery is charged and load-tested, then work grounds, then the solenoid, then the safety interlocks, then the ignition switch, and finally the starter, in that order.
A healthy 12-volt battery should rest at about 12.6 volts and stay above 9.6 volts while cranking, and any cable or ground that loses more than about 0.5 volts under load is starving the starter even when the battery is brand new.
Lawn Mower Won't Turn Over With New Battery? The 60-Second Diagnosis
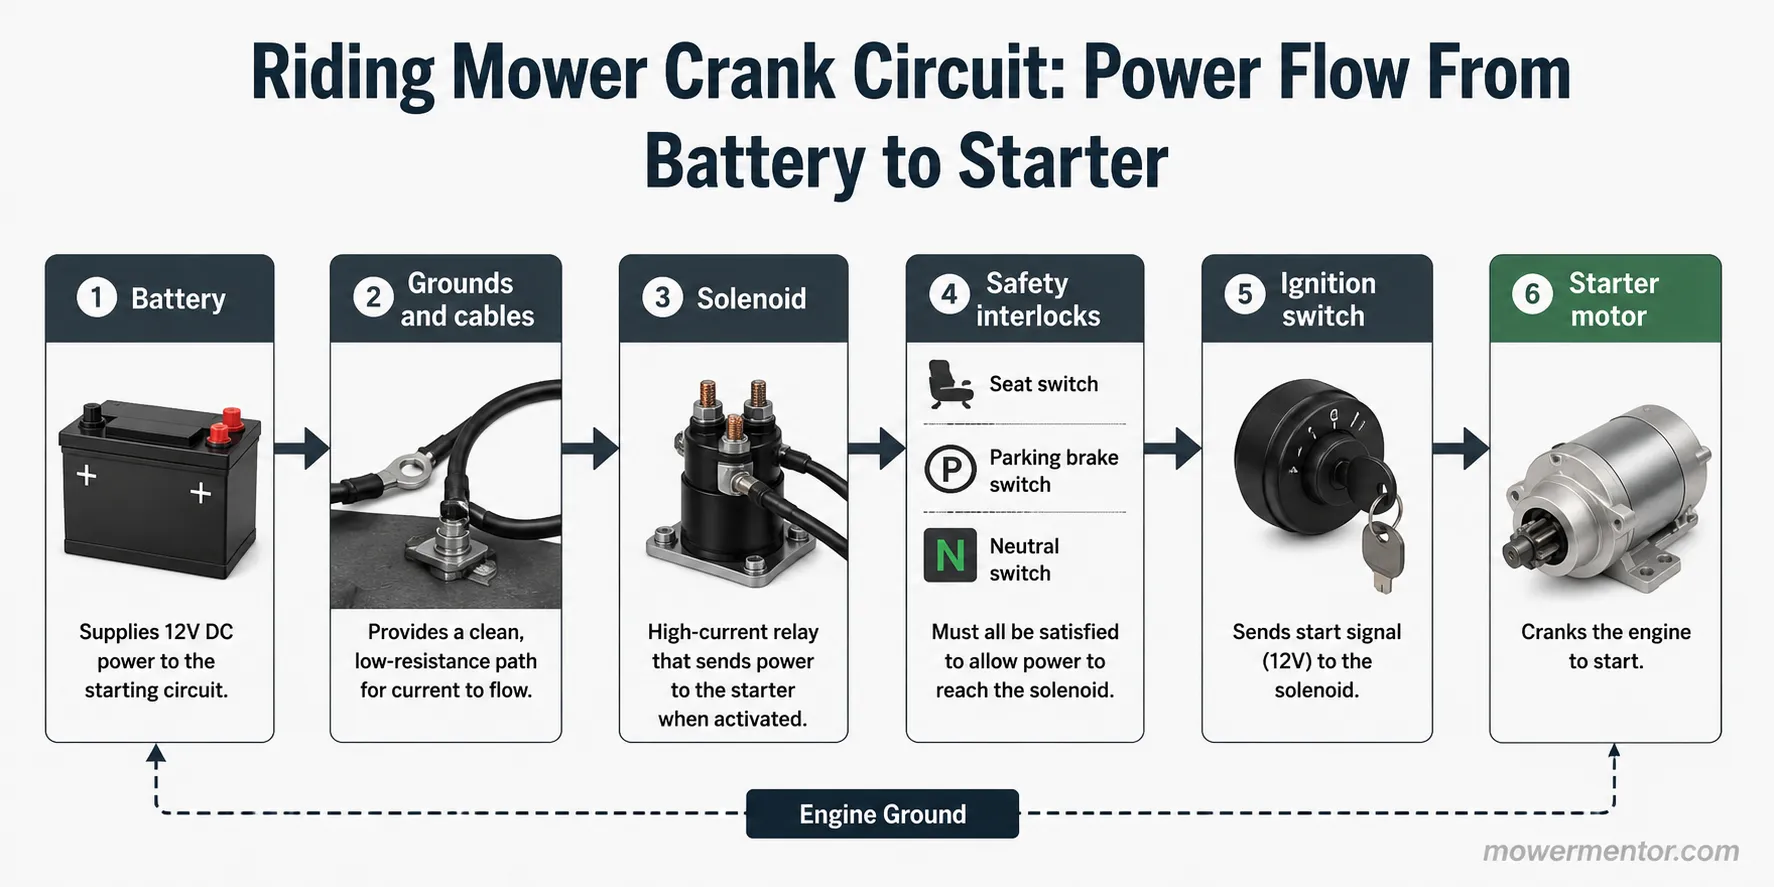
When a lawn mower won't turn over with new battery power installed, the fault lives in the cranking circuit rather than the battery roughly nine times out of ten, because that circuit runs battery to ground to solenoid to safety interlocks to ignition switch to starter and a break anywhere gives the same dead key.
According to Briggs & Stratton's starter guidance, no-crank causes include loose or corroded connections, a failed safety interlock, an open ignition or starter switch, and a bad solenoid, so verify the battery first and then walk those nodes in order.
One word of scope before you start. "Turn over" and "crank" mean the electrical job of spinning the engine, which is different from "won't start," where the engine spins but fuel or spark is missing.
This guide stays strictly on the no-crank side. If your engine cranks but will not fire, that is a fuel and spark problem, and it belongs in a different diagnosis entirely.
Here is the ordered map you are about to follow. Each node has a pass or fail test, and you only move down when the one above passes.
Prove the new battery is charged and can hold voltage under load.
Check the grounds and battery cables for voltage drop.
Test the starter solenoid, battery side and starter side.
Rule out the safety interlocks (brake, PTO, and sometimes the seat).
Confirm the ignition switch sends 12 volts at start.
Confirm the starter motor spins and engages.
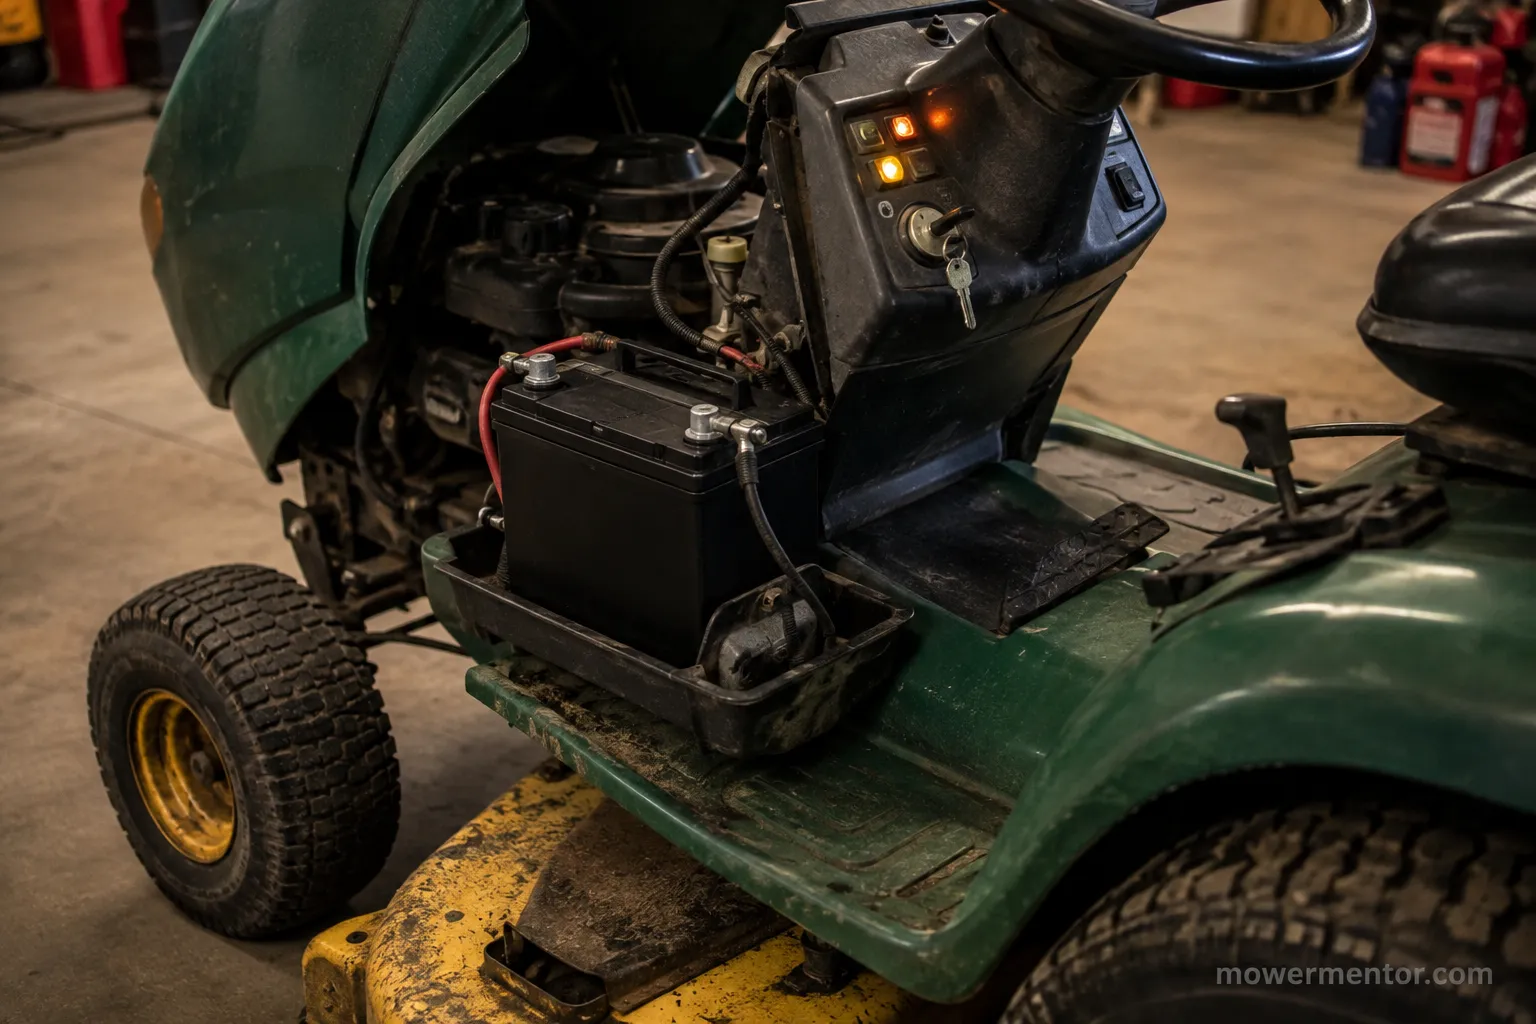
On the machine I documented for this guide, a 2014 John Deere D130, the owner had already fitted a new battery and still got a dead key. Walking this exact order put the fault two nodes down, at the ground strap, and not a cent went to a second wrong part.
Scope check. This is a no-crank guide only. If the engine spins but will not fire, stop here and switch to a fuel and spark diagnosis instead.
First, Prove the New Battery Is Actually Good
A brand-new mower battery can still be the problem, because a fully charged 12-volt battery should read about 12.6 volts at rest and hold above roughly 9.6 volts under cranking load, yet a weak one collapses the instant the starter pulls on it.
As AutoZone's battery test guide describes, a healthy battery drops only modestly under load while one that plummets has good surface charge but no real capacity, and on a small U1-size mower battery a cheap low-CCA unit is the usual culprit.
Charged and capable are two different things. A resting voltage reading tells you state of charge, but only a load reveals whether the battery can actually deliver cranking current.
Run these checks before touching anything downstream.
With the key off, put a meter across the terminals. You want 12.6 volts or more.
Have a helper turn the key to start while you watch the meter. A healthy battery holds above 9.6 volts.
If it drops into the 8s or 9s and the mower gives a fast tick-tick-tick, that sag is the battery or a connection, not necessarily a dead solenoid.
Confirm the group size and terminal orientation are correct for your machine, so a wrong-fit battery is not undersized on cold cranking amps.
Reading | Healthy | Suspect | What it means |
|---|---|---|---|
Rest voltage | 12.6 V or higher | Under 12.4 V | Undercharged; charge fully before testing |
Voltage while cranking | 9.6 V or higher | Under 9.6 V | Battery collapses under load; defective or too low on CCA |
Recovery after crank | Snaps back near 12.6 V | Slow to recover | Weak cell or a bad connection |
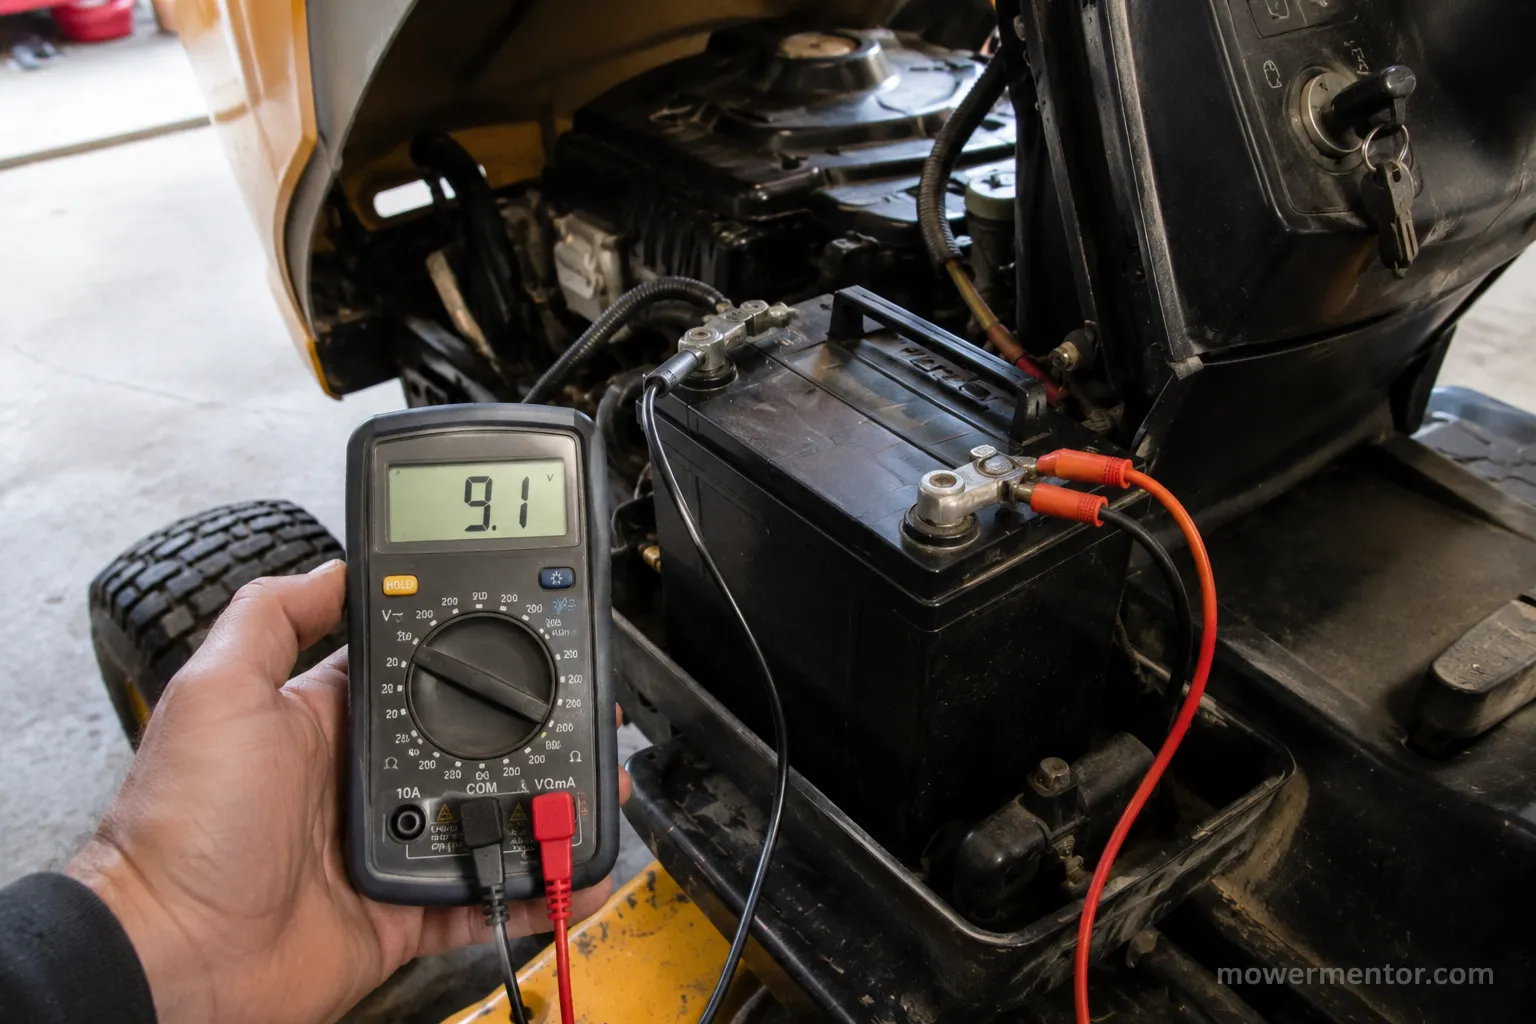
Here is a case that catches people. On a 2016 Cub Cadet XT1 last March, a bargain replacement battery rested at a confident 12.7 volts, then sagged to 9.1 volts the moment the key hit start.
That battery was new and looked fine on a resting meter, but its cold cranking amps were far below what the machine needed. If your load test fails like that, you may simply have chosen the wrong battery for the job, and Craftsman owners in particular hit Craftsman battery sizing quirks worth checking.
Fitment charts differ by deck and series, so if you run a green machine, the John Deere fitment guidance is the faster path to the right group size and CCA.
Methodology note. A charger that reads "full" only proves the surface is charged. Trust the under-load reading, because capacity is the thing a resting voltage hides.
Check the Grounds and Battery Cable Connections
The single most common hidden culprit after a battery swap is a bad ground or a high-resistance cable that starves the starter even with a perfect battery, so to check the ground on a riding mower you run a voltage-drop test while cranking rather than eyeballing the terminals.
Fluke's voltage-drop method is the standard: probe bare metal, test both the positive and the ground side under crank, and treat more than about 0.5 volts of loss as excessive resistance from corrosion or a loose connection that a new battery cannot push past.
Voltage drop, not a resistance reading, is the correct under-load test. A connection can measure fine with the key off and still choke under the current a starter demands.
Work the ground path in this order.
Clean both battery posts and the ground strap where it bolts to the chassis or engine block.
Positive side: red probe on the battery positive post, black probe on the starter main terminal, then crank and read.
Ground side: red probe on the battery negative post, black probe on bare chassis metal, then crank and read.
Anything over about 0.5 volts on either side is a bad connection or a cable failing internally under its own insulation.
Re-torque the terminals, and never trust a plastic wing nut or paint-trapped contact to carry starter current.
On the D130 from earlier, the ground strap read a 1.3-volt drop on crank, which is far past the limit. Cleaning the paint and corrosion off the chassis bolt brought it to 0.1 volts, and the engine cranked on the next turn of the key.
That was the whole fault. No new solenoid, no new starter, just a ground bolt that current could not get through.
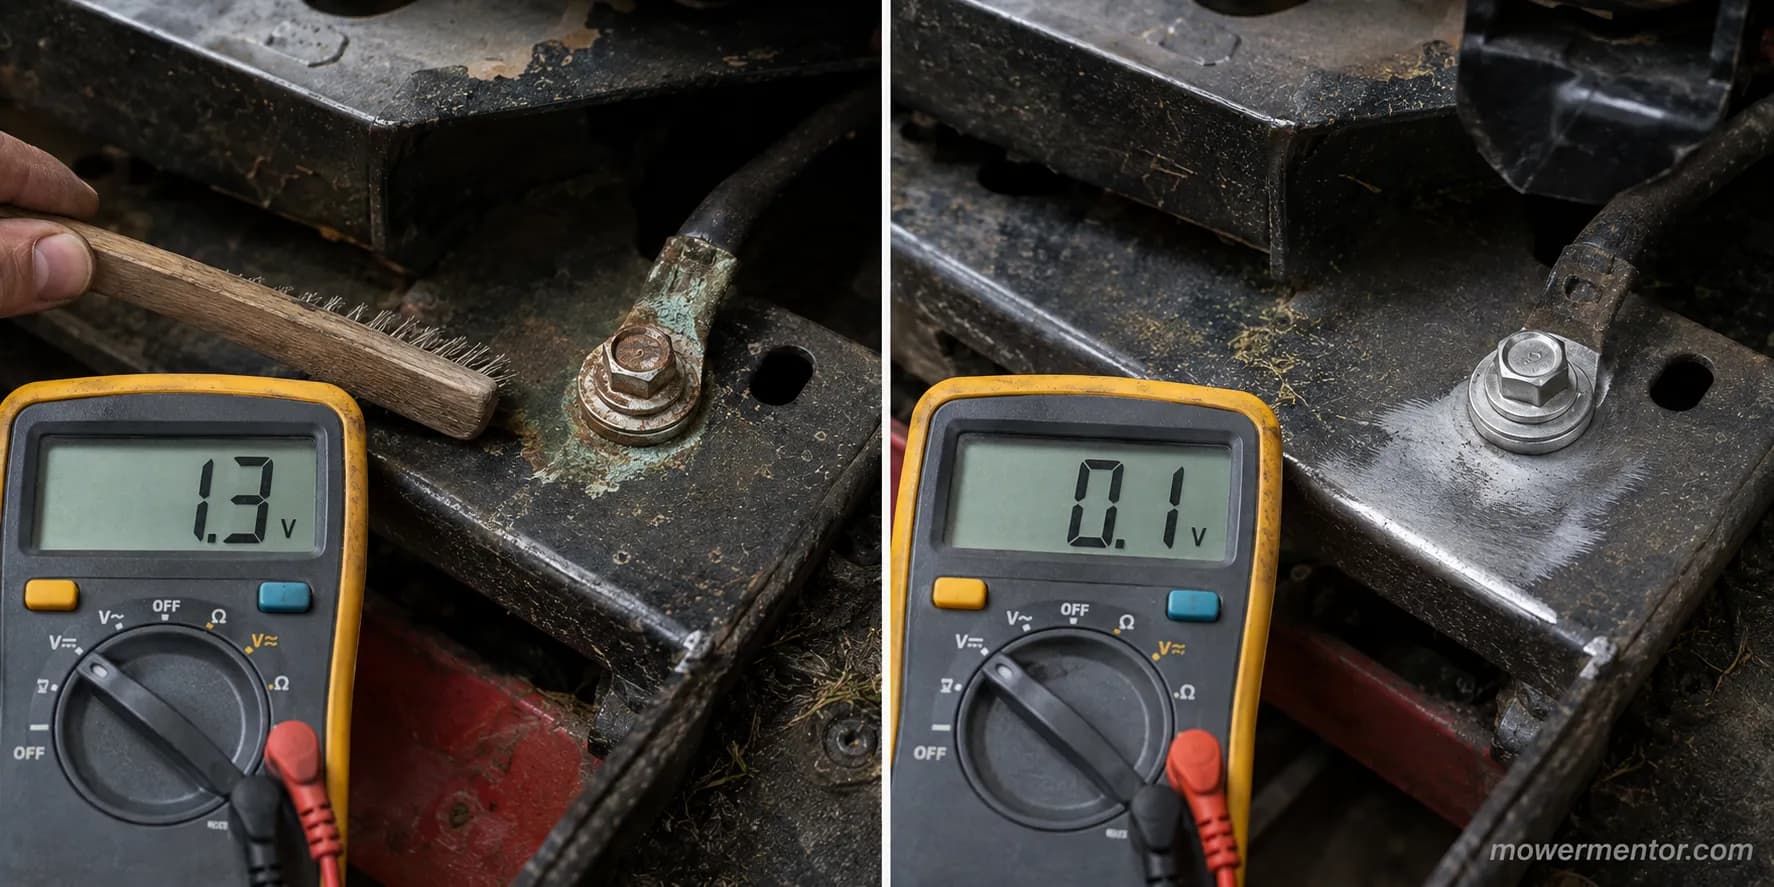
If the battery keeps going flat between uses rather than failing under load, the real story may be why the battery keeps dying in the charging system. Keeping it topped up on a maintainer is the simplest way to avoid a repeat no-crank, and our guide to safely charging the battery covers the right charger for the job.
Clean connections rarely stay clean on their own. A full seasonal tune-up keeps the grounds and terminals honest so this fault does not come back next spring.
Test the Starter Solenoid (Click vs. No-Click)
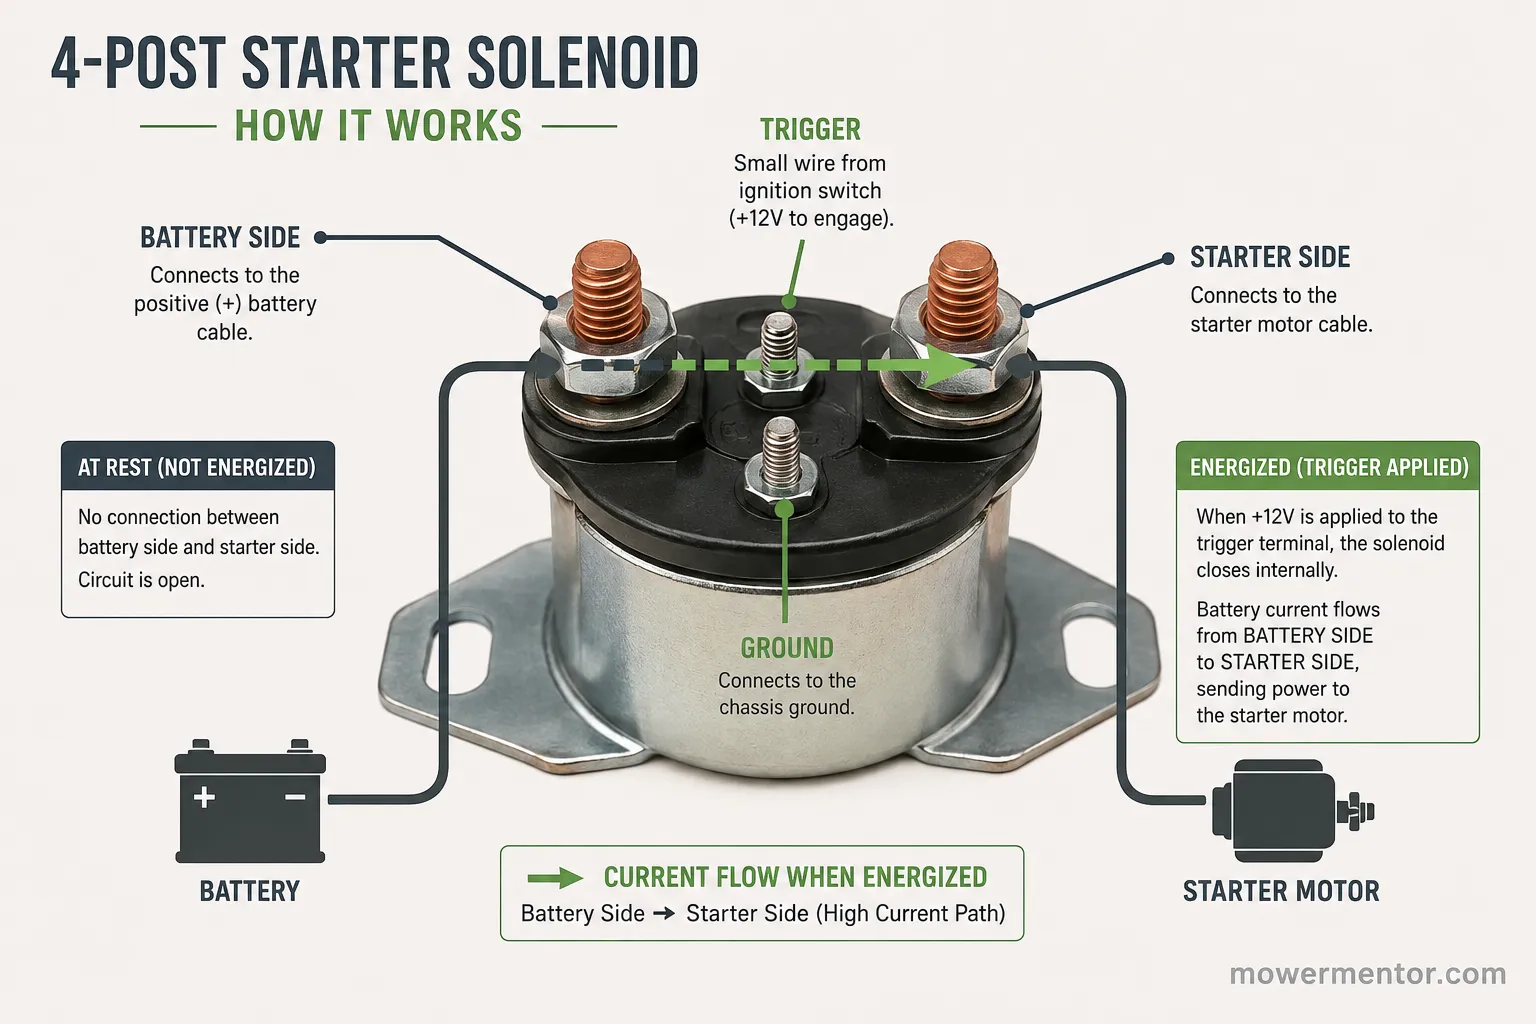
The starter solenoid is the next node, where most people waste money swapping the part before testing it, so to test a mower starter solenoid you check the large battery-side terminal for battery voltage and watch the starter-side terminal while a helper turns the key.
As Sears PartsDirect explains, the key energizes the solenoid coil which snaps the contacts closed to pass current to the starter, so a click with a dead starter side means failed contacts, while no click and no 12 volts at the trigger wire puts the fault upstream in the interlocks or ignition.
A click tells you the coil works. It does not tell you the contacts inside can still carry the current, which is exactly the distinction that sends people to the parts counter too early.
Why does it just click and not crank?
A single loud click with no crank usually means the solenoid coil is pulling in but the heavy contacts are burned and cannot pass current, while a rapid tick-tick points back upstream to low voltage or a weak connection from the last section.
No crank and no click at all, with no 12 volts on the trigger wire, means the signal never reached the solenoid, so the problem is an open interlock or a dead ignition switch.
Localize it with these readings.
Battery-side big post: should sit at full battery voltage all the time.
Small trigger terminal, key at start: should read about 12 volts, give or take a volt.
Starter-side big post, key at start: should jump to near battery voltage when the solenoid closes.
To confirm the starter and cable while isolating the solenoid, carefully bridge the two big posts with a heavy screwdriver, which is the old "jump the solenoid" trick.
What you see | Battery side | Starter side on crank | Trigger wire | Verdict |
|---|---|---|---|---|
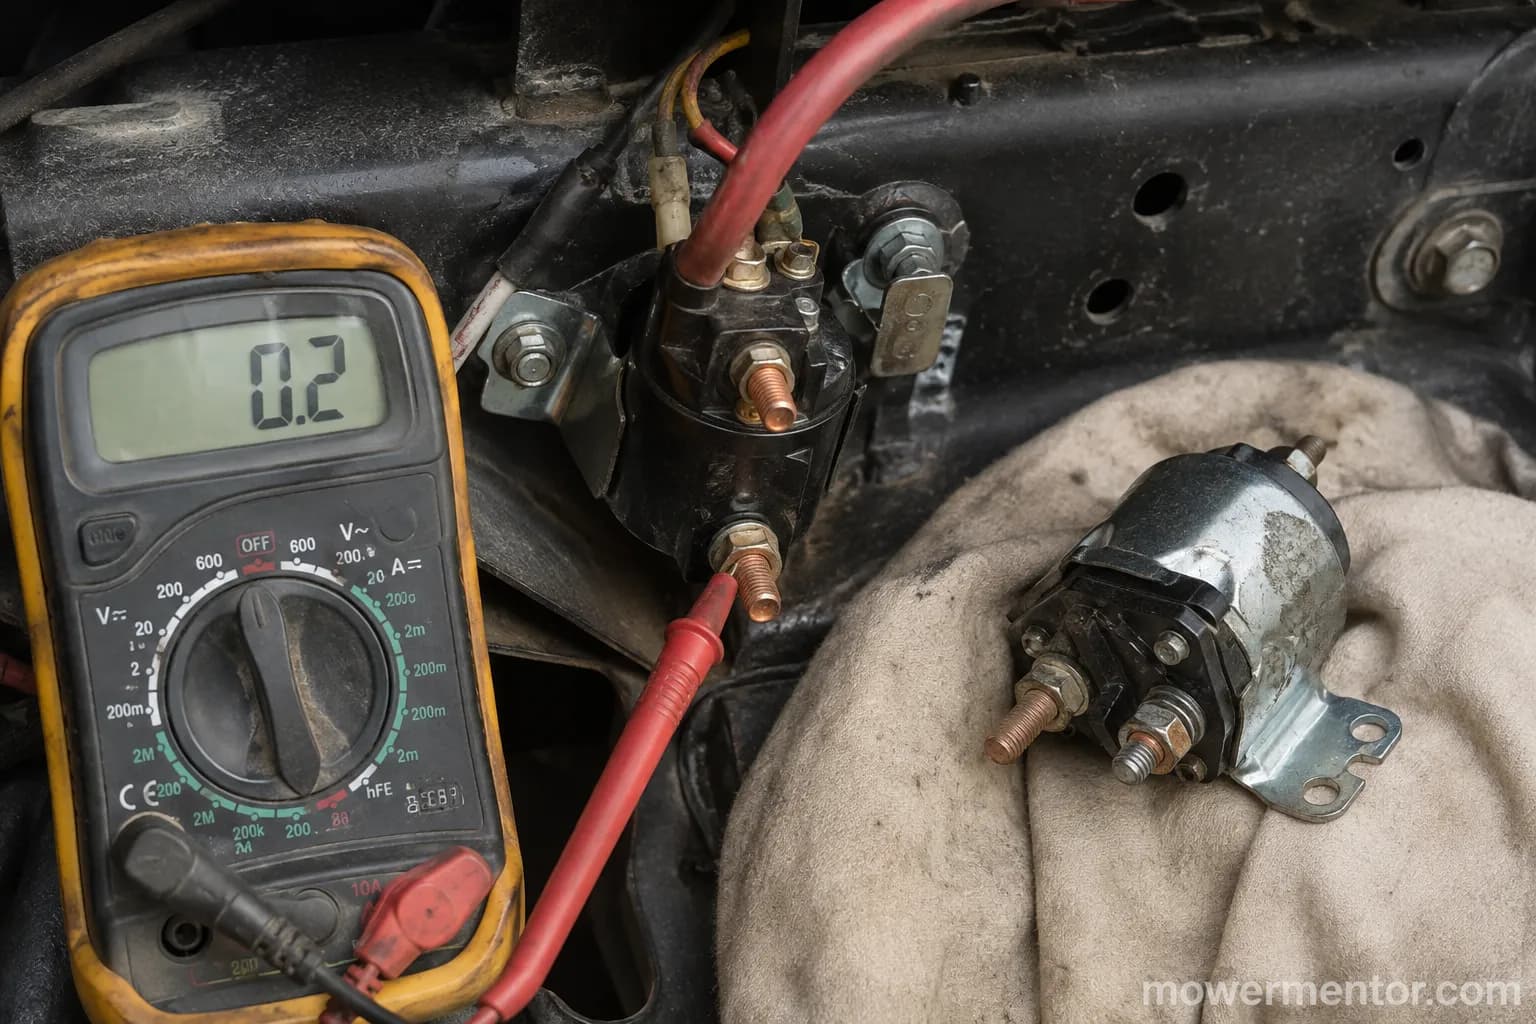
Clicks, no crank | 12.6 V | Stays near 0.2 V | About 12 V | Solenoid contacts dead; replace |
No click, no crank | 12.6 V | 0 V | 0 V | Upstream: interlock or ignition |
Cranks when jumped | 12.6 V | Near 12.6 V | About 12 V | Starter and cable fine; trust the readings |
Safety callout. Jumping the solenoid across the big posts throws a hard spark. Set the parking brake, drop the blades and PTO, keep the mower in neutral, and keep your face and loose sleeves clear.
On a Craftsman T310 that clicked but would not crank, the starter side held at just 0.2 volts on crank while the trigger wire showed a healthy 12 volts. The coil was fine, the contacts were burned, and a new solenoid fixed it.
The owner had already thrown one new solenoid at it before that, because he skipped the trigger-wire reading and guessed. That is the exact trap the two-sided test prevents.
For the audible-symptom side of this, our write-up on the just-clicks diagnosis splits battery clicks from solenoid clicks in more depth. Troy-Bilt owners tend to hit the same click-or-nothing pattern and can start there.
If you would rather zoom out to the whole starting system, the complete electrical diagnosis is the hub that routes every branch. When the key is truly silent with no click at all, work a silent dead-circuit checklist instead.
Rule Out the Safety Interlocks (Seat, Brake, PTO)
Safety interlocks sit inside the cranking circuit, so an open switch stops the starter cold even with a new battery and a good solenoid, and on most riding mowers the parking brake must be set and the PTO or blade clutch off before the solenoid trigger ever sees 12 volts.
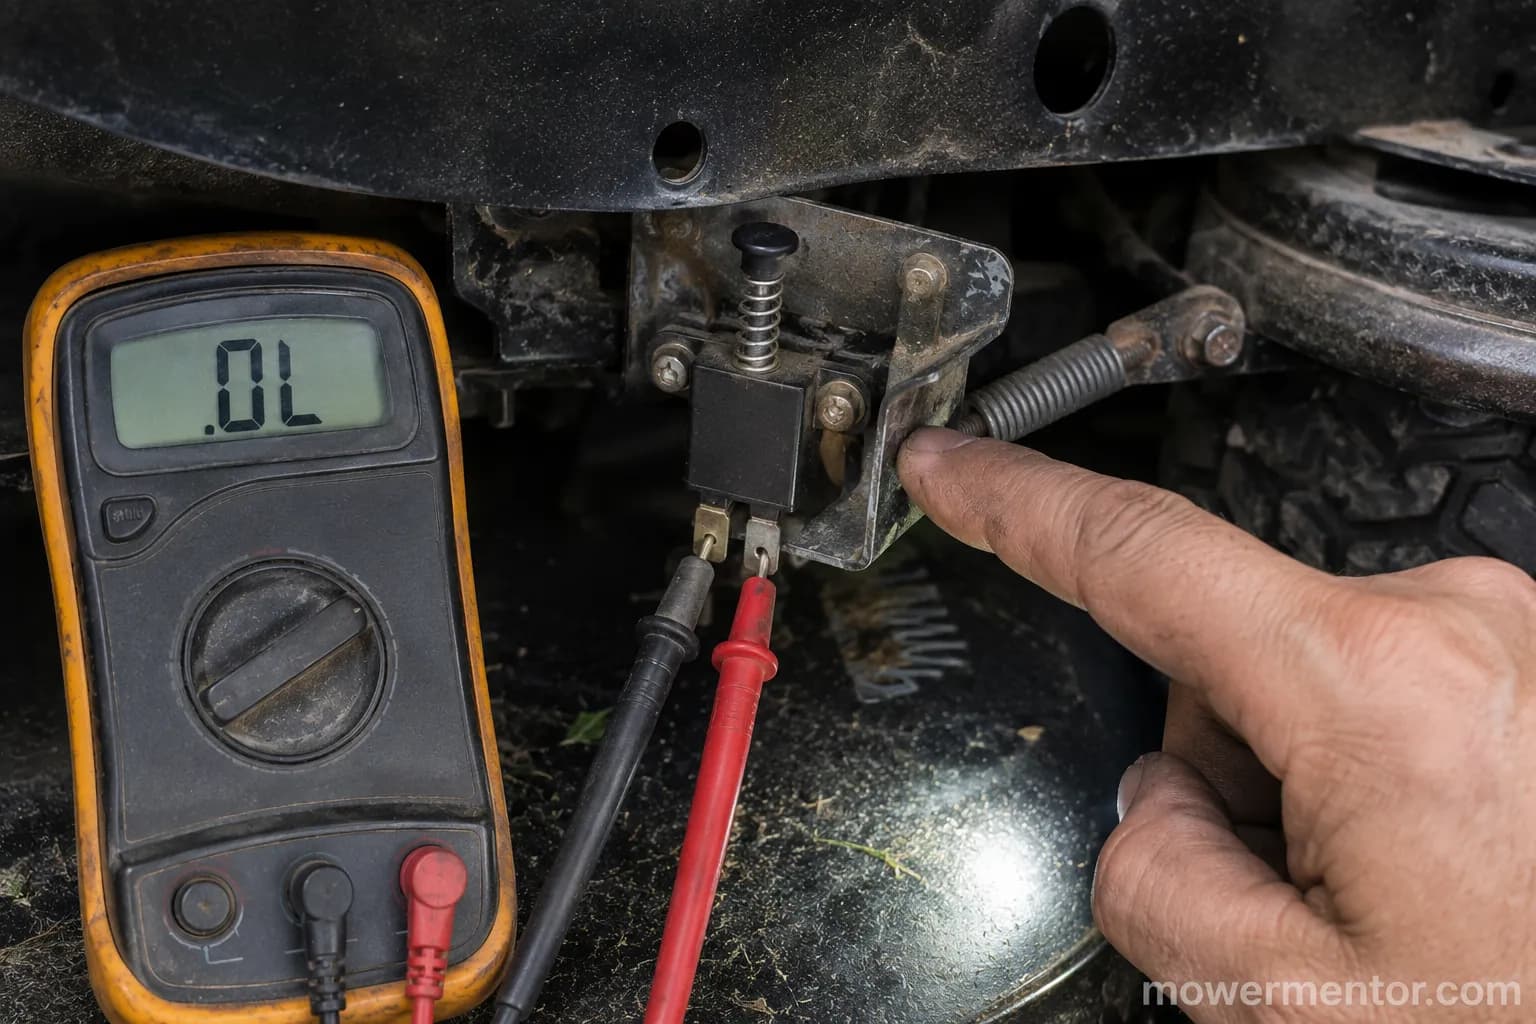
Briggs & Stratton's problem-solving tips list a faulty operator-presence switch among common no-start causes, so test each switch for continuity, bypass it briefly to isolate the fault, then replace the failed switch rather than leaving it defeated.
A new battery and a new solenoid cannot beat an open safety switch. This is the node editorial guides skip and forums bring up constantly, which is exactly why it is worth your meter.
Can a stuck seat or PTO switch stop it from cranking?
Yes, on the brake and PTO switches especially, though the seat switch is often wired into the run circuit rather than the start circuit, so on many models a bad seat switch kills a running engine but does not block cranking.
That split is model-dependent, so check your machine rather than assuming, because a stuck plunger or a bent bracket holding any of these switches open reads as no continuity and stops the crank.
Parking brake switch: set the brake and check for continuity across the switch.
PTO or blade-clutch switch: confirm it reads closed with the PTO disengaged.
Seat switch: check whether yours sits in the start circuit at all before you chase it.
Physical check: look for bent brackets and stuck plungers that never let the switch close.
Bypass discipline: a temporary jumper is fine to isolate the fault, but never run the machine with an interlock permanently defeated.
On a Husqvarna YTH last spring, a slightly bent brake bracket held the safety switch plunger open, so the switch never closed and the starter never saw a trigger. Bending the bracket back into place restored continuity and it cranked at once.
That machine had a good battery and a good solenoid the whole time. The only fault was a bracket a quarter inch out of position.
Safety callout. Interlock bypasses are for diagnosis only. Once you find the bad switch, replace it, because these switches exist to keep the blades from turning when you are not in the seat.
Brand flowcharts help when the key is silent. Craftsman no-crank cases usually trace to this circuit, and the Craftsman no-crank fix walks it switch by switch, while Husqvarna owners can follow the Husqvarna diagnostic flow for the same checks.
Green machines have their own quirks in the seat and PTO wiring, covered in John Deere silent-key diagnosis. If you want fuel and spark covered in the same place, the complete Craftsman flowchart runs the whole tree end to end.
Check the Ignition Switch
The ignition switch is the last upstream stop before the starter, so to test a mower ignition switch you back-probe the start terminal with the connector seated, where it should read 0 volts with the key off and about 12 volts with the key held at start.
No voltage at start means the switch has failed internally or an interlock upstream is still open, so re-check the safety switches first, and remember that working panel lights do not prove the start terminal works because lights and cranking run through different switch positions.
Back-probing keeps the circuit live and connected, which is the only way to catch a switch that tests fine unplugged and fails under load. Some mowers fold an interlock into the switch assembly, which is why a 0-volt reading is not automatically a dead switch.
Find the start terminal, often labeled S on the key switch.
Back-probe it with the connector plugged in so the circuit stays live.
Key off should read 0 volts at the S terminal.
Key held at start should read about 12 volts. If it does not, and the interlocks all passed, the switch is bad.
On a Murray that came in dead-silent, back-probing the S terminal showed a flat 0 volts at start even though the dash lights and headlights worked fine. The key switch had failed internally, and swapping it brought the crank back.
Lights on, starter dead, is a classic pattern that fools people into replacing a battery or solenoid. The back-probe reading settles it in about a minute.
While you are at the switch, the Murray starting checklist runs the same key and safety sequence for that brand. If the machine later cranks but will not fire, changing and gapping the plug rules out spark noise before you go deeper.
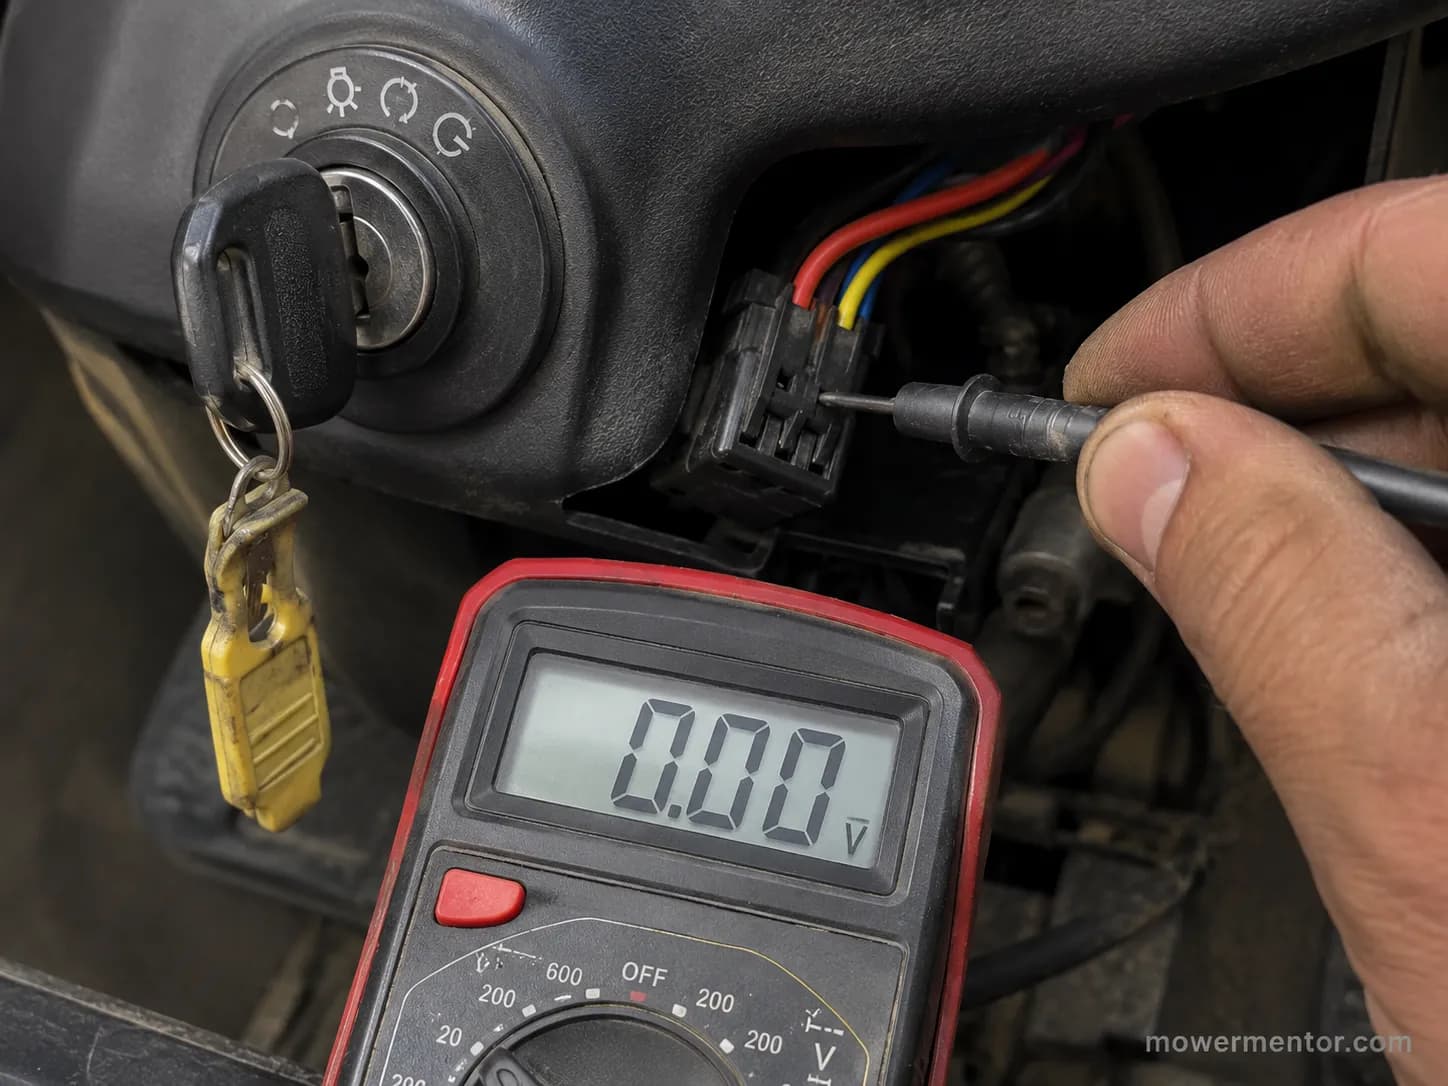
Limitation. A 0-volt reading at start can also be an interlock still holding the circuit open. Confirm the safety switches from the previous section before you condemn the key switch.
Confirm the Starter Motor (Free-Spin & Bench Test)
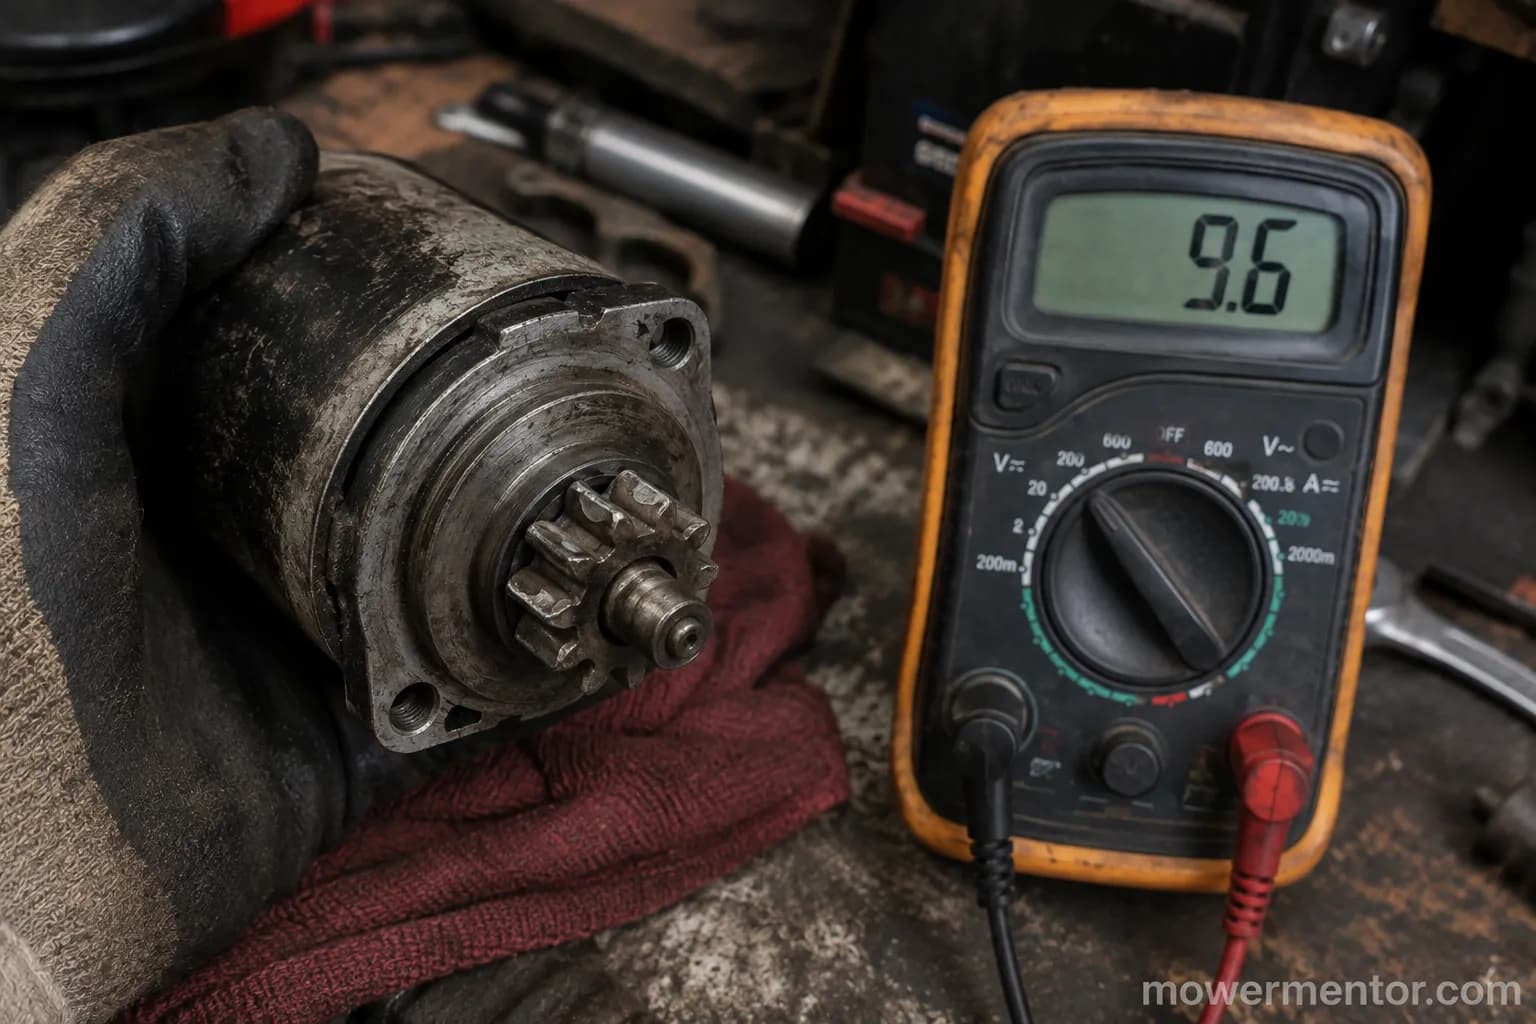
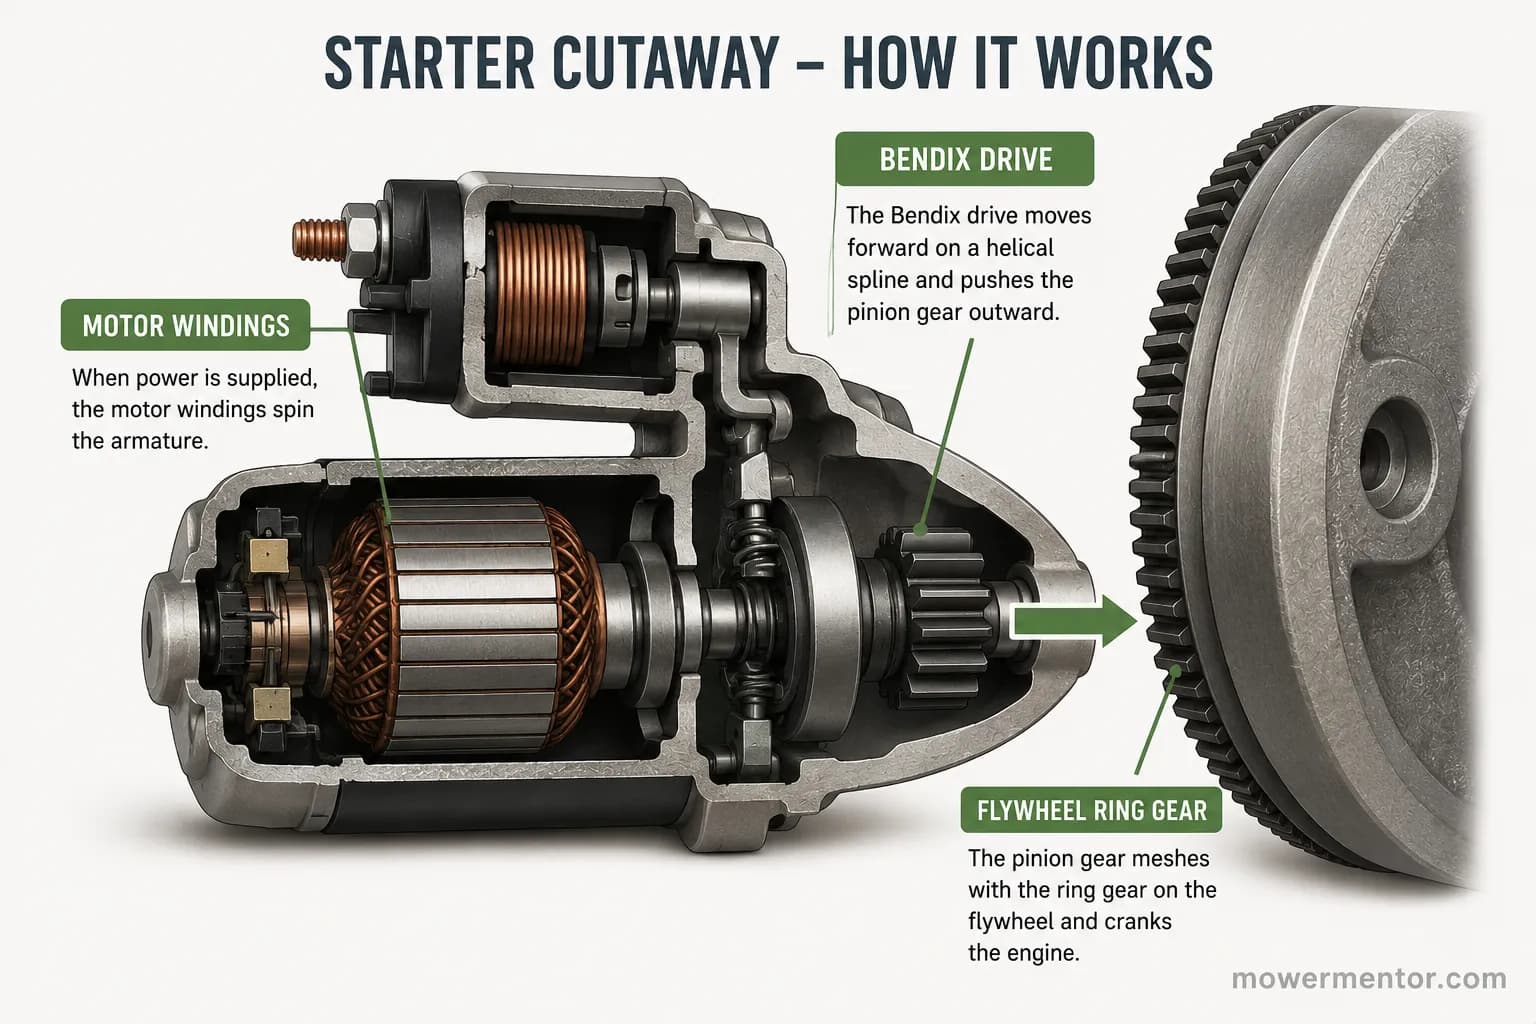
Once the battery, grounds, solenoid, interlocks and ignition all pass, a mower that still will not turn over points at the starter motor itself, so you apply 12 volts directly to the starter feed and expect it to spin hard and engage the flywheel, while a whir that never turns the engine means a worn drive or ring gear.
A documented iFixit case followed this exact path, where a new battery and new solenoid changed nothing and the starter was the fault, and you should see roughly 9.5 to 10 volts at the starter during crank.
There are three different failures hiding inside the word "starter," and they carry three different fixes. A dead motor, a chewed drive that free-spins, and a worn ring gear are not the same repair.
With everything upstream confirmed good, jump 12 volts straight to the starter feed.
Watch and listen: a healthy starter spins fast and its drive climbs to engage the flywheel.
Free-spin symptom: the motor whirs but the engine does not turn, which means a bad drive or ring gear, not a dead motor.
Measure the starter feed during a normal crank; about 9.5 to 10 volts is expected, and less means an upstream loss.
If in doubt, pull the starter and bench-test it clamped down securely.
On a Troy-Bilt where every upstream reading passed, a direct feed made the starter spin freely but never catch. The Bendix drive gear was chewed, so the motor was fine and only the drive needed replacing.
That distinction saved a needless full starter swap. A free-spin is a drive problem far more often than a motor problem.
Safety callout. A starter kicks hard when it engages. On the bench, clamp it down before you feed it power, and keep your hands clear of the pinion.
A tired starting system usually has more than one worn part. Following a John Deere tune-up keeps the whole starting circuit honest between seasons, and Husqvarna owners can follow a Husqvarna service walkthrough for the same maintenance.
The Battery-Eliminated Check Order (and When to Stop)
If your lawn mower won't turn over with new battery power in place, work one fixed order and let the readings tell you where to stop: confirm the new battery is charged and load-tested, then check the grounds and cables, the starter solenoid, the safety interlocks, the ignition switch, and finally the starter motor.
The fault is almost never the battery you just installed, and on the D130 I documented this order found it at node two, the ground, without buying a single extra part, matching the battery-side and starter-side logic in Green Tractor Talk's own D130 no-crank thread.
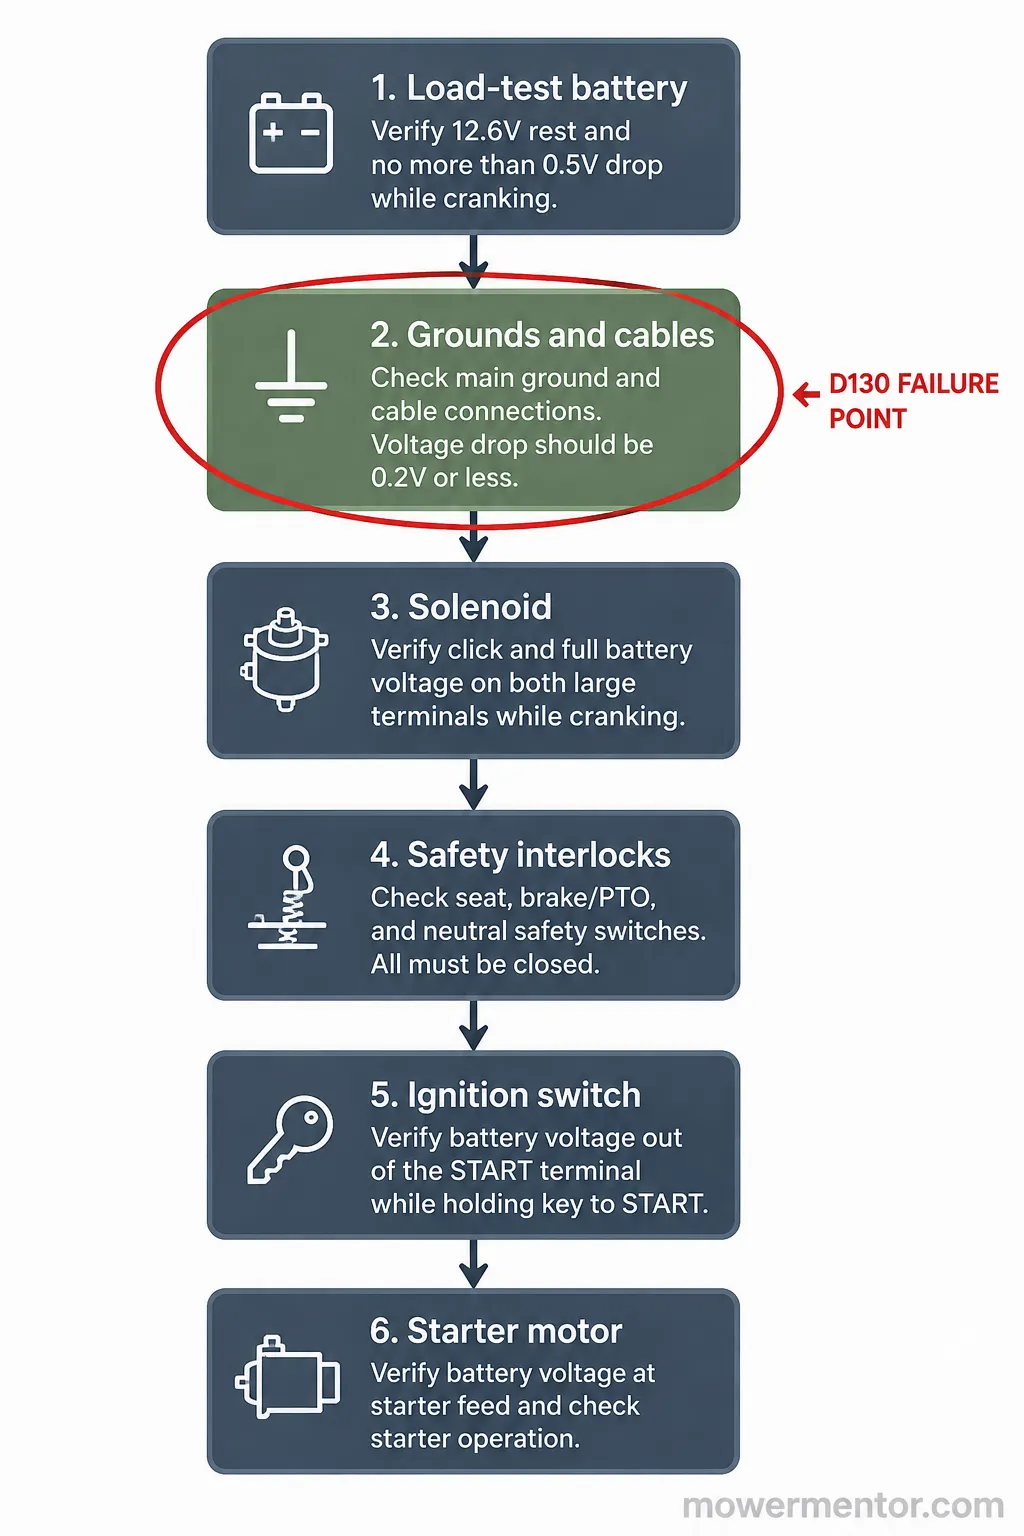
The order is not arbitrary. It runs cheapest and most likely first, so you clear a corroded ground bolt before you ever reach for a starter, and you confirm no crank and no click means an open circuit before you buy a solenoid.
Some faults do belong at a shop, and it is worth knowing the line. An intermittent no-crank that comes and goes, an internal short in the wiring harness, or a damaged flywheel ring gear are all jobs where a pro will save you time and guesswork.
For adjacent problems, route to the right guide rather than forcing them here. When you want the wider tree beyond a fitted battery, the full no-crank diagnosis covers every branch, and battery-first electric machines have their own routine in caring for an electric mower.
Work the order once and the mystery goes away. A no-crank after a fresh battery is a circuit problem with a fixed address, and the meter takes you straight to it.
When to call a pro. Intermittent faults, suspected harness shorts, and ring-gear damage are shop territory. There is no shame in handing off a fault that hides, and it is cheaper than replacing parts by trial and error.
Frequently Asked Questions
Can a brand-new mower battery really be bad?
Yes. A new battery can rest at a healthy 12.6 volts and still collapse below 9.6 volts under cranking load if its cold cranking amps are too low or a cell is weak, which is why a load test beats a resting reading.
How do I know if it's the solenoid or the starter?
Read the solenoid's starter-side post while cranking. If it never rises to near battery voltage, the solenoid contacts are dead, and if it does rise but the starter still will not spin on a direct 12-volt feed, the starter is the fault.
Can a safety switch stop a mower from cranking?
Yes. The parking brake and PTO switches sit in the cranking circuit on most riding mowers, so a stuck or bent-open switch blocks the starter even with a new battery and a good solenoid.
What voltage should I see at the starter while cranking?
Expect roughly 9.5 to 10 volts at the starter feed during a healthy crank. A reading well below that points back to a bad ground or cable rather than the starter itself.
Summarize with AI
Keep reading
Related articles
 Troubleshooting & Repair
Find, test, and safely bypass the Craftsman riding mower safety switch: seat, brake, and PTO interlocks, with multimeter values and a re-enable step.
 Troubleshooting & Repair
Test your Craftsman riding mower starter solenoid in about 15 minutes with a screwdriver and multimeter, then fix the click-no-crank for around $18.
 Troubleshooting & Repair
Fix a Craftsman riding lawn mower won't start no clicking: test battery voltage, inline fuse, safety switches, ignition and solenoid with a multimeter.
 Troubleshooting & Repair
Find the right Craftsman riding mower battery: 12V U1/U1R size chart by model, 5 tested picks, and why yours keeps dying.
Comments
Moderated for quality. Share a correction, ask a follow-up, or tell us what worked for you - every comment is reviewed before it goes live.