
Wired Wrong? Lawn Mower Starter Solenoid Wiring Diagram
See the exact lawn mower starter solenoid wiring diagram for 3-pole and 4-pole units, with labeled terminals, a which-wire-where table, and a free PDF.
Written by Tony MaldonadoReviewed by Wade CoburnLast updated on September 24, 2026
When you buy parts or tools through links on our site, we may earn a commission at no extra cost to you. It never changes what we recommend. Learn more.
You pulled the old part off, dropped in the new one, and now you cannot remember which wire lands where.
That single moment is why most people go looking for a lawn mower starter solenoid wiring diagram, usually mid-repair with a dead mower and a fistful of loose cables.
Here is the reassuring part.
A mower solenoid has only four possible connections, so once you can name each post you can wire any brand correctly, even without your exact factory schematic.
A lawn mower starter solenoid is a low-current relay that lets the key switch close a heavy battery-to-starter contact.
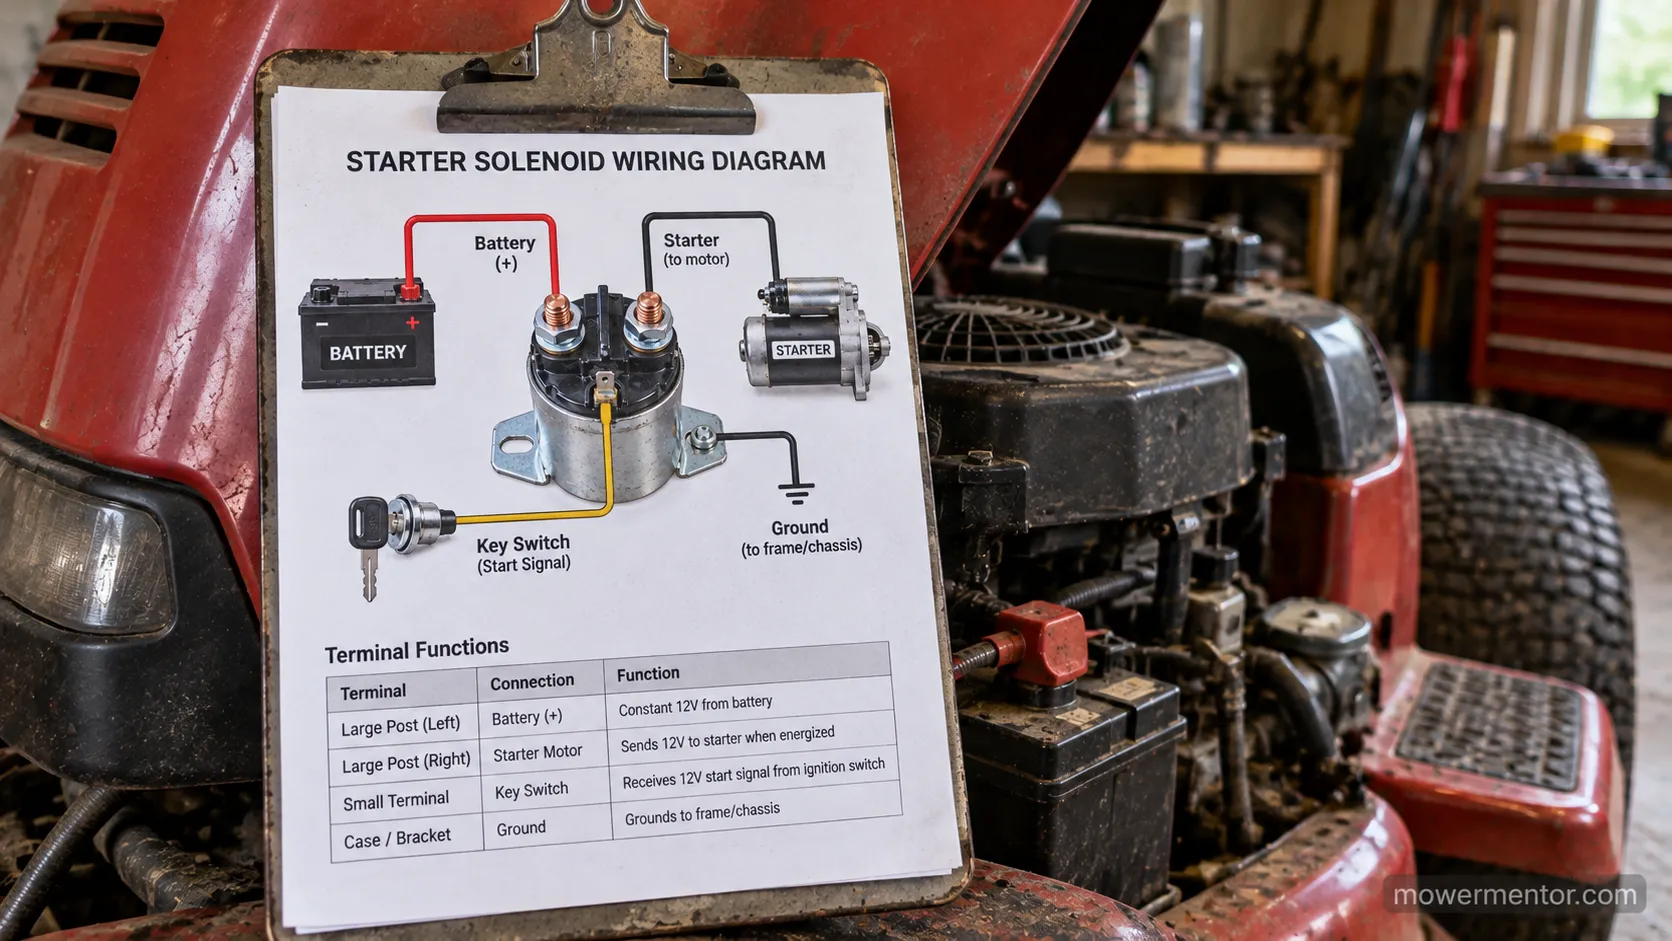
Wire it like this: battery positive to one large post, the starter cable to the other large post, the small trigger wire from the key to the small post, and the case or fourth lug to ground.
Large-post order does not matter.
The small trigger post only goes live in START, where a healthy 12-volt system reads about 12.4 volts.
Lawn Mower Starter Solenoid Wiring Diagram (Quick Terminal Map)
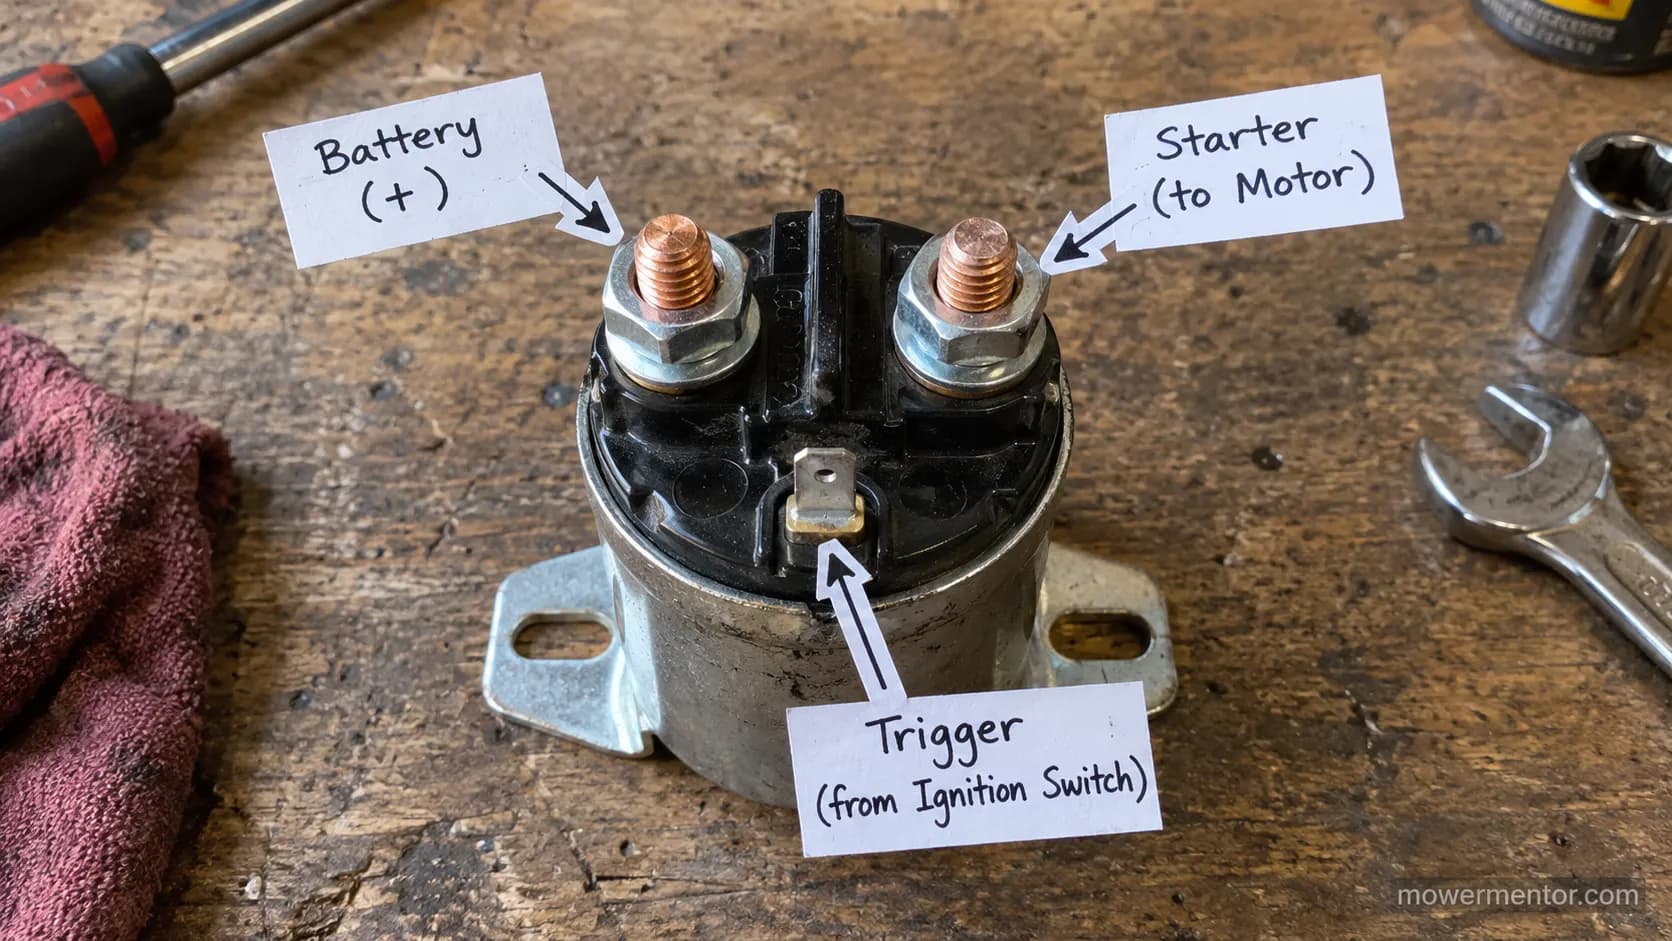
The lawn mower starter solenoid wiring diagram comes down to four connections you can label in seconds.
A starter solenoid is a low-current relay, confirmed by Wikipedia's starter solenoid entry, meaning a small key-switch current energizes a coil that snaps a high-current battery-to-starter contact closed.
Battery positive lands on one large post, the starter cable on the other large post, the small trigger wire from the key on the small post, and the mounting base or a fourth lug carries ground.
That is the whole map.
On the bench solenoid I wired for this guide, the two large posts were interchangeable, while the small post only triggered with the key held in START.
Terminal | Connects to | Wire |
|---|---|---|
Large post A | Battery positive | Heavy red battery cable |
Large post B | Starter motor | Heavy starter cable |
Small post (S) | Key switch start signal | Thin trigger wire, live in START only |
Case or 4th lug | Ground | Mount bolt or dedicated ground wire |
Both the common 3-pole and the 4-pole (4-post) styles are covered below, along with a printable version you can keep in the shed.
The Four Solenoid Terminals: Big Posts, Small Posts and Ground
Every lawn mower starter solenoid uses the same four terminal roles, no matter the brand stamped on it.
According to CarParts.com's wiring guide, the large battery (B) terminal feeds heavy current in, the start (S) terminal takes the key signal, and the motor terminal sends current out to the starter.
On a mower you will hear owners call these the big posts, the small post, and the ground, and knowing the role of each is what makes any solenoid readable before you touch a wire.
The two large posts carry the heavy load, which is why they take thick battery-gauge cable. One brings power in from the battery, the other sends it out to the starter, and they are electrically symmetric.
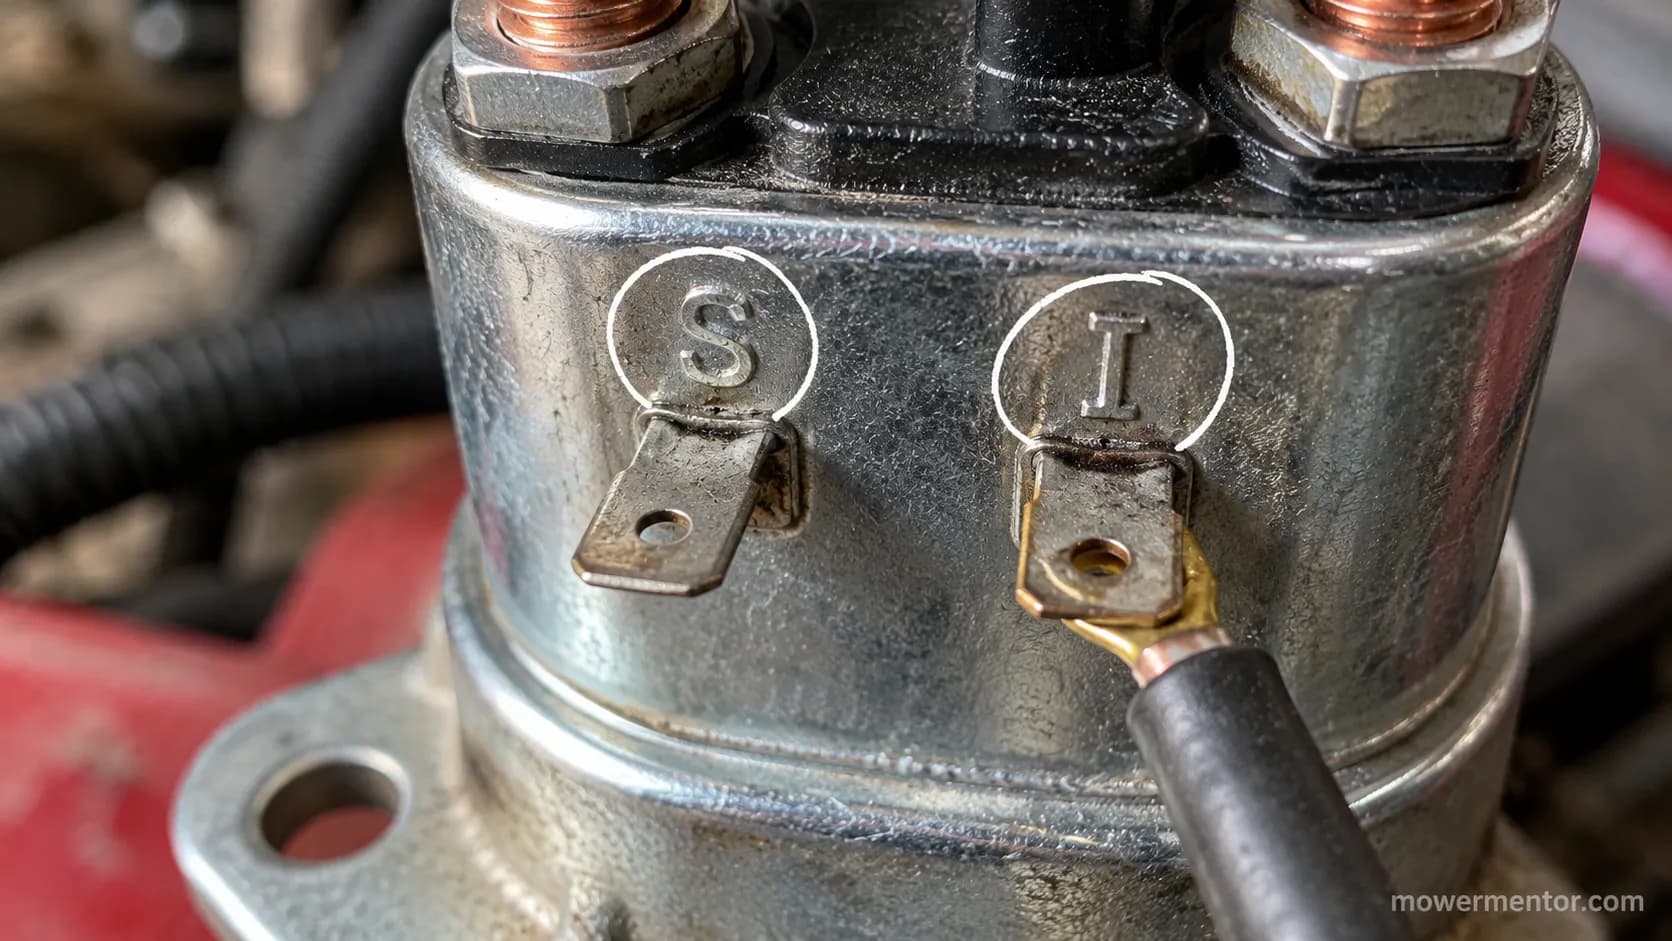
The small post, often stamped S, is the trigger. It receives the thin start wire from the key switch and only carries voltage while the key is held in START.
That small post is fed by the key switch, whose own contacts are mapped separately if you need the ignition switch terminal map.
A second small lug, sometimes stamped I, appears on 4-post units and is usually a ground or an ignition feed rather than a second trigger.
On the test solenoid, the small lugs were stamped S and I, and the I lug sat empty on this mower, so I grounded it rather than leaving it floating.
If you are still unsure the part itself is the fault, it helps to review how the starter solenoid works before rewiring.
Post | Common label | Wire it takes | Live when |
|---|---|---|---|
Large post | B or unmarked | Battery cable in | Always |
Large post | M or unmarked | Starter cable out | While cranking |
Small post | S | Key start wire | Key in START |
Small lug | I or ground | Ignition feed or ground | Varies by model |
3-Pole Starter Solenoid Wiring Diagram
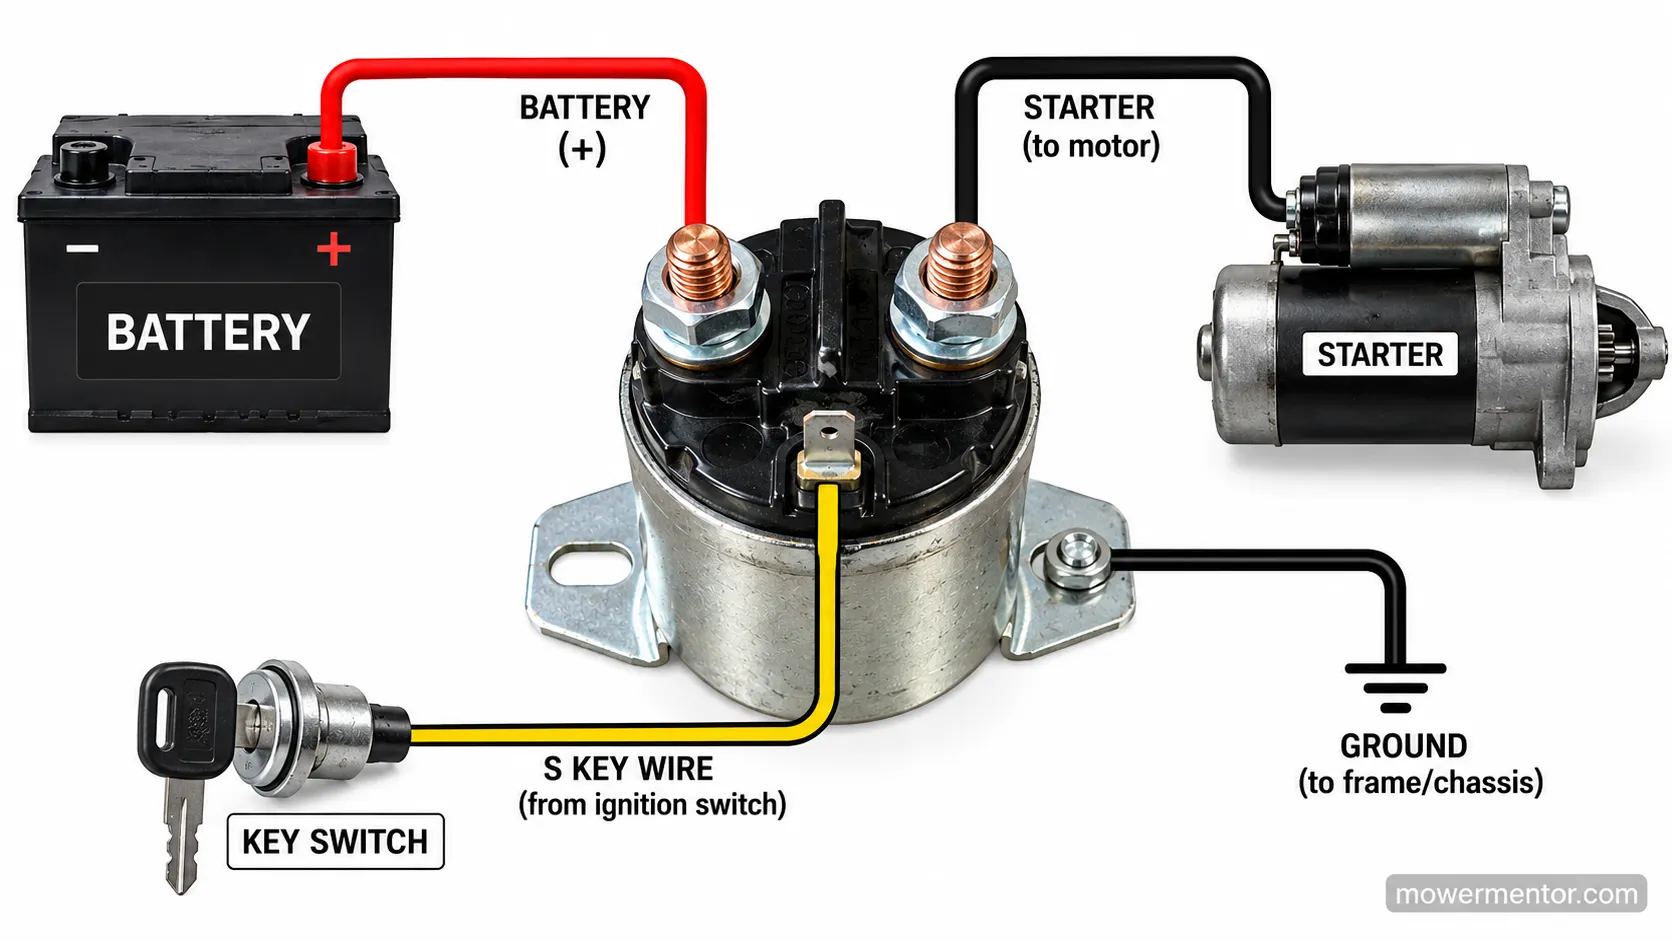
The 3-pole design is the most common mower solenoid, with two large posts and one small post, grounded through its metal mounting base.
DB Electrical's starter guide confirms the flow: turning the key sends power through the solenoid to the starter motor, which spins the flywheel until the engine catches.
To wire this 3-pole starter solenoid, land the battery cable on one large post, the starter cable on the other, the thin key wire on the small post, and let the bolted-down base handle ground.
Follow this order and a standard 3-lug unit wires in under five minutes:
Disconnect the battery negative before touching anything.
Bolt the solenoid to clean, bare metal so the base grounds.
Attach the heavy battery cable to one large post.
Attach the starter cable to the other large post.
Push the thin key wire onto the small post.
One detail trips people up. On many riders an extra small red wire also lands on the battery large post, and on the bench that wire fed the key switch and dash rather than the starter.
This solenoid is only one slice of a larger loop, so if you want the full picture, it is worth reading the whole starting circuit end to end.
Before you blame the wiring for a no-crank, it is worth confirming the solenoid itself is good first, since a dead coil looks identical to a bad wire.
A well-known no-crank walkthrough at LawnMowerFixed notes that the solenoid keeps battery and starter joined only while the key is held.
Watch this: If the mounting bracket is painted or rusty, the case ground fails and the solenoid will not trigger even when every wire is correct.
Scrape the mount to bare metal.
If it still will not turn over once wired, step back and work the complete electrical diagnosis from the battery forward.
4-Pole (4-Post) Starter Solenoid Wiring Diagram
The 4-pole (4-post) style adds a dedicated ground lug so the solenoid no longer depends on a grounded mount.
Community testing collected in MyTractorForum's solenoid thread shows that a 4-lug solenoid can be bolted to plastic or painted metal and still work, because the fourth lug carries its own ground.
To wire this 4-post starter solenoid, keep the two large posts for battery and starter, use one small lug for the key trigger, and run the fourth lug to a clean frame ground.
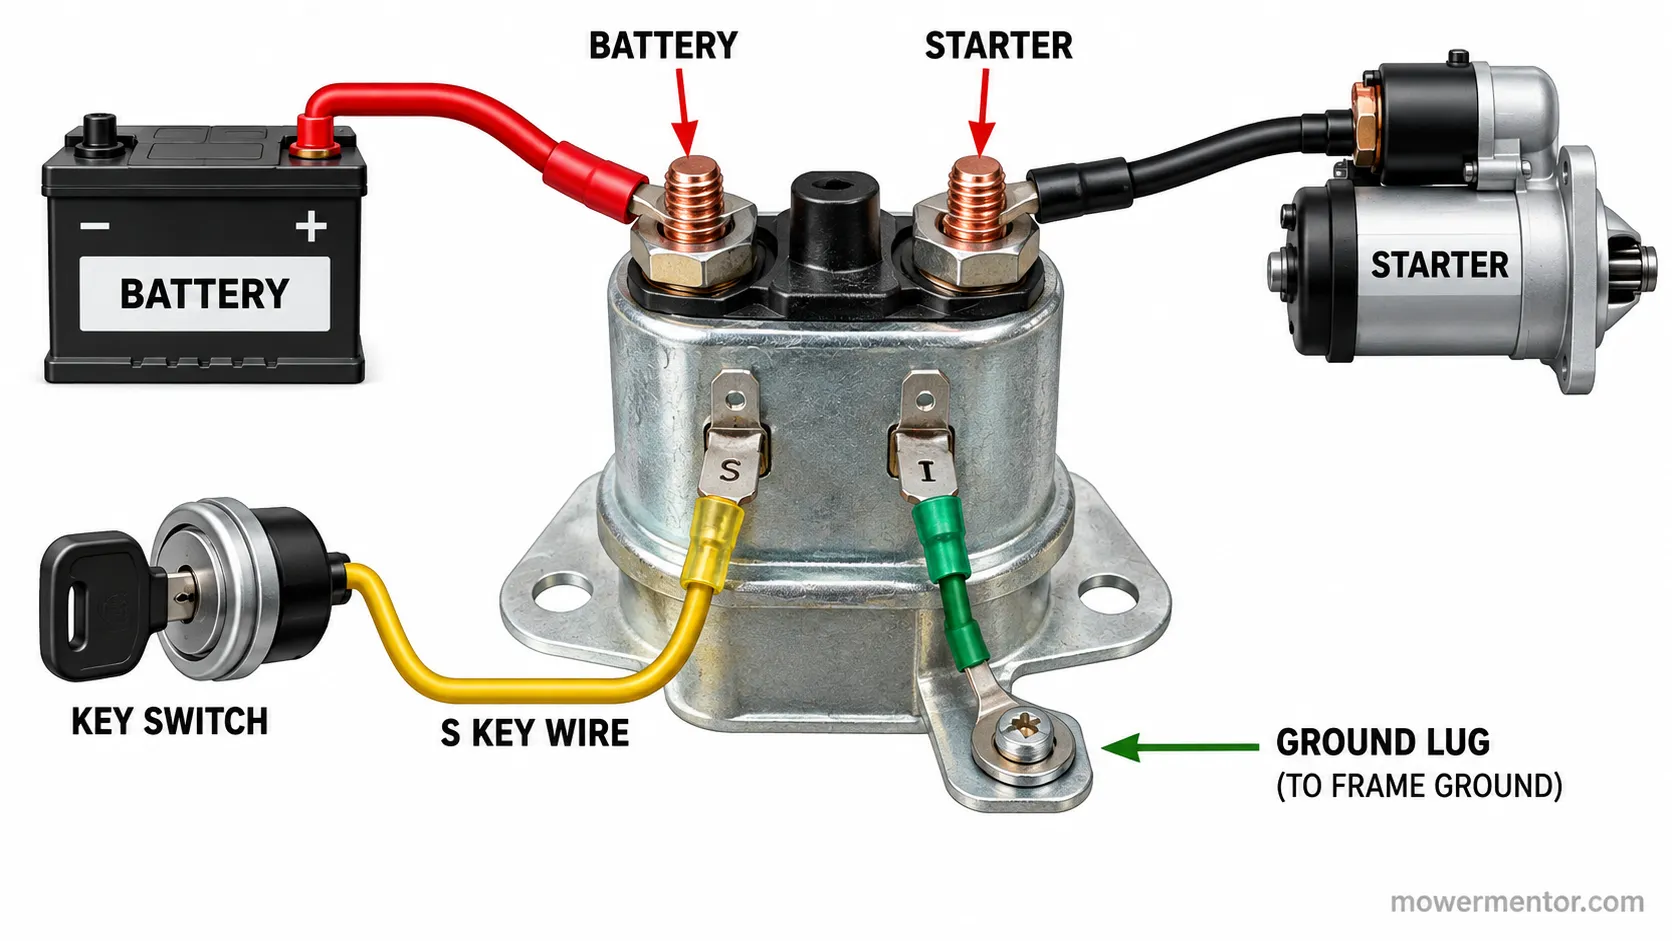
Wire the 4-post version in this order:
Battery cable to one large post.
Starter cable to the other large post.
Key trigger wire to one small lug.
A short ground wire from the fourth lug to clean frame metal.
I mounted this 4-post unit to a plastic panel and it would not trigger at all until I ran that fourth lug to frame ground.
The moment the ground wire went on, it cranked. A LawnSite rewiring thread documents the same rule: ground the unused small lug, and either small lug can take the key wire.
Watch this: Skipping the fourth-lug ground on a plastic mount produces a silent no-click that looks exactly like a failed part.
It is the single most common miswire on 4-post swaps.
If the coil clicks but the motor never spins, the next check is how to test the starter motor rather than the wiring.
Craftsman riders often use this 4-post style tucked under the fender, and the Craftsman solenoid specifics cover its exact bracket.
Cub Cadet XT and ZT decks route the ground lug the same way, detailed in Cub Cadet solenoid wiring.
Which Wire Goes Where on the Solenoid?
Which wire goes where is the question that sends most owners searching, and the answer is fixed for standard units.
The two large posts are interchangeable, so either can take the battery cable, a point the CarParts.com wiring guide makes for the B and M terminals.
The small post takes the key trigger wire and nothing else, and on a 4-post the second small lug is almost always ground.
Match those roles and the wiring is correct, regardless of brand or color code.
To settle the myths, I swapped the two large-post cables and the mower cranked identically both ways.
Then I moved the small trigger wire onto the ground lug and it died instantly, which is the whole point of the table below.
Post | Wire that belongs here | How to recognize it | Does order matter? |
|---|---|---|---|
Large post A | Battery positive cable | Thickest wire, often red, may share a small feed wire | No, either large post works |
Large post B | Starter cable | Thick wire running to the starter motor | No, either large post works |
Small post (S) | Key start wire | Thin wire from the ignition switch | Yes, this post only |
Small lug (I or ground) | Ground, or ignition feed on some models | Thin wire to frame, sometimes a large-eye ring terminal | Yes, do not put the key wire here |
A quick identification tip saves grief. The thin wire with a large-eye ring terminal is usually the small red ignition feed, and it belongs on the battery large post, not the trigger post.
Once you know the map, swapping the part itself is quick, and replacing the solenoid step by step walks the removal.
If it clicks once and stops after you rewire, read what a single click means before pulling anything apart.
To crank without the key while you check your work, you can jump the two big posts, covered in jumping the solenoid safely.
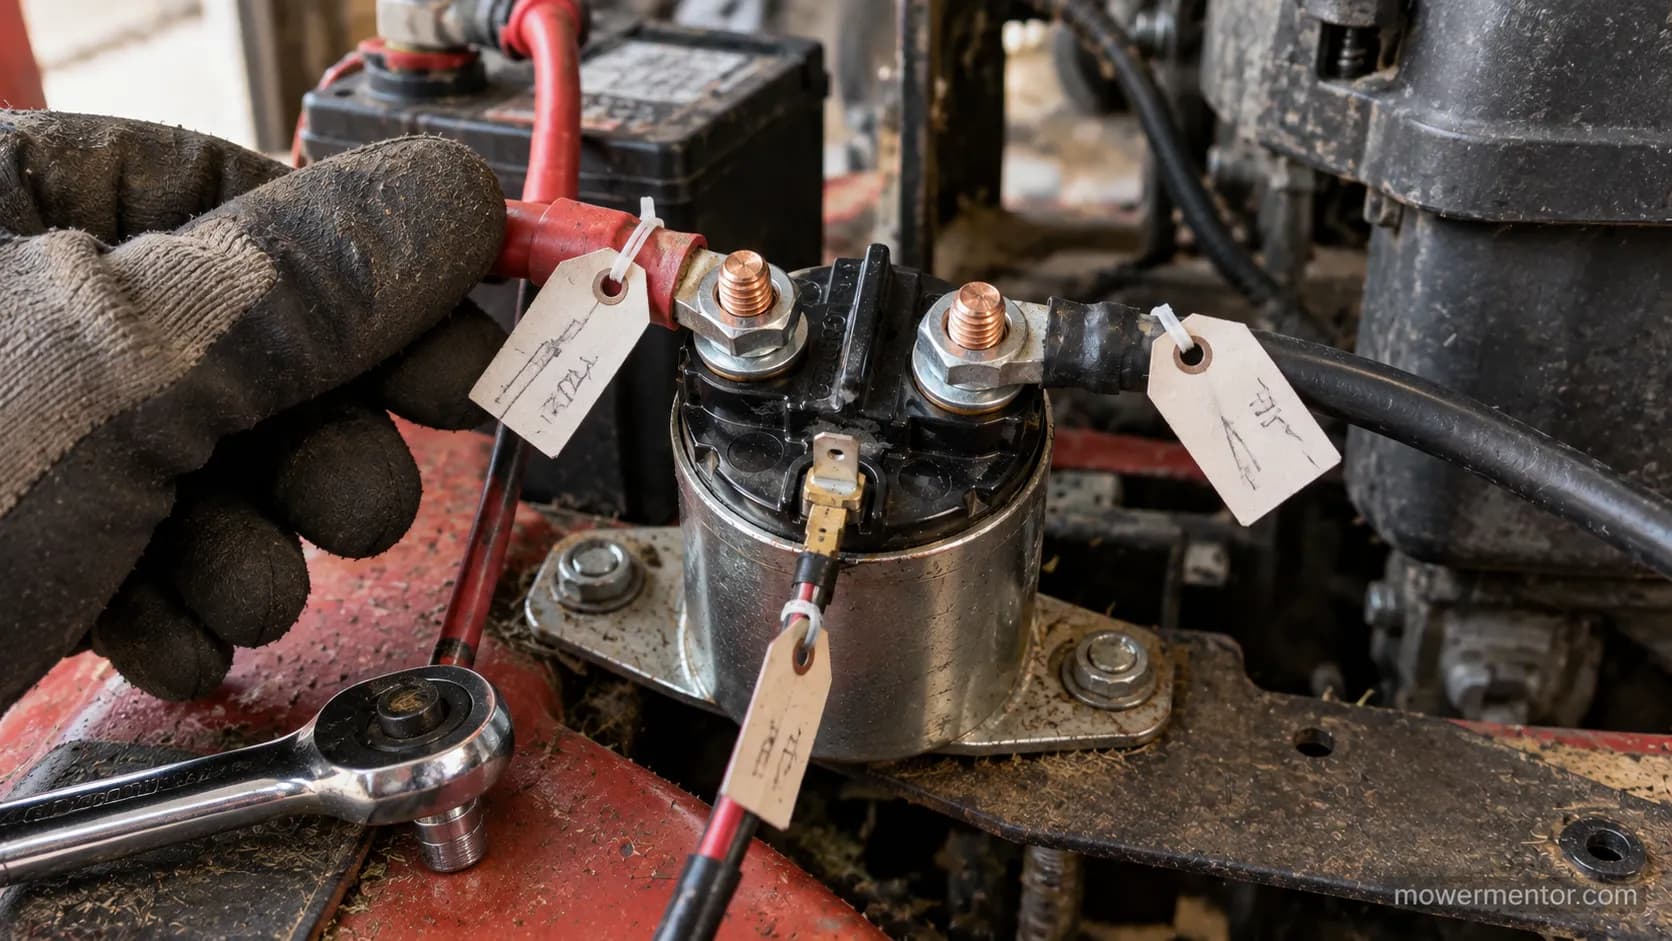
Watch this: On a 4-post solenoid, the second small lug is usually ground.
Putting the key wire there instead of the true S post is a frequent, frustrating miswire.
3-Pole vs 4-Pole: Which One Do You Have (and Does It Matter)?
A 3-pole and a 4-pole lawn mower starter solenoid are usually interchangeable, as long as you ground the 4-post's extra lug.
The MyTractorForum testing referenced earlier shows a 4-lug unit can stand in for a 3-lug because it grounds through its own lug instead of the mount.
Count the small terminals to tell them apart: one small lug means a 3-pole that grounds through its base, while two small lugs mean a 4-pole with a dedicated ground.
For most repairs, a universal 4-post is the safer replacement because it works on any mount.
I dropped a universal 4-post in place of a failed 3-pole on a riding mower, grounded the fourth lug, and it cranked first try.
Feature | 3-pole | 4-pole (4-post) |
|---|---|---|
Small lugs | One | Two |
Ground path | Through the metal mount | Through a dedicated lug |
Typical mount | Bare metal bracket | Any surface, including plastic |
Stands in for the other? | Only on a grounded mount | Yes, ground the extra lug |
Watch this: Match the amperage and stud thread size when you buy a universal.
Not every replacement fits every stud, even when the terminal layout looks right.
Brand location and style vary, so it pays to check yours before buying. Murray riders often ship with the 3-pole style plus the Murray solenoid cross-reference for a Briggs equivalent.
John Deere units differ by deck, so confirm the terminal count first, and testing a John Deere solenoid shows where it hides.
Husqvarna placement changes by model too, mapped in the Husqvarna solenoid location.
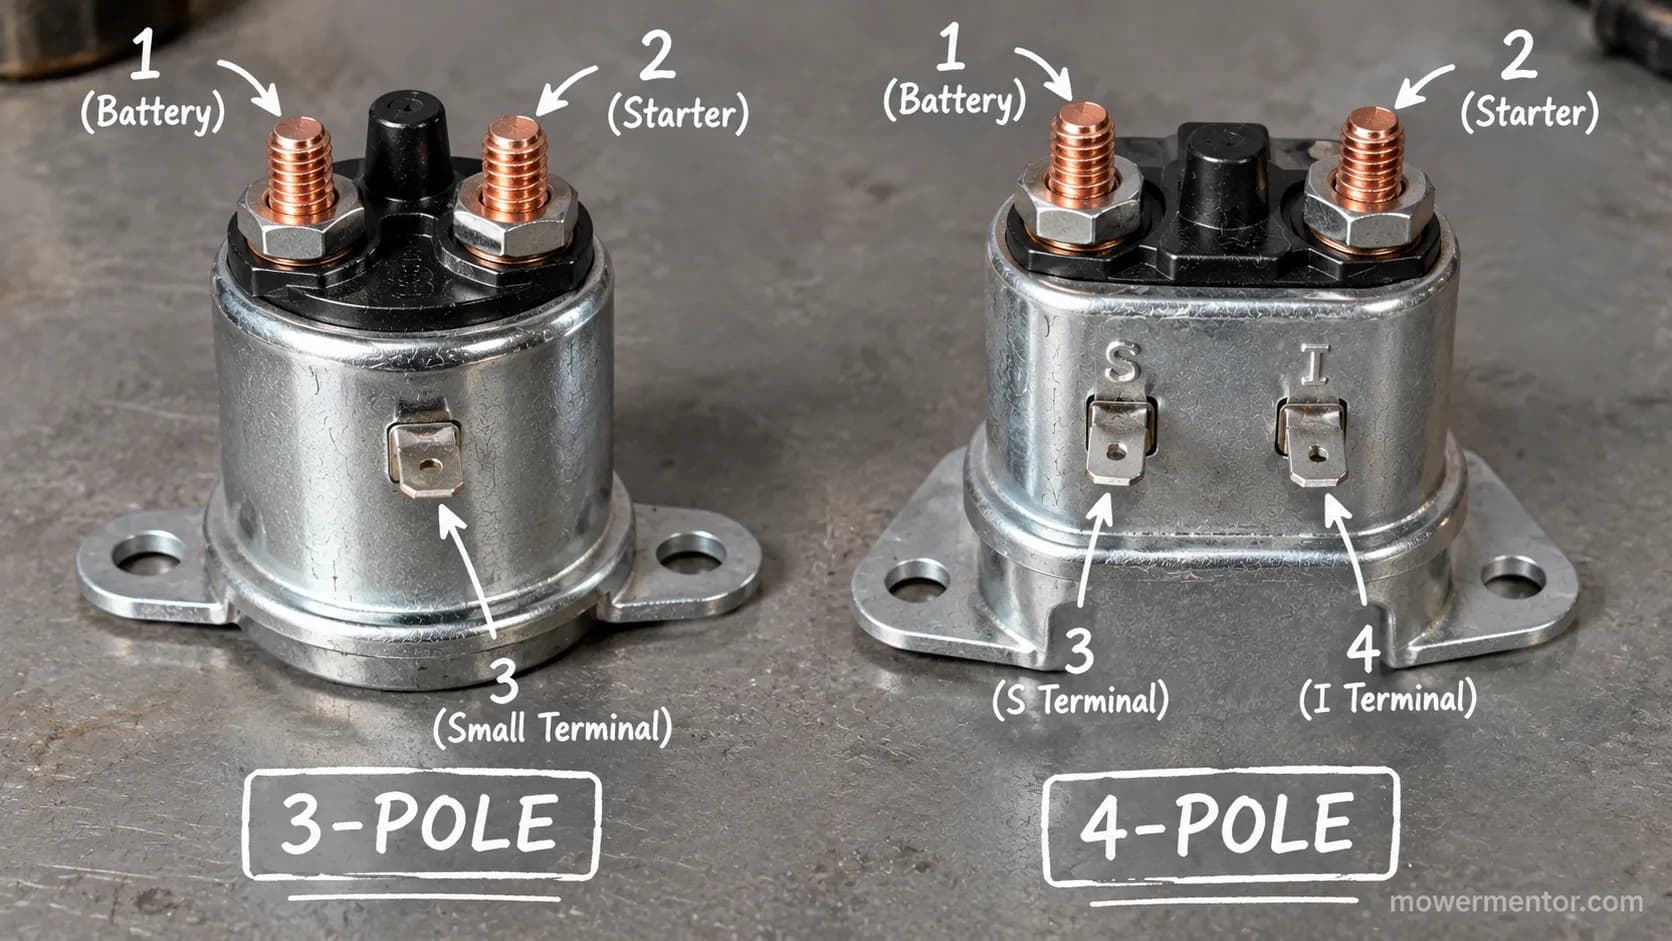
Wiring Mistakes to Avoid, and How to Verify It's Right
Most no-crank complaints after a solenoid swap trace to a handful of wiring mistakes, not a bad part.
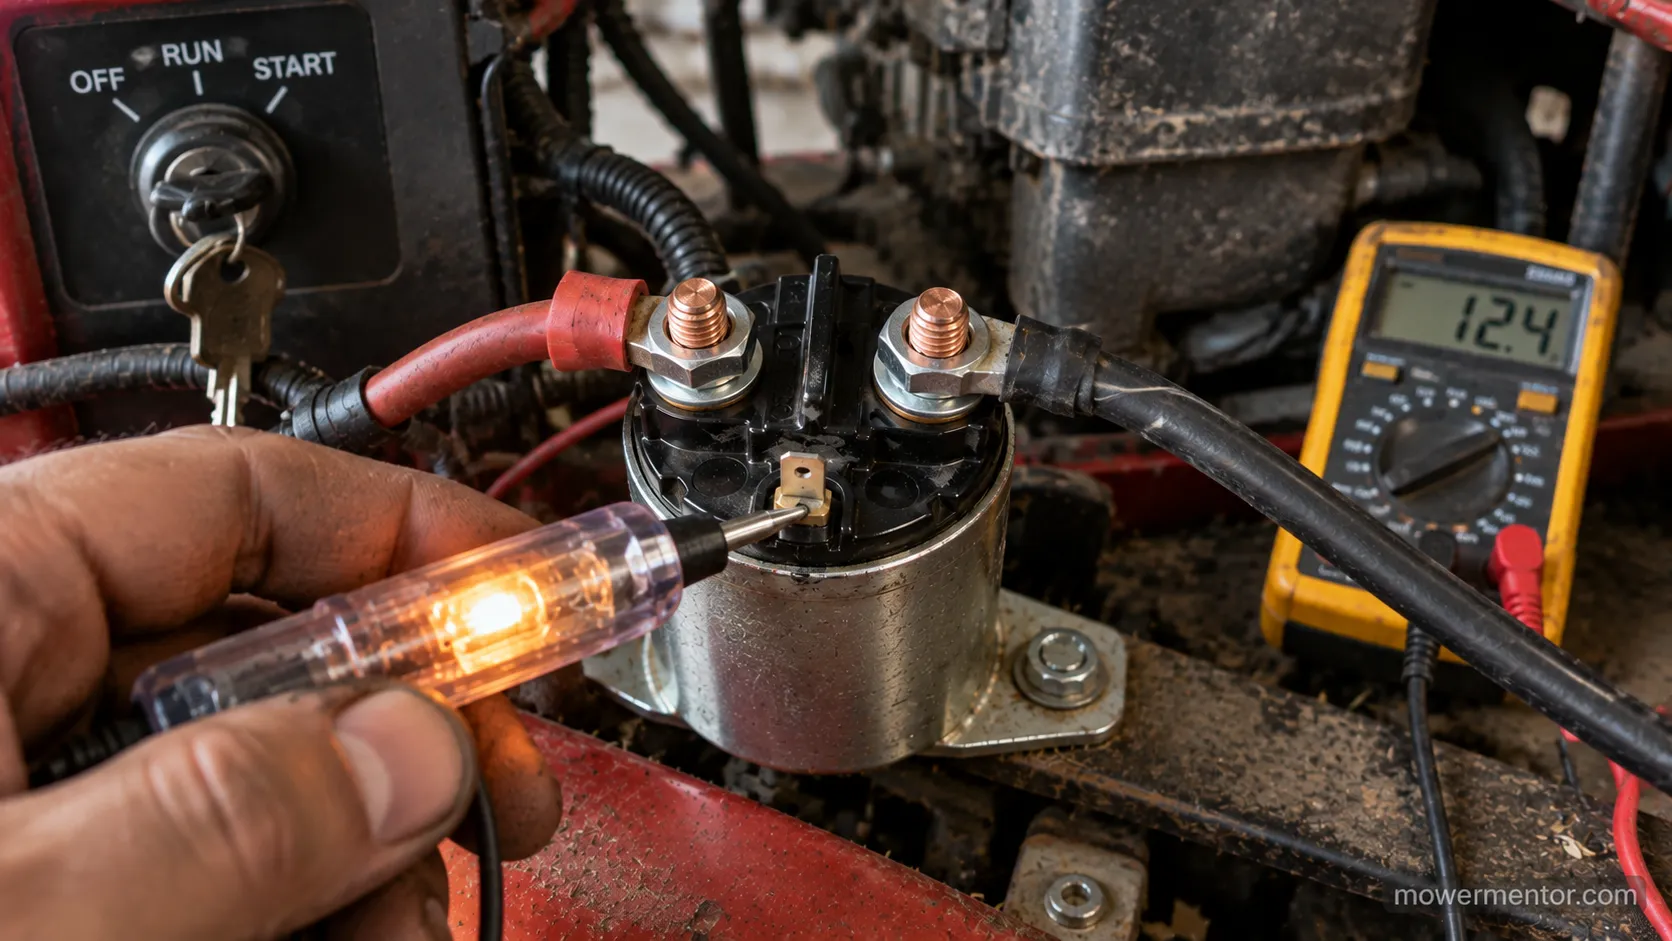
The fastest confirmation is voltage at the small trigger post: on the bench I measured 12.4 volts there with the key in START and 0 volts at rest, and that swing is your proof the trigger circuit is alive.
A grounded or misplaced trigger wire, a floating fourth lug, or a painted mount will each produce a dead click while every cable looks connected.
Check for these common miswires first:
Key trigger wire pushed onto the ground lug instead of the S post.
Fourth lug left ungrounded on a plastic or painted mount.
Solenoid bolted to a rusty bracket, so the case never grounds.
Battery and starter cables loose or corroded at the large posts.
Then verify the wiring in three quick steps:
Set a meter or test light on the small trigger post.
Turn the key to START and confirm roughly 12 volts appears.
Release the key and confirm it drops back to zero.
A Kohler solenoid test guide recommends checking the battery-side terminal for 10 to 14 volts before blaming the wiring at all, which rules out a weak battery masquerading as a miswire.
Watch this: A weak battery mimics a wiring fault. If it clicks but will not crank, load-test the battery before you tear the wiring apart again.
If the starter itself tests bad after all this, it comes out next, and replacing the starter motor is the follow-on job.
A correctly wired mower still needs the rest of its seasonal care to start reliably, so pair this fix with a full seasonal tune-up each spring.
Toro riders in particular have a model-specific service rhythm worth following, laid out in a Toro rider's annual service.
Download the Printable Wiring Diagram (Free PDF)
This free PDF packages both the 3-pole and 4-pole starter solenoid diagrams plus the which-wire-where table on one printable sheet, sized to tape inside your mower hood.
It is the exact reference I wired from on the bench for this guide, exported at print scale so the labels stay legible on paper.
Print it at 100 percent scale, then tape it inside the hood or pin it to the shed wall so it is there the next time a wire comes loose.
Watch this: The sheet covers standard 3-pole and 4-pole units. Odd factory harnesses with extra safety-switch feeds can differ, so verify against your own part.
Battery-powered riders skip the solenoid entirely but still need their own upkeep, covered in caring for an electric mower.
Frequently Asked Questions
Does it matter which large post connects to the battery?
No. The two large posts are electrically symmetric, so the battery cable and the starter cable can go on either one. In my swap test the mower cranked identically both ways. The only post with a fixed role is the small trigger post, which must take the key wire.
Can I use a 4-post solenoid to replace a 3-pole one?
Usually yes. A 4-post solenoid grounds through its own fourth lug, so it works on any mount as long as you run that lug to clean frame metal. Keep the two large posts for battery and starter, and use one small lug for the key wire. Match the amperage and stud size when you buy.
Why does my mower still click after I rewired the solenoid?
A click with correct wiring usually means the coil is not fully grounded or the battery is weak. Check that the mount or fourth lug reaches bare metal, then load-test the battery. If both are fine, the click points to the starter motor rather than the solenoid wiring.
Where does the small red wire go?
The thin red wire with a large-eye ring terminal is normally the ignition feed, and it lands on the battery large post, not the trigger post. It powers the key switch and dash. Putting it on the small trigger post is a frequent miswire that leaves the mower dead.
Do all brands wire the same starter solenoid?
For standard 3-pole and 4-pole units, yes. Craftsman, Cub Cadet, Murray, John Deere and Husqvarna all follow the same battery, starter, trigger and ground layout. The same seasonal habits that keep tuning up a Honda mower reliable apply to your rider's electrics too.
My solenoid is wired right but the mower is still slow to start. What else matters?
Wiring is only half the starting system. A tired battery, dirty filter or stale fuel will all drag on cranking even with perfect connections. While you are doing seasonal care, the right filter part matters, and finding the right air filter keeps airflow where it should be.
Keep the Diagram Within Reach
A lawn mower starter solenoid wiring diagram looks intimidating until you see that it is only ever four connections.
Battery to one large post, starter to the other, the key wire to the small trigger post, and the base or fourth lug to ground.
Large-post order never matters, the trigger post always does, and the fourth lug earns its keep on plastic or painted mounts.
That is the belief worth carrying away from this guide.
You do not need your exact model's factory schematic to wire a mower solenoid correctly, because the part itself only allows those four connections no matter whose name is on the mower.
The fastest way to prove your work is the trigger post: a healthy circuit swings to roughly 12 volts in START and back to zero at rest.
If it does, you wired it right. Print the sheet, tape it inside the hood, and the next time a cable slips off you will fix it in minutes instead of guessing.
Keep this map close, and a loose solenoid wire stops being a lost afternoon.
Found this useful? Make us a preferred source so we show up in your Google results.
Keep reading
Related articles
Troubleshooting & Repair
Dead Dash? Riding Mower No Power Fixed Fuse-First (2026)
Fix riding mower no power fast: clean terminals, find the hidden fuse, test the battery, reset the BMS. A fuse-first checklist for gas & electric mowers.
Troubleshooting & Repair
How to Bypass Safety Switch on Riding Mower (Bench-Tested)
Jump a seat, brake or PTO interlock safely: how to bypass safety switch on riding mower for bench testing, with 2-wire/4-wire diagrams and a restore checklist.
Troubleshooting & Repair
Riding Lawn Mower Won't Turn Over: 5-Stage Voltage Test
Fix it fast: a riding lawn mower won't turn over usually means battery, ground, solenoid or starter. Test each in 5 ordered stages.
Troubleshooting & Repair
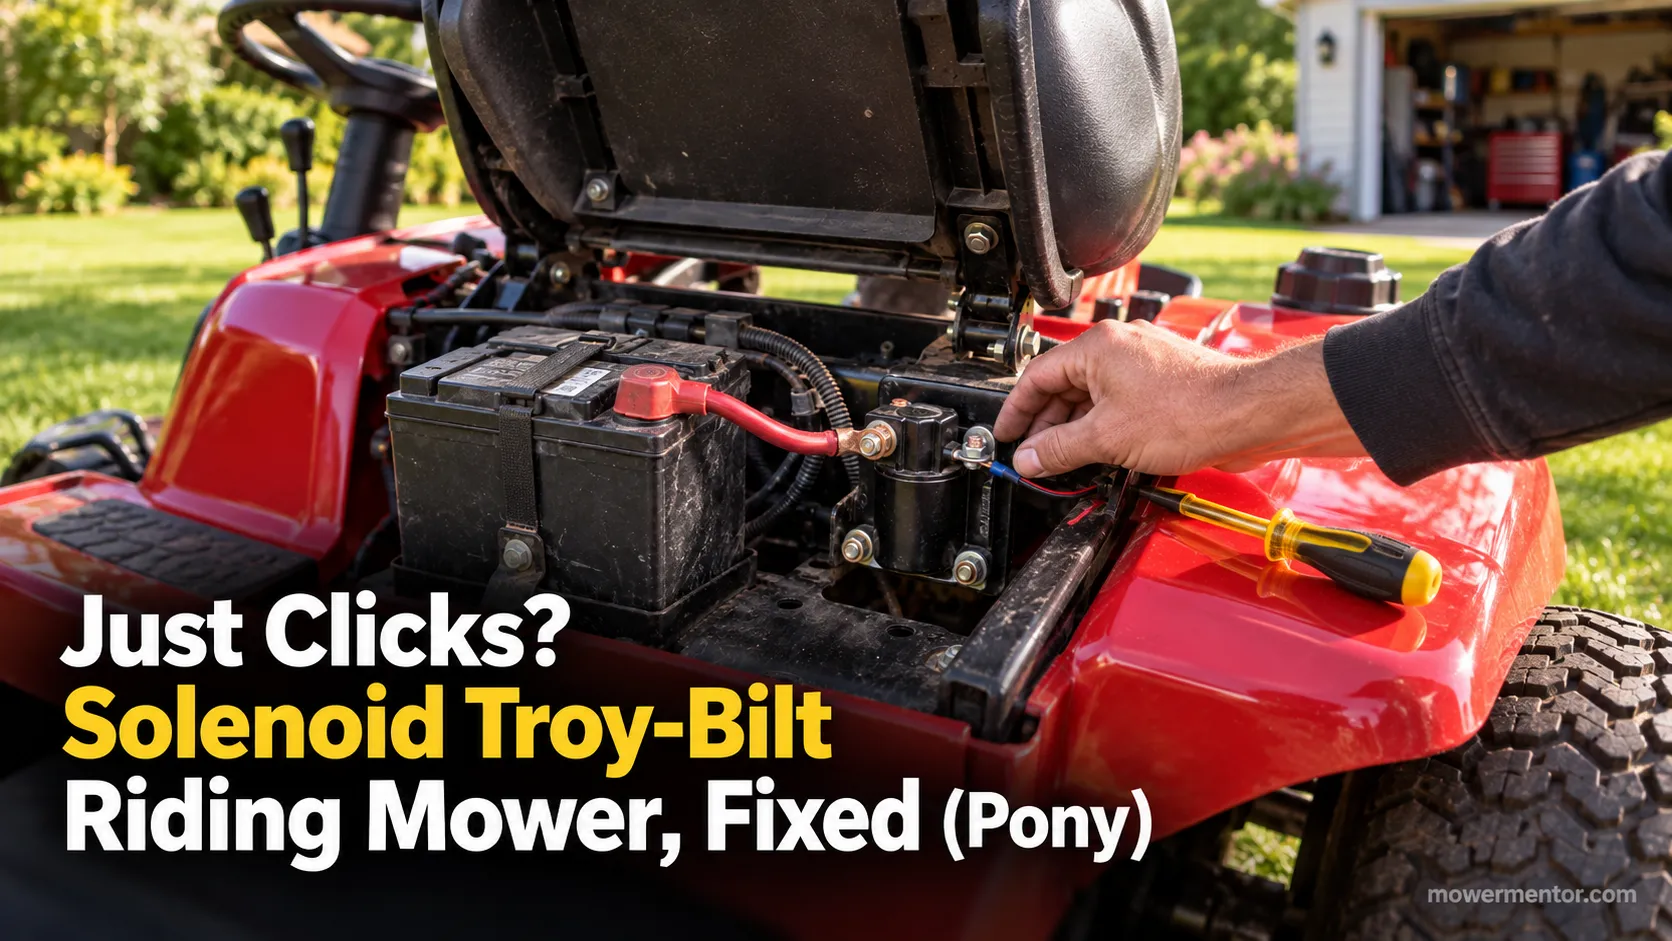
Just Clicks? Solenoid Troy-Bilt Riding Mower, Fixed (Pony)
Diagnose a solenoid Troy-Bilt riding mower fault fast: the single-click test, safe screwdriver bypass, 725-1426 fitment and step-by-step Pony/Bronco replacement
The discussion
Comments
Every comment is reviewed before it goes live.