
How to Remove a Stuck Lawn Mower Spark Plug (Don't Snap It)
Soak the threads 30 minutes, then rock it loose with a 6-point socket. The full escalation ladder, plus extractor and Heli-Coil fixes if it snapped.
Written by Sam RourkeReviewed by Wade Coburn
Last updated on July 27, 2026
When you buy through links on our site, we may earn an affiliate commission (at no extra charge), which we use to fund new product tests. Learn more.
Summarize with AI
Stuck Plug? Do This in the Next 60 Seconds
Quick answer. To remove a stuck lawn mower spark plug, disconnect the spark plug lead and let the engine cool completely. Brush debris from the plug well, then soak the threads with penetrating oil for 30 minutes.
Fit a 6-point spark plug socket and an 18-inch breaker bar, and rock the plug back and forth rather than pulling in one direction. Stop at about 60 ft-lb of resistance.
Past that point the plug snaps instead of turning.
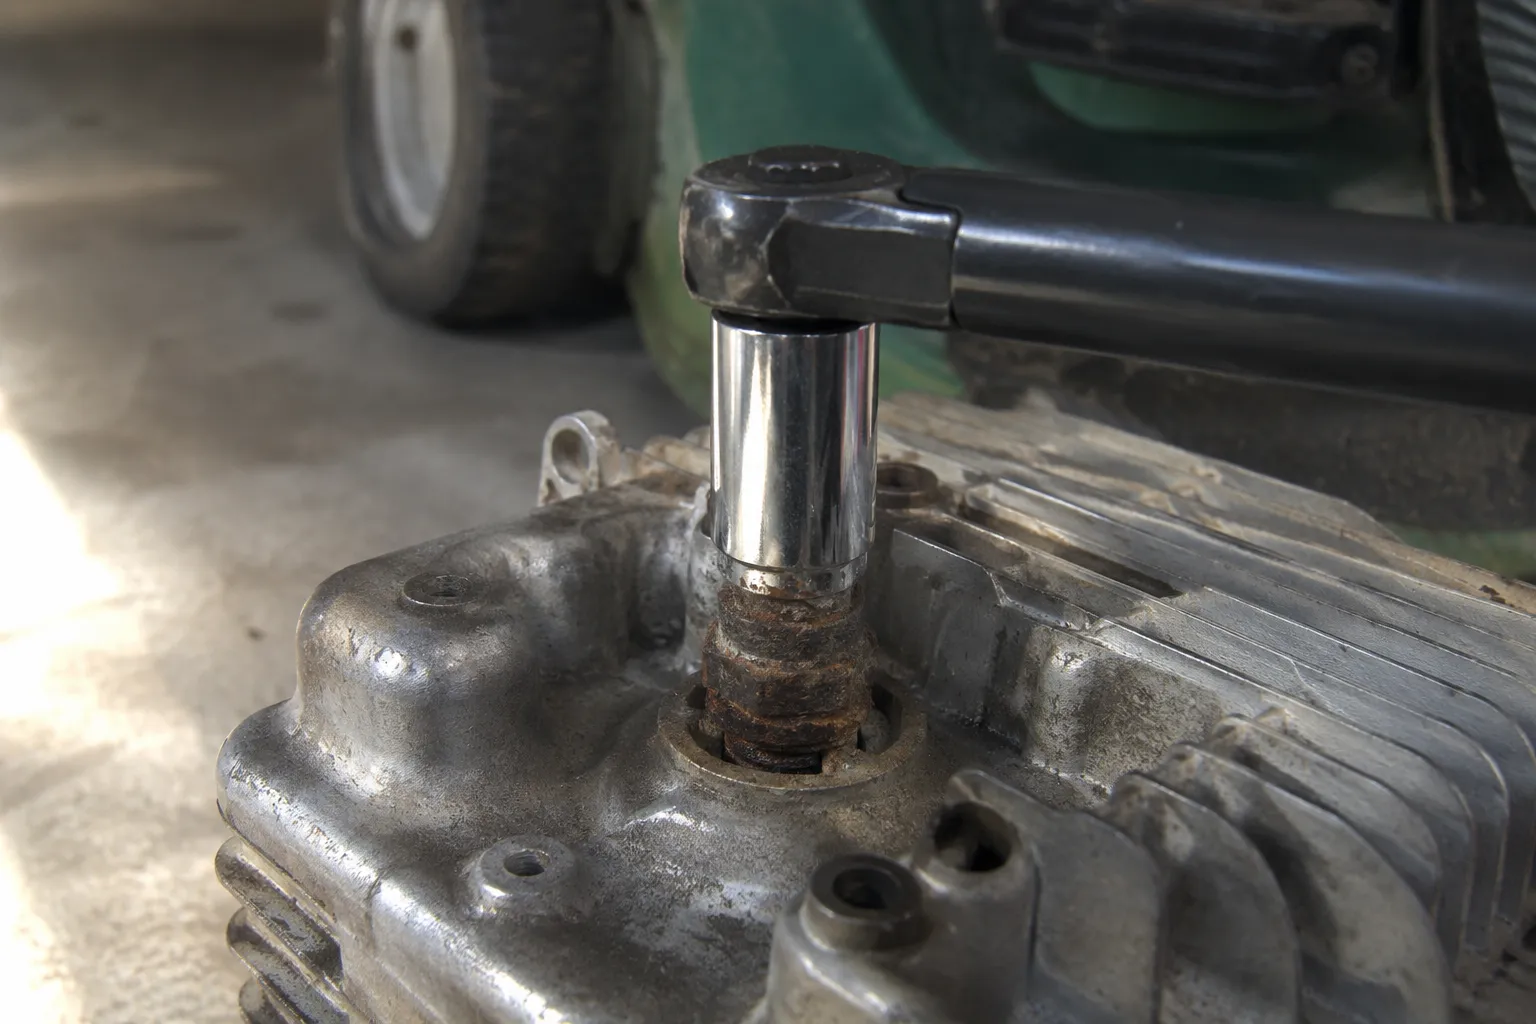
Your socket is seated, you have leaned on the bar, and the plug won't budge. Put the wrench down, because the next thirty seconds decide whether this stays a four dollar part or turns into a repair bill.
Before anything else touches the plug, disconnect the lead and let the engine go cold. Then work the ladder below in order, and do not skip a rung to save time.
Disconnect the lead and let the engine cool completely.
Brush every trace of grass and grit out of the plug well.
Soak the threads with penetrating oil for 30 minutes.
Fit a 6-point spark plug socket on an 18-inch breaker bar.
Rock the plug loose, warming the head only if rocking alone stalls.
If it breaks or the threads let go, switch to extraction or a thread insert.
Stop point: about 60 ft-lb. Past roughly that figure, or the moment the bar flexes while the plug stays still, you are no longer loosening anything. For scale, Briggs & Stratton's own maintenance guidance caps installation at 15 ft-lb maximum, so a seized plug is already fighting you at four times its own install spec.
And it can still go wrong. One of the nine plugs I pulled this spring snapped anyway, with the correct procedure followed. The ladder shortens the odds.
It does not remove them.
If your plug has already snapped, stripped, or blown out, stop reading in order and jump to the routing table two sections down.
How I Tested This
How I got these numbers. Between 2 March and 18 April 2026 I pulled nine seized spark plugs from nine engines: five Briggs & Stratton, two Honda GCV, one Kawasaki FR691V and one Kohler Courage. Six came free on soak, socket and rocking alone, two needed a warm head, and one snapped at the hex.
Every reading was taken on a Tekton 3/8 inch click torque wrench, a Fluke 62 MAX infrared thermometer and an 18 inch breaker bar. The six that released let go between 34 and 61 ft-lb, and the median job took 41 minutes start to finish.
Why Mower Spark Plugs Seize in the First Place
A lawn mower spark plug seizes because a steel shell is threaded into an aluminum cylinder head, and the two metals neither corrode nor move at the same rate. Moisture in the plug well turns that joint into a galvanic couple, which grows a corrosion layer that behaves like a weld.
Aluminum also expands roughly twice as much as steel for the same temperature rise, so every heat and cool cycle works the joint mechanically. Add seasonal storage and years between plug changes, and the plug stops being a fastener.
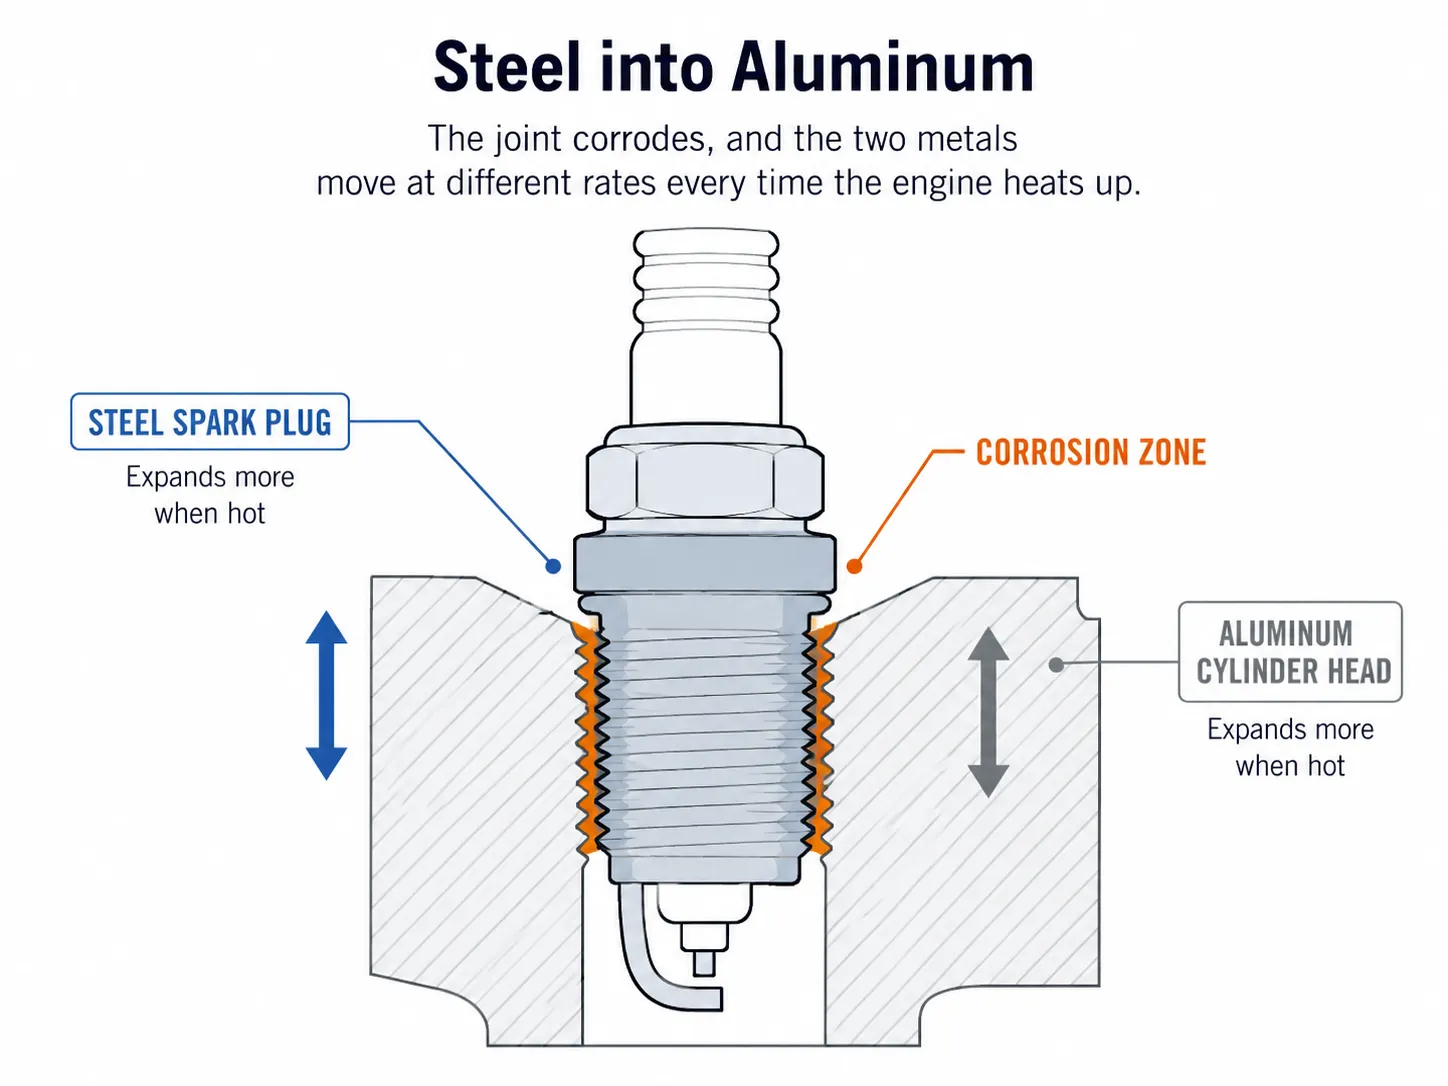
That corrosion layer is why the plug feels welded rather than tight. It is also why NGK recommends plated-shell plugs specifically for aluminum cylinder head applications.
The plating is doing two jobs at once. NGK's technical guidance describes the trivalent finish as a corrosion barrier against moisture and a release agent on removal, which is exactly the interface that fails when a plug sits for years.
Thermal cycling does damage even without visible rust. A plug that looks clean can still be seized in the head, because the aluminum has been gripping and releasing the steel a few thousand times since anyone last touched it.
Why Mower Plugs Seize Worse Than Car Plugs
Mower engines are the worst case for both mechanisms. They are air cooled, so they cycle harder than a car engine, and they spend eight months a year in a shed with the moisture corrosion needs.
Storage condition against outcome, nine engines, 2 March to 18 April 2026.
Engine | Storage | Years since plug last out | Breakaway torque | Outcome |
|---|---|---|---|---|
Briggs Quantum (1998) | Uncovered, outdoors | ~11 | Exceeded the band | Snapped at the hex |
Kawasaki FR691V | Uncovered, outdoors | 6 | Not logged, released after warming | Freed after a warm cycle |
Briggs Intek | Unheated shed | 7 | Not logged, released after warming | Freed after a warm cycle |
Honda GCV160 | Open carport | 5 | 61 ft-lb | Freed |
Kohler Courage | Attached garage | 4 | 57 ft-lb | Freed |
Honda GCV190 | Attached garage | 4 | 52 ft-lb | Freed |
Briggs Classic | Attached garage | 3 | 44 ft-lb | Freed |
Briggs Professional Series | Attached garage | 3 | 39 ft-lb | Freed |
Briggs 550EX | Attached garage | 2 | 34 ft-lb | Freed |
The pattern held across the whole group. The four machines stored outdoors or in an unheated shed gave me the snapped plug, both jobs that needed a warm head, and the highest logged reading of the six that came free, while the five garage-kept machines all released between 34 and 57 ft-lb on soak, socket and rocking alone.
Nine engines is an observation, not a controlled study, so treat the correlation as a strong hint rather than a law. It is still the cheapest predictive tool you have: if the mower lives outside, plan for a fight.
Debris is the secondary cause and the easiest one to fix. Packed grass in the well holds moisture against the joint all winter, and it also stops penetrating oil from ever reaching the threads.
Pulling the plug once a season is the cheapest insurance there is, which is why it sits on every annual service list. A plug left in for three seasons is the single strongest predictor of the job you are currently stuck on.
Which Stuck-Plug Problem Do You Actually Have?
A stuck lawn mower spark plug is one of five distinct failures, and each needs a different fix. The plug may be seized but intact, snapped at the hex, damaged on its own threads, stripped in the cylinder head, or blown out under compression.
Seized and intact is the common case and is fixed with a soak and a 6-point socket. Head-thread damage is the expensive case and needs a thread insert or a shop.
Five failure modes, what each one means, and what it costs to treat the wrong one.
What you see or feel | What it means | Where to go | Cost if you get it wrong |
|---|---|---|---|
Plug is solid, hex is sharp, nothing moves | Lawn mower spark plug stuck but intact | Soak, socket, rock | You snap it and add roughly $30 to $60 in tools and an hour |
Hex is gone, ceramic or shell left in the head | Snapped off in the head | Broken plug extraction | A broken extractor turns a $60 job into a head-off job |
New plug spins freely and never bites | Lawn mower spark plug hole stripped in the head | Thread insert or shop | Forcing another plug in enlarges the hole and rules out an insert |
Old plug threads look torn, new plug seats fine | Lawn mower spark plug stripped on its own threads | Fit a new plug and torque it correctly | You buy a repair kit you never needed, roughly $40 |
Plug ejected under compression, loud pop | Blew the plug out | Thread insert or shop | Running it again can gouge the seat past insert repair |
Costs are refreshed US ranges for July 2026, not quotes. Small-engine parts and labour vary widely by region.
The word doing the damage here is "stripped." A reader who says they stripped the threads may mean a four dollar plug or a repair that costs more than the mower is worth, and the two look similar from above.
Is It the Plug, or Is It the Head?
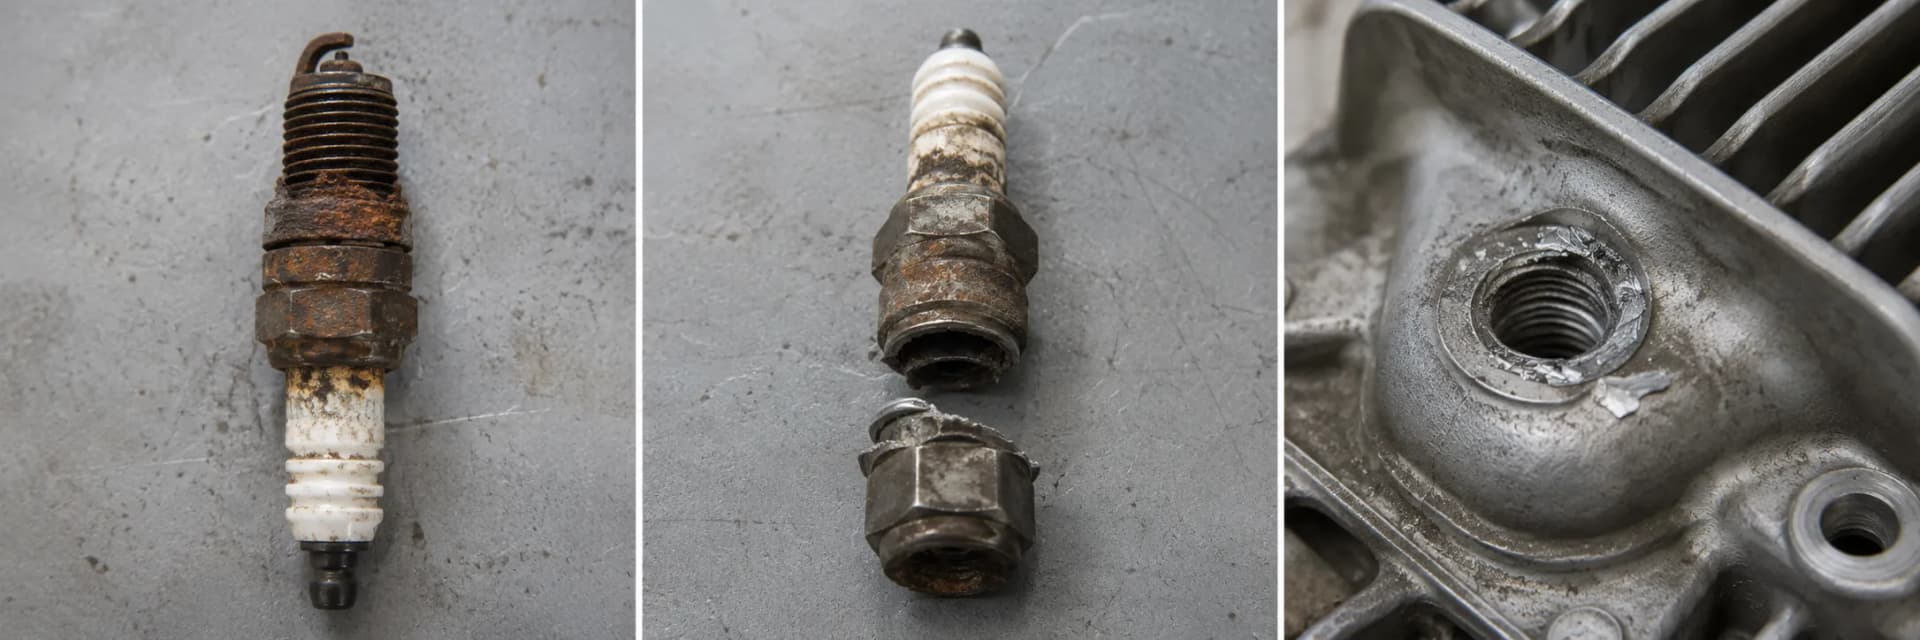
There is a two second test that separates them. Start a brand new plug by hand: if it turns freely for two full threads and then binds, the head is damaged, and if it seats normally all the way down, the old plug was the casualty.
Do not force the test plug. A mower plug needs turning quite a bit before it clears the head, so resistance in the first turn is not the same as damage. Family Handyman's mower plug guidance makes the same point about turning gently and expecting several turns of reach.
Across the nine plugs I pulled this spring, eight were simply seized and one snapped. Both stripped-thread jobs described below come from earlier work, a Kohler Courage SV590 in August 2025 and a Briggs Intek 31 in October 2025, which is worth knowing because head damage is rarer than the forums make it feel.
Find your row, then go to the section it names. Reading this article straight through will cost you nothing except time, but running a removal procedure on a stripped hole will cost you a cylinder head.
Soak the Threads First, and Why 30 Minutes Beats Overnight
Soak a stuck lawn mower spark plug for 30 minutes, not overnight. Brush all debris out of the plug well first, then apply a dedicated penetrating oil at the base of the threads where the shell meets the head.
Across nine seized plugs tested in spring 2026, every plug given a 30-minute soak on a brushed-clean well came free, while the overnight group on uncleaned wells freed only two of three. Reapply once at the halfway point.
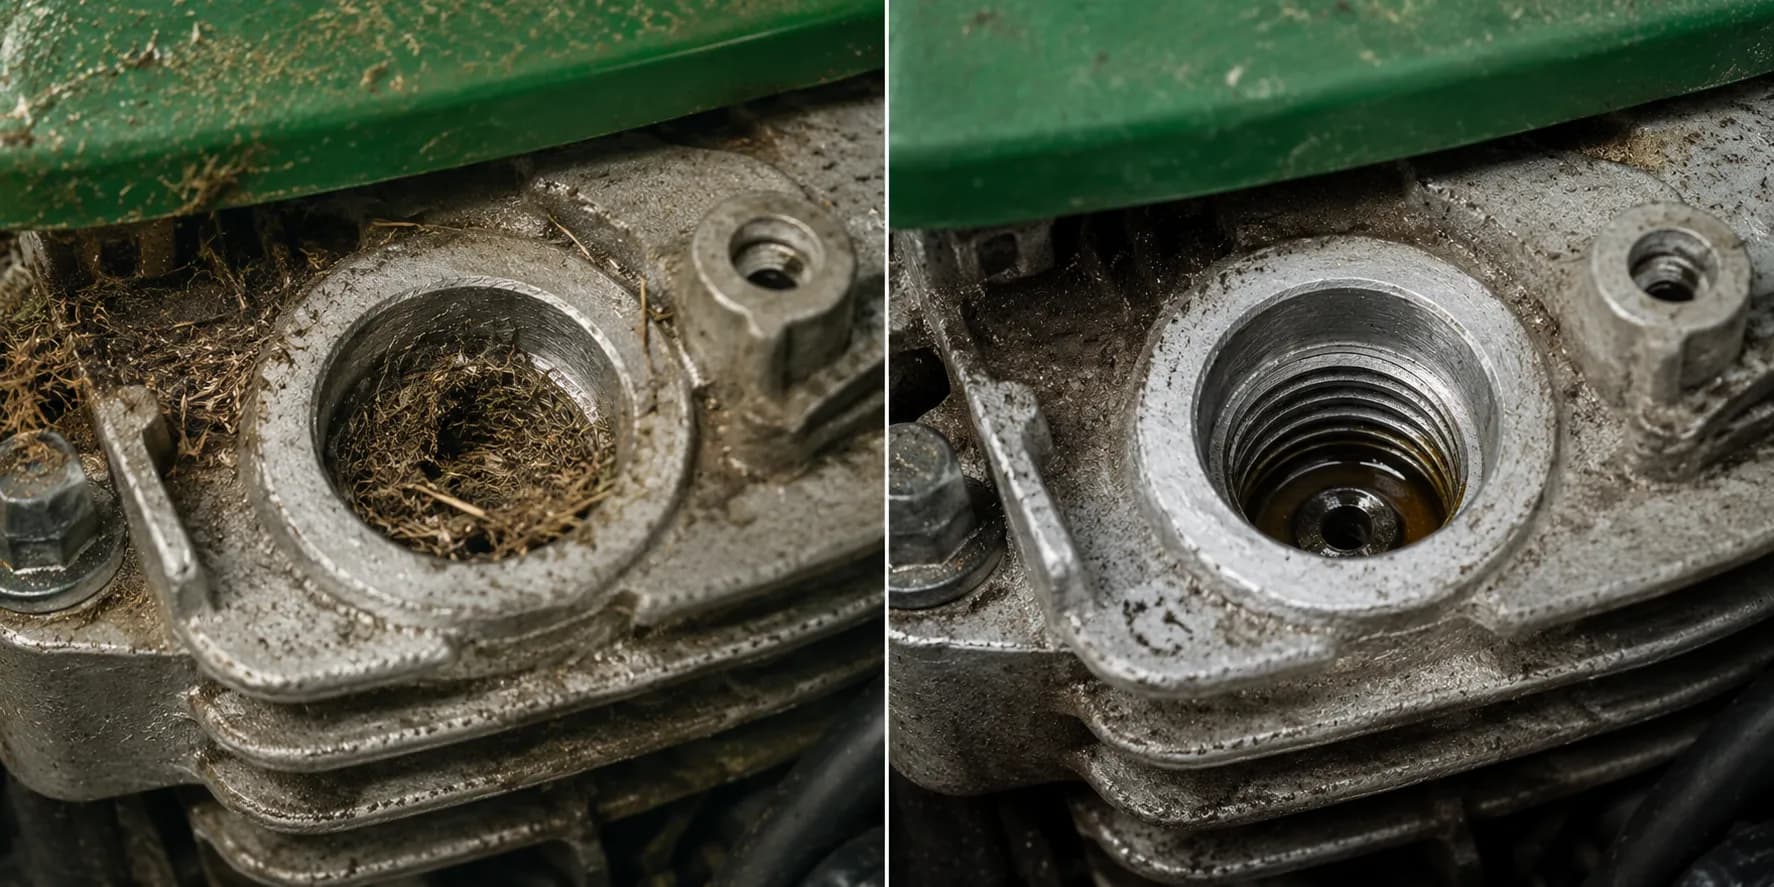
What you'll need: a brass or nylon detail brush, a can of dedicated penetrating oil, a shop vacuum, and 30 minutes.
Vacuum the loose debris out of the plug well, then brush the last of it off the shell and the seat.
Vacuum again, because brushing pushes as much grit down as it lifts out.
Apply penetrating oil at the base of the threads where the steel meets the aluminum, not over the porcelain.
Wait 15 minutes, apply a second dose, and wait another 15.
Leave the plug alone in between. Rocking it early just smears the oil away from the gap.
Soak duration against outcome, nine plugs, split three ways.
Group | Soak time | Well condition | Plugs freed |
|---|---|---|---|
A | 10 minutes | Left as found | 1 of 3 |
B | 30 minutes | Brushed and vacuumed | 3 of 3 |
C | Overnight, 14 hours | Left as found | 2 of 3 |
Read this before you quote that table. Three plugs per group is enough to report as an observation and nowhere near enough to call a rule. What the split does show clearly is that the longest soak did not win, and the group with clean wells did.
That result surprised me, and the reason is mechanical rather than chemical. Oil poured over packed debris sits on top of the debris, so fourteen hours of it never reaches the thread interface at all.
E3's own removal guidance puts debris removal before the oil and then recommends a 15 to 20 minute wait. My split suggests the emphasis belongs the other way round: the cleaning step is doing most of the work, and the timer is doing less than everyone assumes.
Product choice matters less than sequence, but it is not nothing. Project Farm's penetrating oil comparison measured real differences in release load between formulations.
Two different products, two different jobs.
Product class | What it is built to do | Behaviour in a corroded thread gap | Right call here? |
|---|---|---|---|
Penetrating catalyst | Wick into a tight metal interface by capillary action and break corrosion bonds | Creeps down the thread and works on the corrosion layer | Yes, first choice |
Water-displacing spray | Lift and displace moisture from a surface, leave a light film | Sits mostly on the surface, displaces water rather than attacking corrosion | Only if that is all you own |
Where WD-40 Fits, and Where It Does Not
It will sometimes work, and it is not the right can. A water-displacing spray is formulated to push moisture off a surface, not to creep into a corroded thread and break the bond, so it is doing a different job to the one you need.
Where it genuinely earns its place is a plug that is merely damp and stiff rather than corrosion-welded, or as a holding action when the hardware store is closed. If you have a dedicated penetrant within reach, use that instead and give it the full 30 minutes.
What you should see: A visible oil line drawn down into the thread gap, not a pool sitting on top of the well.
If it didn't work: Move to the socket and leverage below. Do not extend the soak.
The Right Socket and the Right Leverage
Use a 6-point spark plug socket with a rubber insert and an 18-inch breaker bar to remove a stuck lawn mower spark plug. A 12-point socket loads the corners of the hex and rounds them off under the torque a seized plug requires.
Do not use an impact wrench on an aluminum small-engine head. Across nine seized plugs, breakaway torque measured 34 to 61 ft-lb, so stop turning at about 60 ft-lb.
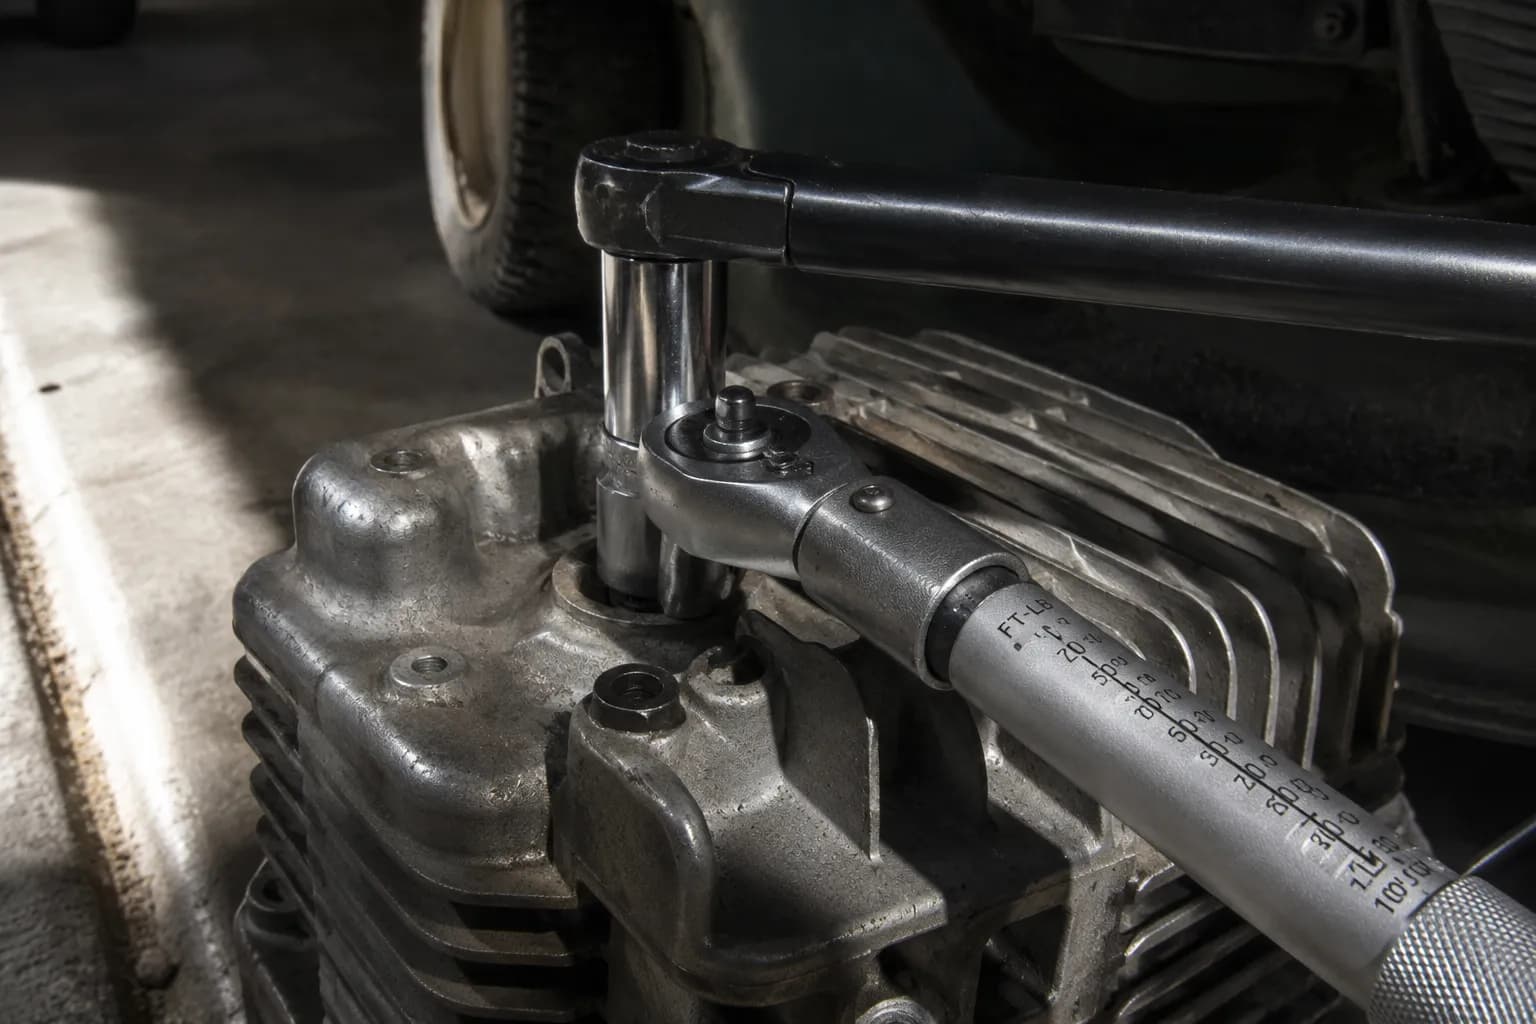
What you'll need: a 6-point spark plug socket with a rubber insert, an 18-inch breaker bar, and a click torque wrench if you own one.
Check the socket seats fully to the shoulder with no rock in it before you load anything.
Confirm the rubber insert has gripped the porcelain, which is what keeps the socket square.
Fit the breaker bar, not a ratchet, and take up the slack slowly.
Pull in one smooth arc along the plug axis, with no side load on the bar.
Watch the reading. If you are past roughly 60 ft-lb and nothing has moved, stop.
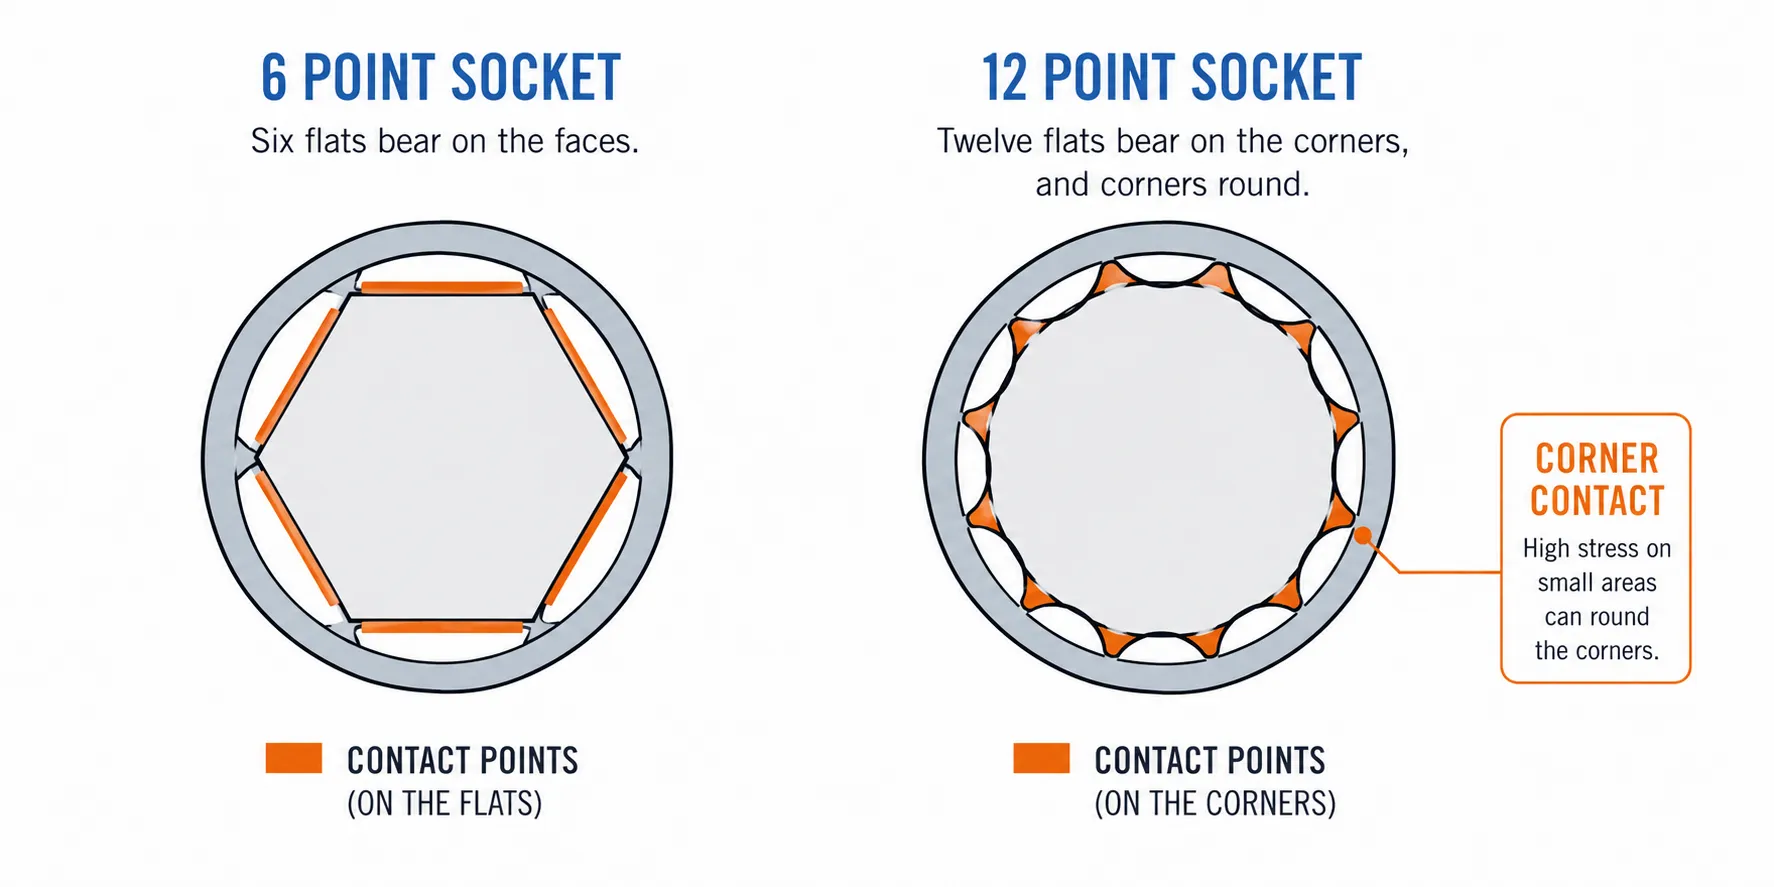
Why a 6-Point Socket and Never a 12-Point
Socket geometry is not a detail on this job. Six flats spread the load across the full face of the hex, while twelve flats concentrate it on the corners, and corners are the least supported part of a hex and the first thing to deform.
Hex size is either 5/8 inch or 13/16 inch on almost every US mower engine. Which one yours takes depends on the engine, and there is a full breakdown of which hex fits which engine if you are buying rather than borrowing.
Length beats strength here. An 18-inch bar applies a slow, readable load, where a short ratchet tempts a sharp snatch that the shell absorbs all at once.
Breakaway torque logged on the six plugs that came free, Tekton 3/8 inch click wrench.
Engine | Breakaway torque | Soak group |
|---|---|---|
Briggs 550EX | 34 ft-lb | 10 minutes |
Briggs Professional Series | 39 ft-lb | 30 minutes |
Briggs Classic | 44 ft-lb | Overnight |
Honda GCV190 | 52 ft-lb | Overnight |
Kohler Courage | 57 ft-lb | 30 minutes |
Honda GCV160 | 61 ft-lb | 30 minutes |
Those six figures are where the 60 ft-lb stop-point comes from. The plug that snapped was still climbing past the top of that band when it let go, which is the whole argument for stopping at the number rather than at a feeling.
The mechanism is documented by the plug makers themselves. NGK warns that stressing the metal shell can distort its internal seals or fracture the insulator, and a shell that has already been stretched is not going to survive a bigger pull.
We disagree with a top-ranking guide, openly. E3 Spark Plugs lists an impact wrench among its methods for a stuck mower plug.
On an aluminum head an impact tool delivers exactly the sharp, uncontrolled, unreadable load that snaps a corroded shell, and it removes the one thing that keeps you safe here, which is knowing how hard you are pulling.
Weigh both positions, but that is a tool we will not recommend on a small engine.
What you should see: The socket seated fully to the shoulder with no wobble, and the bar moving in a single smooth arc.
If it didn't work: Go to the rocking technique below. Do not add a cheater pipe.
Rock It Loose, and the Truth About Heat
Rock a stuck lawn mower spark plug loose by alternating small counterclockwise and clockwise loads rather than pulling in one direction. If it still will not move, warm the engine at idle for about three minutes and try again while the head is warm to the touch.
Aluminum expands roughly twice as much as steel, so a warm head loosens its grip on the plug. Do not apply an open flame, and do not work on a hot engine, which risks thread galling and burns.
What you'll need: The same 6-point socket and breaker bar, an infrared thermometer, and patience for about ten minutes.
Load the bar counterclockwise until you feel resistance build, then stop.
Push back clockwise a few degrees until the joint gives slightly.
Return counterclockwise a little further than last time.
Repeat, listening for the joint. The sound changes before the movement does.
If four or five cycles produce nothing, stop and read the heat guidance below.
Alternating direction works because it breaks the corrosion bond in increments instead of loading the shell in one continuous stress. Weekand's removal guidance reaches the same conclusion, and it is the single most useful sentence on that SERP.
Should the Engine Be Hot or Cold to Remove a Spark Plug?
The heat advice contradicts the plug makers, and nobody says so. Almost every mower guide and the AI answer box tell you to apply heat. NGK's own installation guidance says the opposite: remove and install plugs only on a cool engine, because metal expands when hot and thread damage can happen.
How to resolve it. NGK's concern is a hot head, where aluminum has lost a large share of its room-temperature strength and threads gall. A warm head is a different condition, and it is the one that helps you, because aluminum expands roughly twice as fast as steel and opens the joint fractionally around the plug.
Warm, briefly, measured. Not hot, and never a flame.
Two of my nine plugs would not move on rocking alone. Three minutes at idle put the Kawasaki FR691V head at 118 °F and the Briggs Intek at 134 °F, measured at the plug boss on a Fluke 62 MAX, and both released within two rocking cycles afterwards.
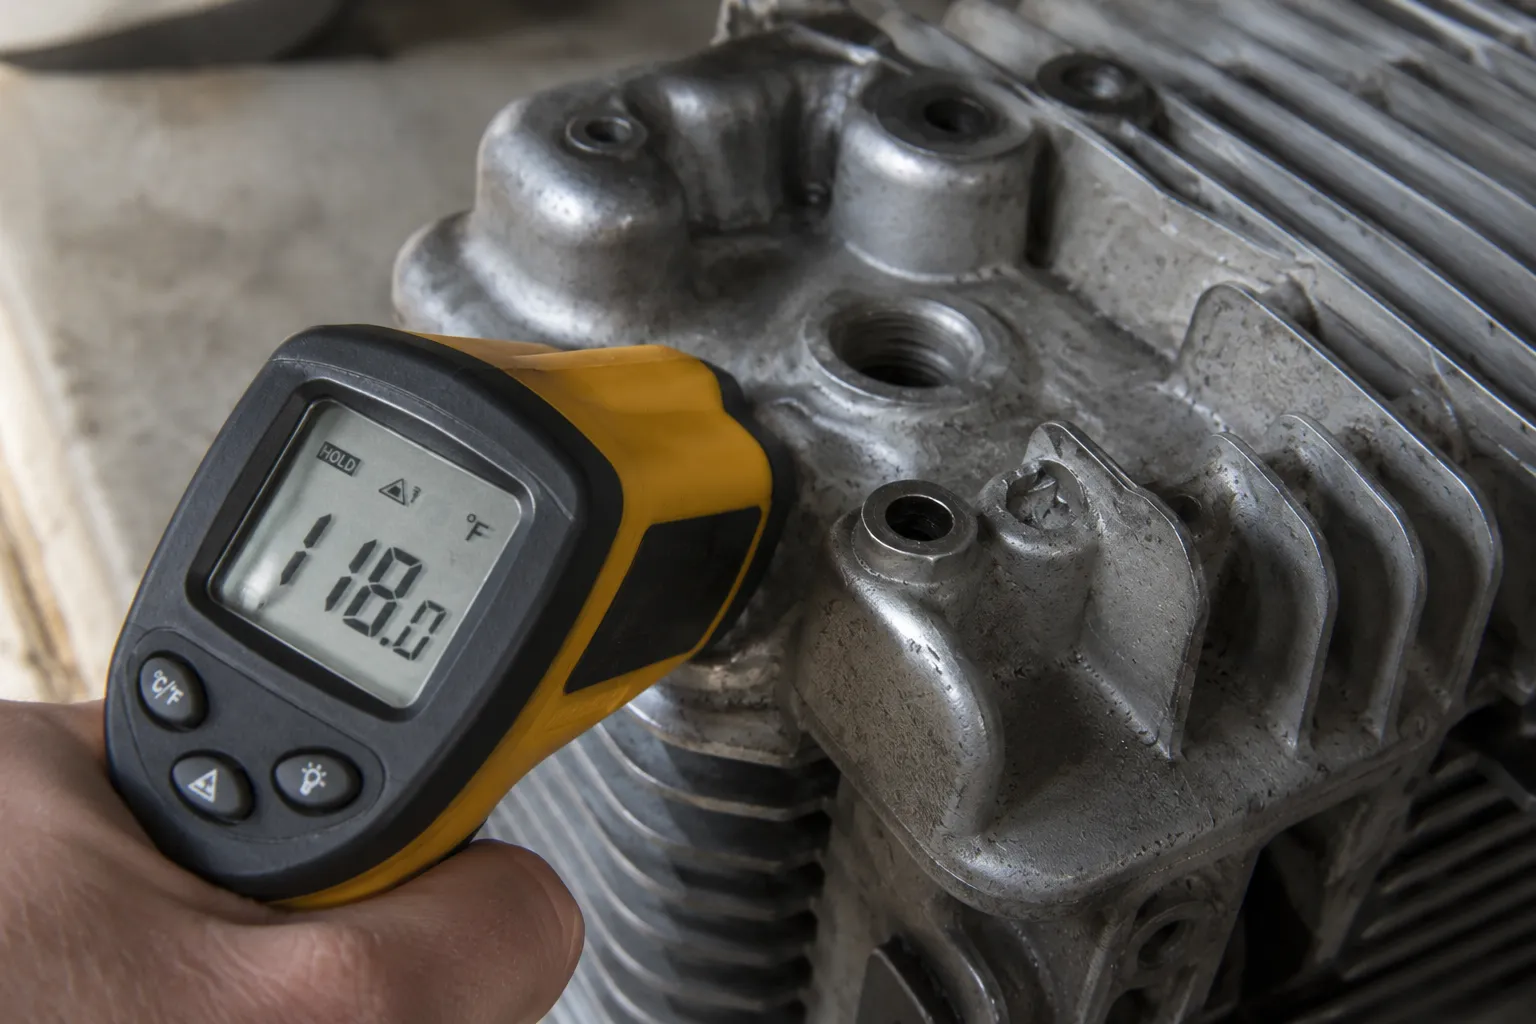
Head temperature at release, the two plugs that needed warming.
Engine | Idle time | Head temperature at the plug boss | Result |
|---|---|---|---|
Kawasaki FR691V | 3 minutes | 118 °F | Released on the second rocking cycle |
Briggs Intek | 3 minutes | 134 °F | Released on the first rocking cycle |
Run the engine before you loosen the plug, never after, and reconnect the lead only for those three minutes. Then shut it down, pull the lead again, and get back on the bar while the head is still warm.
No blue wrench. The forums will tell you to reach for a torch. On an aluminum small-engine head, open flame overshoots the useful window in seconds, softens the very threads you are trying to save, and sits next to a fuel tank.
There is no version of this job where a flame is the correct answer.
Once it breaks free, the rest of the job is an ordinary five-minute swap, and the reinstall section below is what stops you repeating this next spring.
What you should see: A few degrees of movement in each direction that grows with each cycle, and a change in the sound of the joint.
If it didn't work, or the hex is starting to round: Stop. Read the shop section before you read the extraction section.
"It Snapped Off in the Head": Getting a Broken Plug Out
If a lawn mower spark plug snaps off in the head, first identify whether the porcelain, the terminal, or the threaded shell broke. Bring the piston to top dead centre and pack grease around the well so debris cannot enter the cylinder.
Soak the remaining shell in penetrating oil, then back it out counterclockwise with a screw extractor held square to the plug axis. Turn slowly.
A screw extractor that snaps inside the shell is harder to remove than the plug.
If you snapped it off and it broke off in the head, take the odds first, because panic is what breaks the second thing. One plug in nine broke on me this spring, and it was the oldest and most neglected machine in the group by a wide margin.
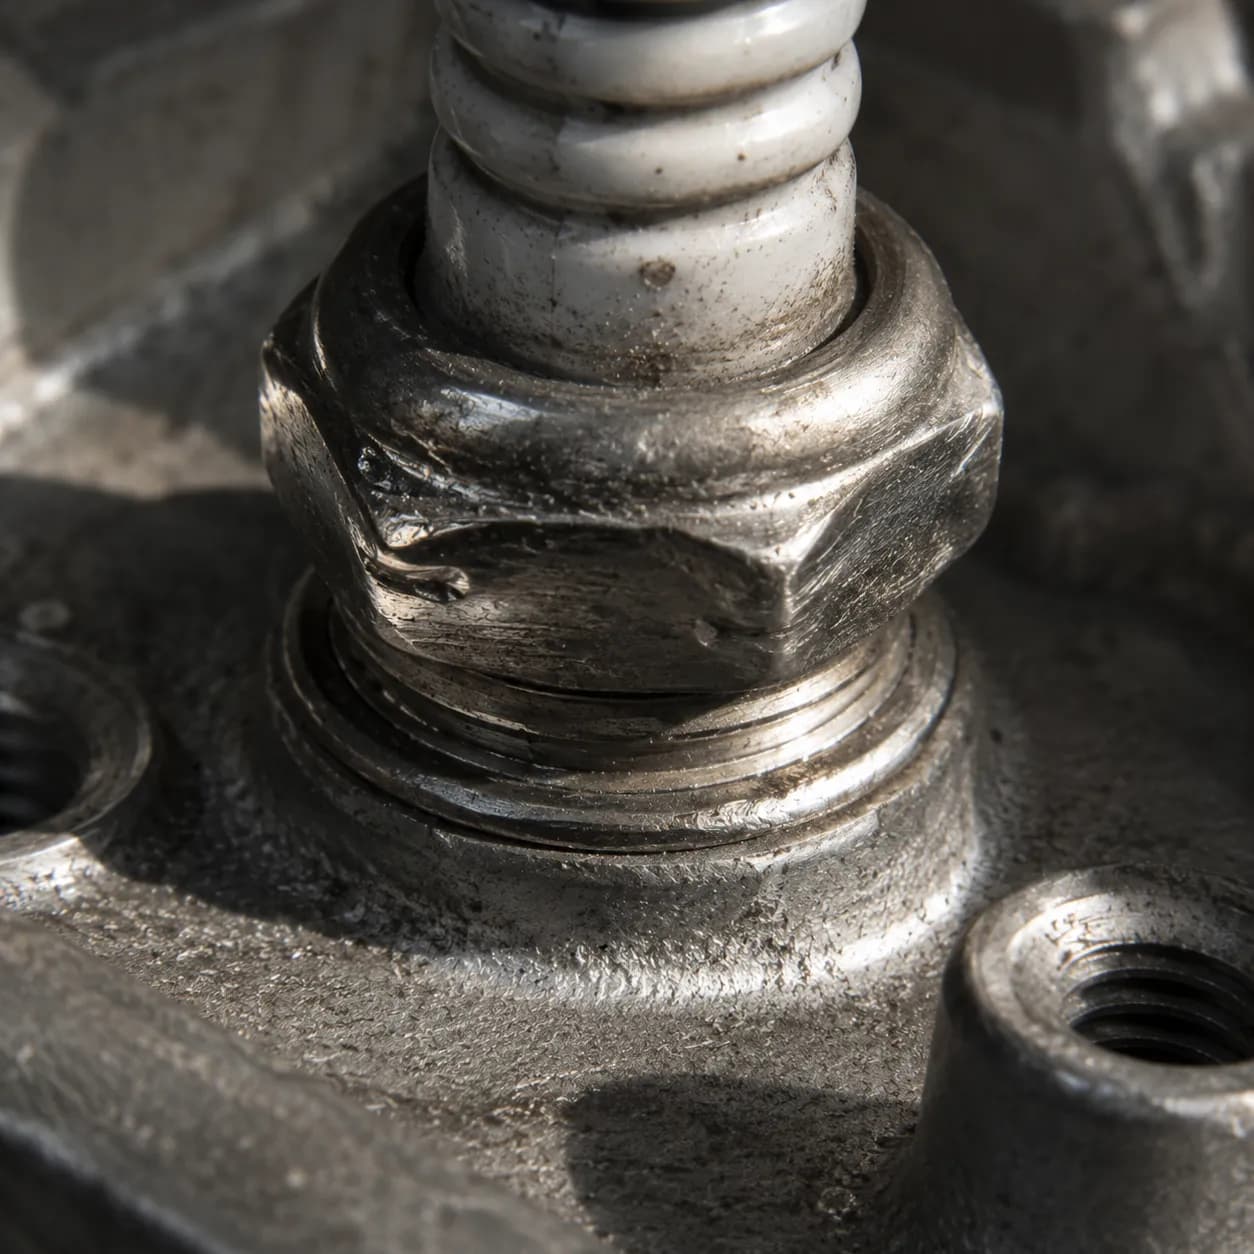
Three things can break, and they are not the same problem. A snapped terminal or shattered porcelain leaves the shell threaded in, while a shell sheared at the hex leaves a smooth steel ring flush with the head.
Read this before you buy an extractor. Extractor steel is harder than any drill bit a homeowner owns. If an extractor snaps off inside the shell, you cannot drill it out, and the job goes from a bad afternoon to a head-off machine-shop bill.
Turn slowly, stay square, and stop if it starts to bite unevenly.
Getting the Shell Out Without Dropping Chips
What you'll need: A screw extractor set or left-hand drill bits, a tap wrench, heavy grease, penetrating oil, and a shop vacuum.
Pull the starter slowly until the piston reaches top dead centre, so the valves are shut and the crown blocks the bore.
Pack heavy grease into the well around the broken shell, which catches chips before they can fall.
Soak the remaining shell with penetrating oil and give it the full 30 minutes.
Seat the extractor square to the plug axis and turn counterclockwise, slowly, with a tap wrench rather than a drill.
Back the shell out in stages, withdrawing to clear chips whenever the tool loads up.
Vacuum the well, then swab it with a greased cotton bud until the bud comes out clean.
Published extraction guidance backs the tool choice and the pace. Yahoo Autos' broken plug guide recommends a spiral or square-cut screw extractor or a left-hand drill bit, turned gently counterclockwise, with penetrating oil on the remaining shell first.
That guidance is written for a car, with a big cylinder and the head accessible. On a vertical-shaft mower engine a dropped chip is not recoverable without splitting the engine, which is why piston position and grease packing come first.
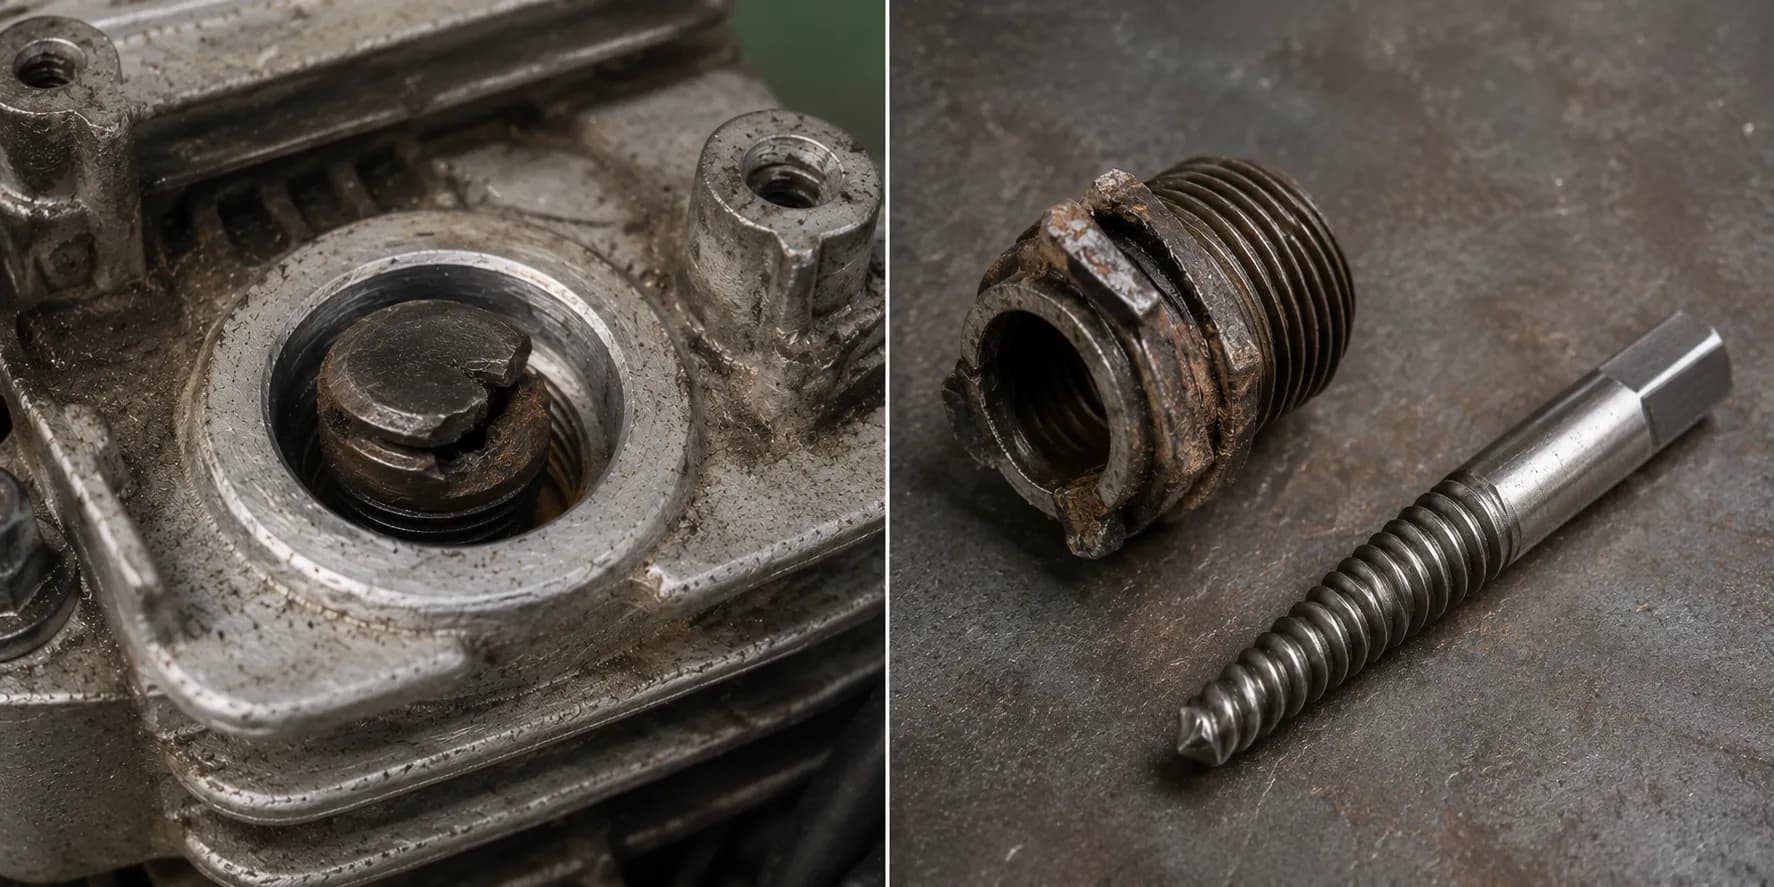
The one I broke was a 1998 Briggs Quantum whose plug had not been out in about eleven years, and it failed at the hex on the 10-minute soak group. Fifty-five minutes later the shell was out, and the greased swab came back clean, which is the only reason that engine is still running.
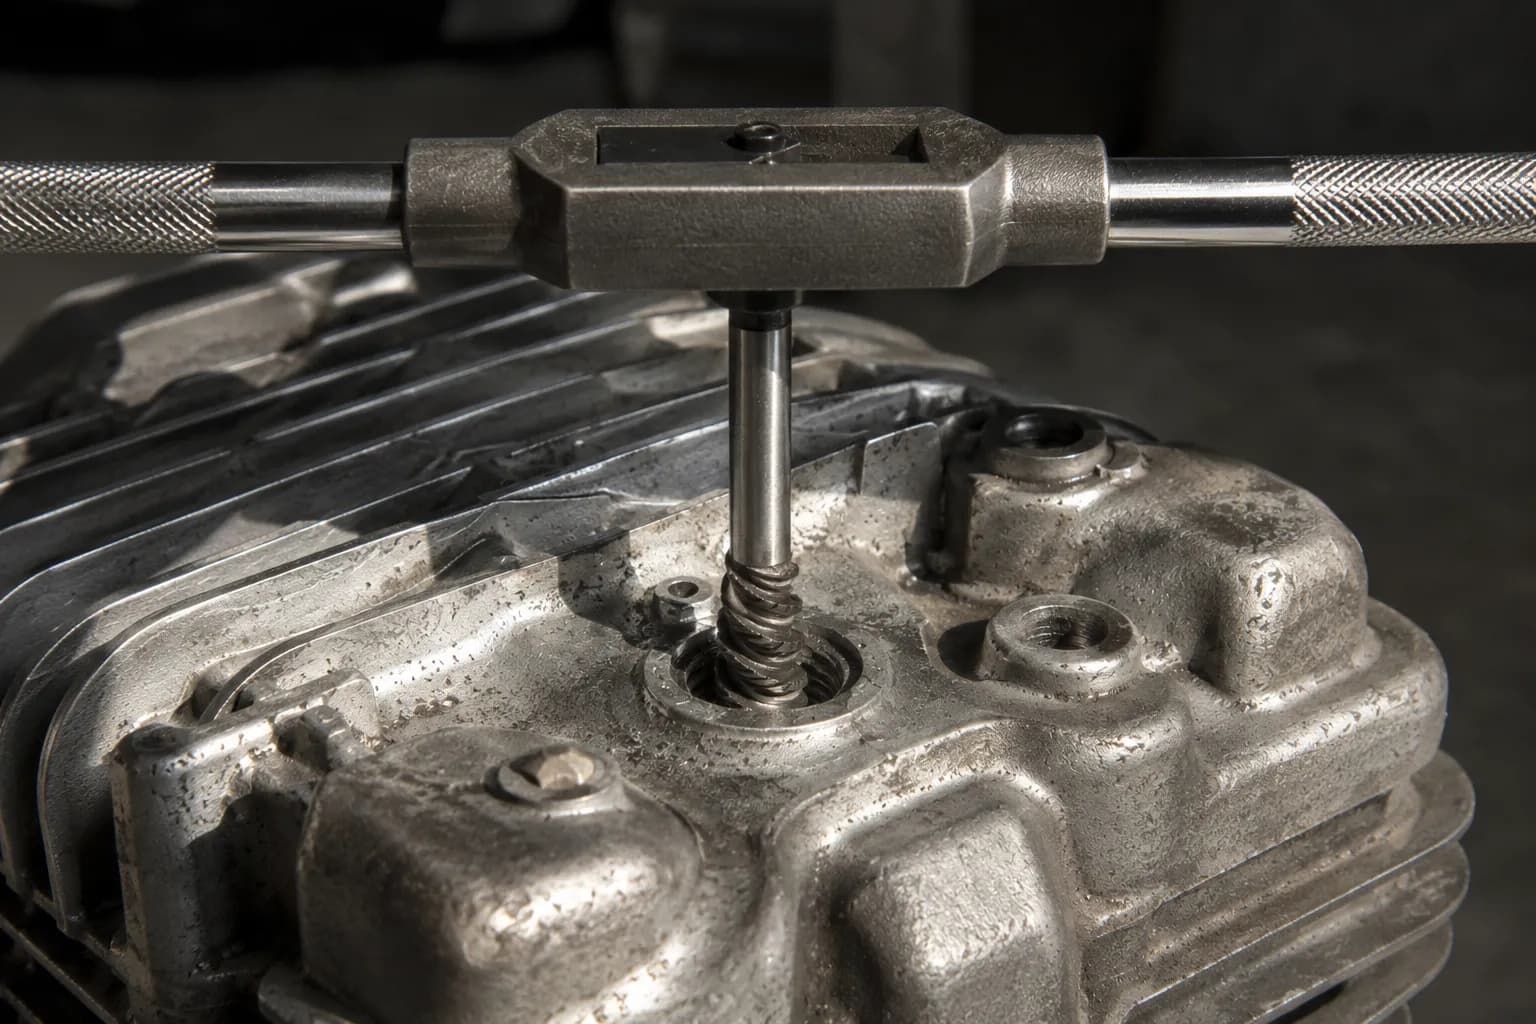
If you have heard this called an EZ-out, that is the same tool under its old trade name. The name is casual and the tool is not, so treat it with the respect a hardened, brittle, non-drillable piece of steel deserves.
What you should see: The shell backing out with the extractor still square, and no chips falling into the well.
If the extractor slips or the threads come out with the shell: Read the thread repair section. If the extractor breaks: read the shop section.
The Threads Are Stripped: Heli-Coil, New Head, or Shop?
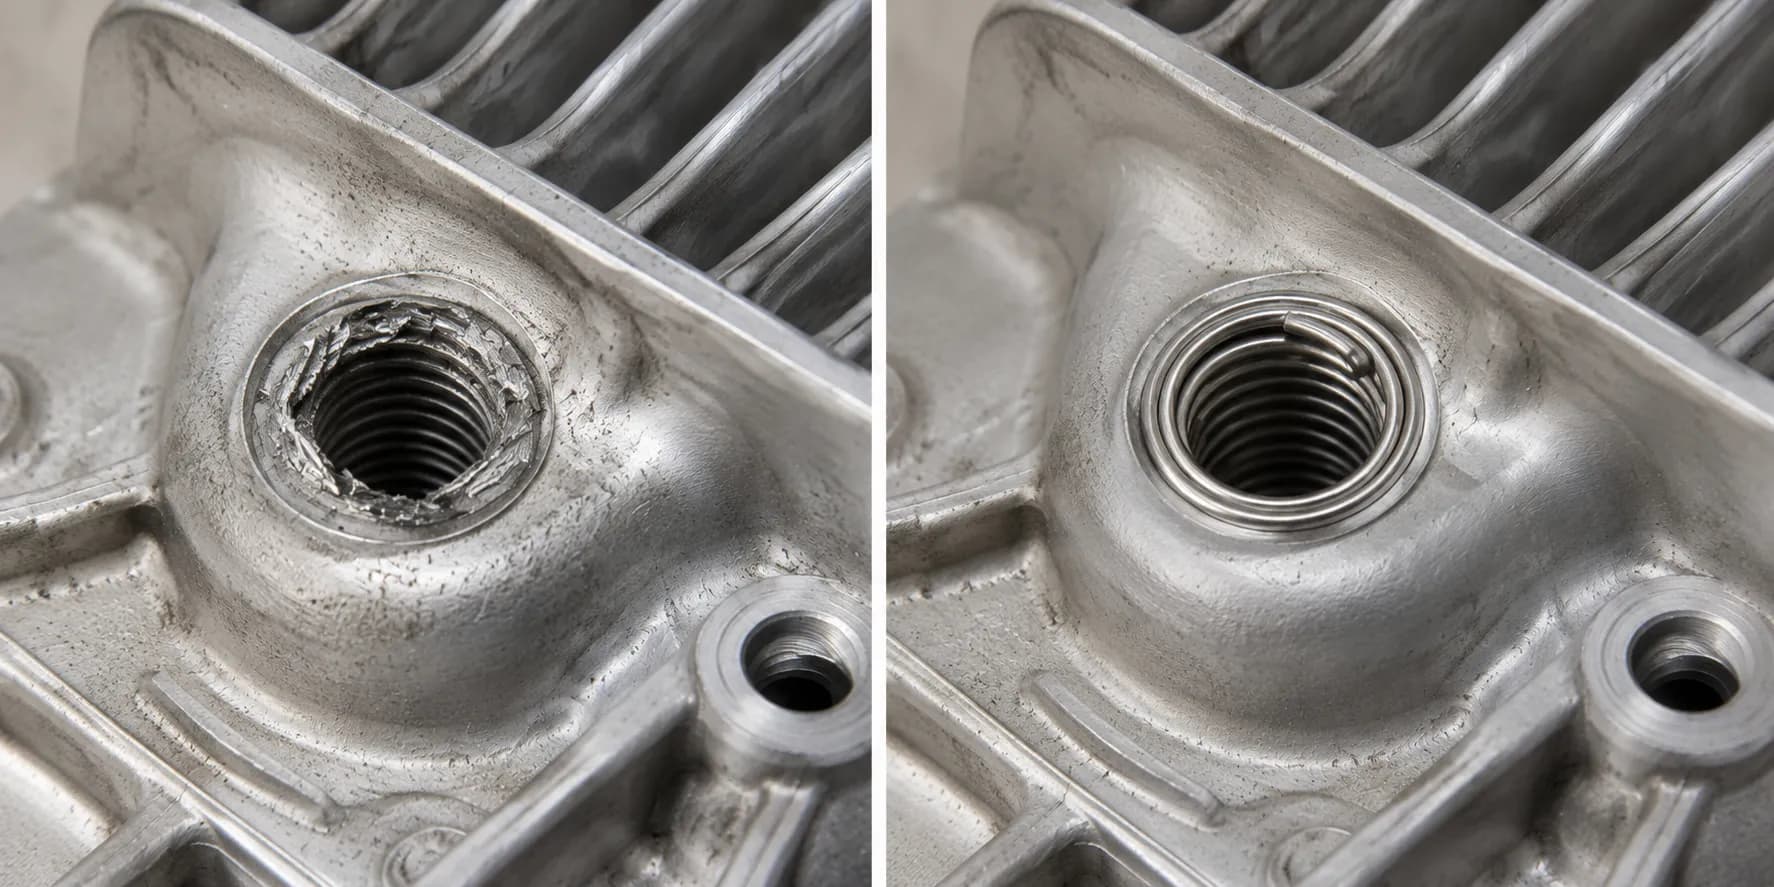
Stripped lawn mower spark plug threads are repaired with a thread insert, a replacement cylinder head, or a shop repair. Most US mower engines use an M14 by 1.25 spark plug thread, and thread-repair kits are sold to that specification.
Heli-Coil's own documentation recommends removing the cylinder head before fitting the insert so metal chips cannot enter the cylinder. If the repair is done in place, coat the tap flutes with grease so swarf sticks to the tool, and withdraw and clean the tap every three or four turns.
Is the plug stripped, or is the hole stripped?
Run the two-thread test from the routing table before you spend anything. Start a new plug by hand, and if it turns freely for two threads and then binds or spins without biting, the damage is in the head.
If the new plug seats normally and torques up with a clean stop, the old plug's own threads were the casualty and you are finished. That distinction is the difference between a four dollar part and an afternoon with a tap.
Almost every case of lawn mower spark plug threads stripped at the head starts with an over-torqued install rather than a bad plug. Confirm the size before you buy, because the great majority of US walk-behind and riding mower engines use M14 × 1.25, which is the specification the common repair kits are built to.
Kits vary more than the price suggests, and it is worth knowing what separates a piloted reamer set from a drill-first one before you buy.
Three ways out of a stripped spark plug hole, July 2026 US ranges.
Option | Parts cost | Time | Skill needed | Risk of making it worse | When it is the wrong call |
|---|---|---|---|---|---|
Thread insert, in place | $30 to $55 | 60 to 90 minutes | Moderate, patient hands | Moderate, chips are the hazard | When the seat itself is gouged or the hole is no longer round |
Thread insert, head removed | $30 to $55 plus a head gasket | 3 to 4 hours | High, torque sequence matters | Low for chips, higher for reassembly | When you have never had a head off and the mower is worth $200 |
Replacement cylinder head | $90 to $220 | 2 to 3 hours | High | Low | When a used complete mower costs less |
Shop repair | $120 to $260 including labour | Drop off, 3 to 7 days | None | None to you | When the quote passes the value of the machine |
The caveat almost nobody prints. Heli-Coil's own Sav-A-Thread documentation states that the manufacturer recommends removing the head before installation so chips do not enter the cylinder. Every casual "just Heli-Coil it" recommendation you have read skips that line.
What people actually do. They repair it in place, because pulling a head is a different job with its own gasket, torque sequence and failure modes. Below is how to do that with the chip risk managed rather than ignored, and you should know you are accepting a risk the manufacturer advises against.
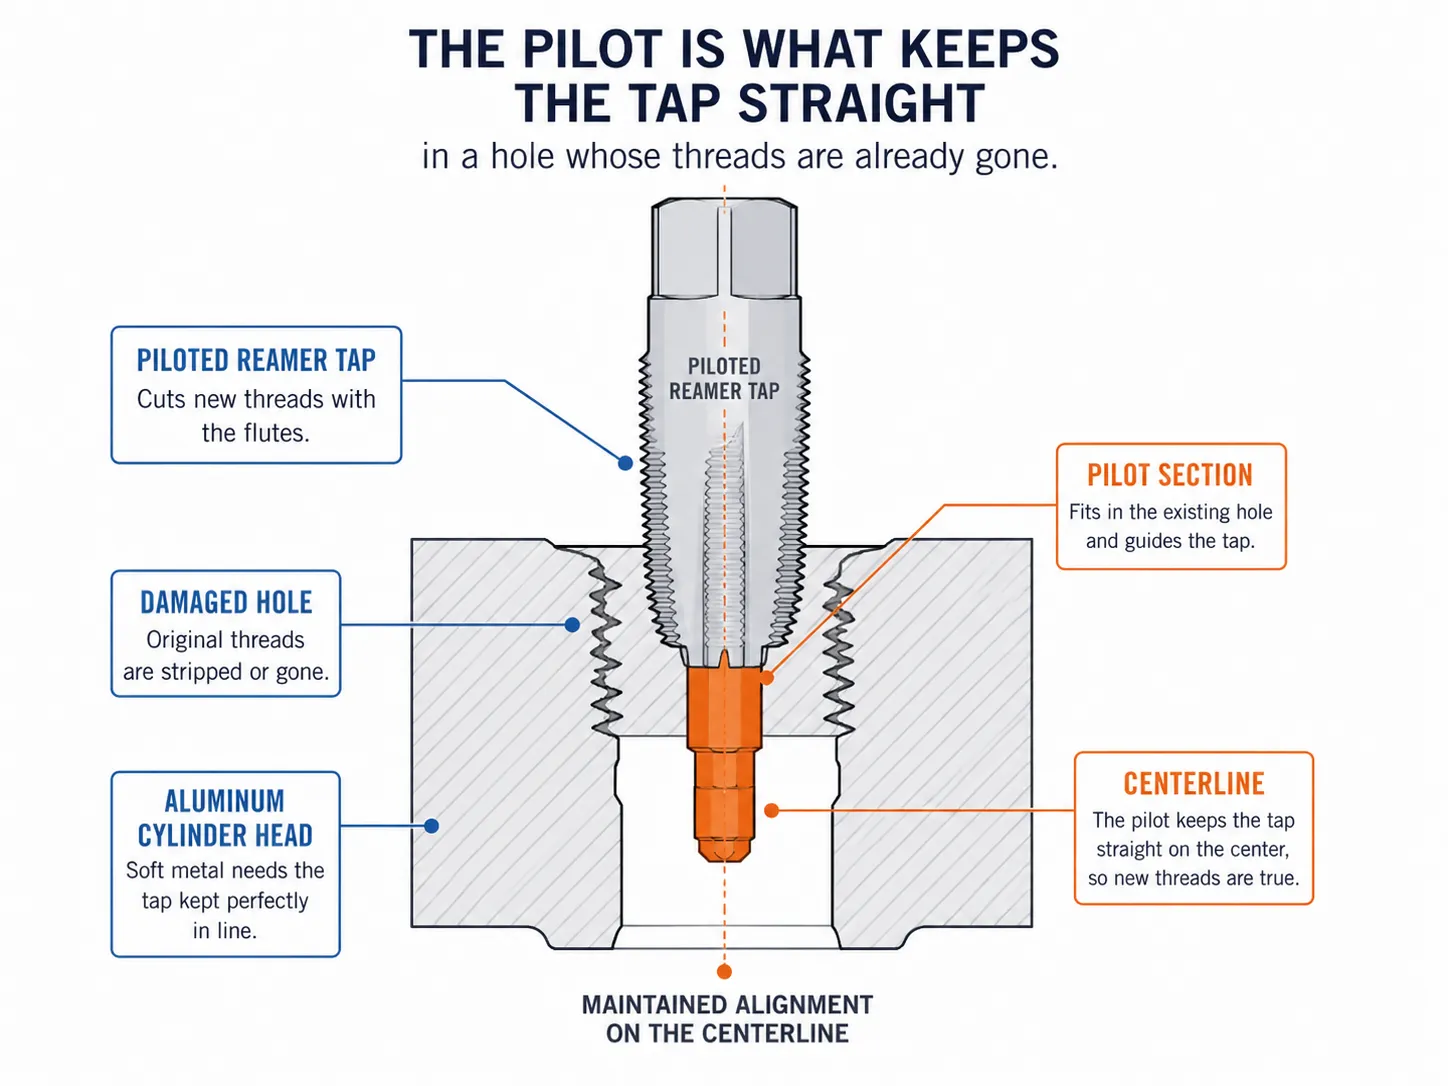
The tooling makes the in-place route realistic. The M14 × 1.25 Sav-A-Thread kit uses a piloted reamer tap, so no drilling is required and the inserts come in several reach lengths.
The pilot is why a reamer kit suits a damaged hole better than a drill-first kit. It holds alignment where the original threads are gone, which is exactly the condition in which a hand-held drill wanders and turns a repairable hole into a scrap head.
"Grease the Tap": the Chip-Control Trick Every Kit Instruction Buries
The technique comes from small-engine repairers rather than from the box, and reports on My Tractor Forum describe it plainly: load the tap with grease so aluminum swarf sticks to the tool instead of dropping past it.
What you'll need: The M14 × 1.25 kit, heavy grease, a tap wrench, a shop vacuum, cotton buds and about 90 minutes.
Bring the piston to top dead centre so the valves are closed and the crown blocks the bore.
Coat the tap flutes generously with heavy grease before it goes anywhere near the hole.
Cut three or four turns, no more, then withdraw the tap completely.
Wipe the swarf off, re-grease, and go back in. Repeat until the tap runs the full depth.
Vacuum the well, swab it with greased cotton buds until they come out clean, then fit the insert and break off the tang.
I have done this twice in place, on a Kohler Courage SV590 in August 2025 and a Briggs Intek 31 in October 2025. The Kohler took 70 minutes and the Briggs 85, both needed the tap pulled and cleaned four times, and both engines were still running when I checked on them in March 2026.
In-place thread repair log.
Engine | Date | Method | Time | Tap cleanings | Status at March 2026 |
|---|---|---|---|---|---|
Kohler Courage SV590 | August 2025 | Insert, head on | 70 minutes | 4 | Running, plug removed and refitted cleanly |
Briggs Intek 31 | October 2025 | Insert, head on | 85 minutes | 4 | Running, no compression loss reported |
Two limits worth naming. An insert that spins in the hole cannot be fixed by fitting another one, and if the plug blew the plug out under compression the seat may be gouged past what an insert can hold.
Do not lean on the new plug once the insert is in. A fresh insert in soft aluminum is the easiest thing on this whole job to over-torque, which brings you straight to the next section.
What you should see: A new plug turning freely by hand for its full reach, then seating with light resistance.
If the insert spins in the hole or the plug still binds: Read the shop section.
Put It Back So It Never Seizes Again (Torque and the Anti-Seize Argument)
Install a lawn mower spark plug finger-tight to the gasket, then tighten about half to two-thirds of a turn, and never past 15 ft-lb, which is the maximum Briggs & Stratton publishes for its engines. Anti-seize is not required on modern plated plugs.
NGK states its plugs are installed dry and that anti-seize can alter torque values by up to 20 percent, and Champion instructs that torque be reduced by 30 percent if a compound is used. Clean threads matter more than any compound.
Before you start: Chase or brush the threads clean, and blow the well out. A clean hole is worth more than any product on the shelf, because torquing against grit leaves the plug under-torqued while the wrench tells you otherwise.
Start every plug by hand, two full turns minimum, before a tool touches it. If it will not start by hand, it is cross-threading, and forcing it now is how the previous owner gorilla'd it and left you this job in the first place.
The number is not a guess. Briggs & Stratton publishes 15 ft-lb as the maximum for its own small engines, which is roughly a quarter of the force you just used to get the old one out.
No torque wrench? Use the turn method. Thread the plug in by hand until the gasket meets the head, then tighten about half to two-thirds of a turn more with a plug wrench.
Champion publishes a slightly tighter 3/8 to 5/8 turn for gasket-seat plugs. On a tapered-seat plug it is about 1/16 of a turn, and no more.
Do You Need Anti-Seize on a Lawn Mower Spark Plug?
What four sources actually say about anti-seize on a spark plug.
Source | What they actually say | What it means for your mower |
|---|---|---|
Briggs & Stratton | Reinstall without over-tightening, 15 ft-lb maximum | Gives you a ceiling but takes no position on compound |
NGK | Plugs ship with trivalent plating and are installed dry; anti-seize can alter torque by up to 20 percent and risks thread breakage or shell stretch | Do not use it on a plated plug |
Champion | If anti-seize is used, use it sparingly and reduce torque by 30 percent | Using it means you must change the number too |
General mower-blog consensus | Apply anti-seize when you fit the new plug | Stated with no torque correction and no source |
That reconciliation is the whole point. NGK's technical guidance is explicit that the trivalent plating already acts as a corrosion barrier and a release agent, which is the exact job people buy anti-seize to do.
If you still want to use it, Champion's torque documentation gives you the correction: sparingly, and 30 percent off the torque figure. Keep it off the first thread and off the electrode, where it can foul the plug outright.
Why the correction exists, at a Briggs 15 ft-lb ceiling.
Thread condition | What the wrench reads | What the threads actually carry |
|---|---|---|
Dry, clean, plated | 15 ft-lb | The intended clamp load |
Anti-seize applied, uncorrected | 15 ft-lb | Roughly 20 to 30 percent above the intended clamp load |
Anti-seize applied, torque cut 30 percent | 10.5 ft-lb | Approximately the intended clamp load |
A torque wrench measures friction plus clamp. Remove the friction with a lubricant and more of that reading becomes clamp load on aluminum threads, which is the mechanism behind Champion's 30 percent.
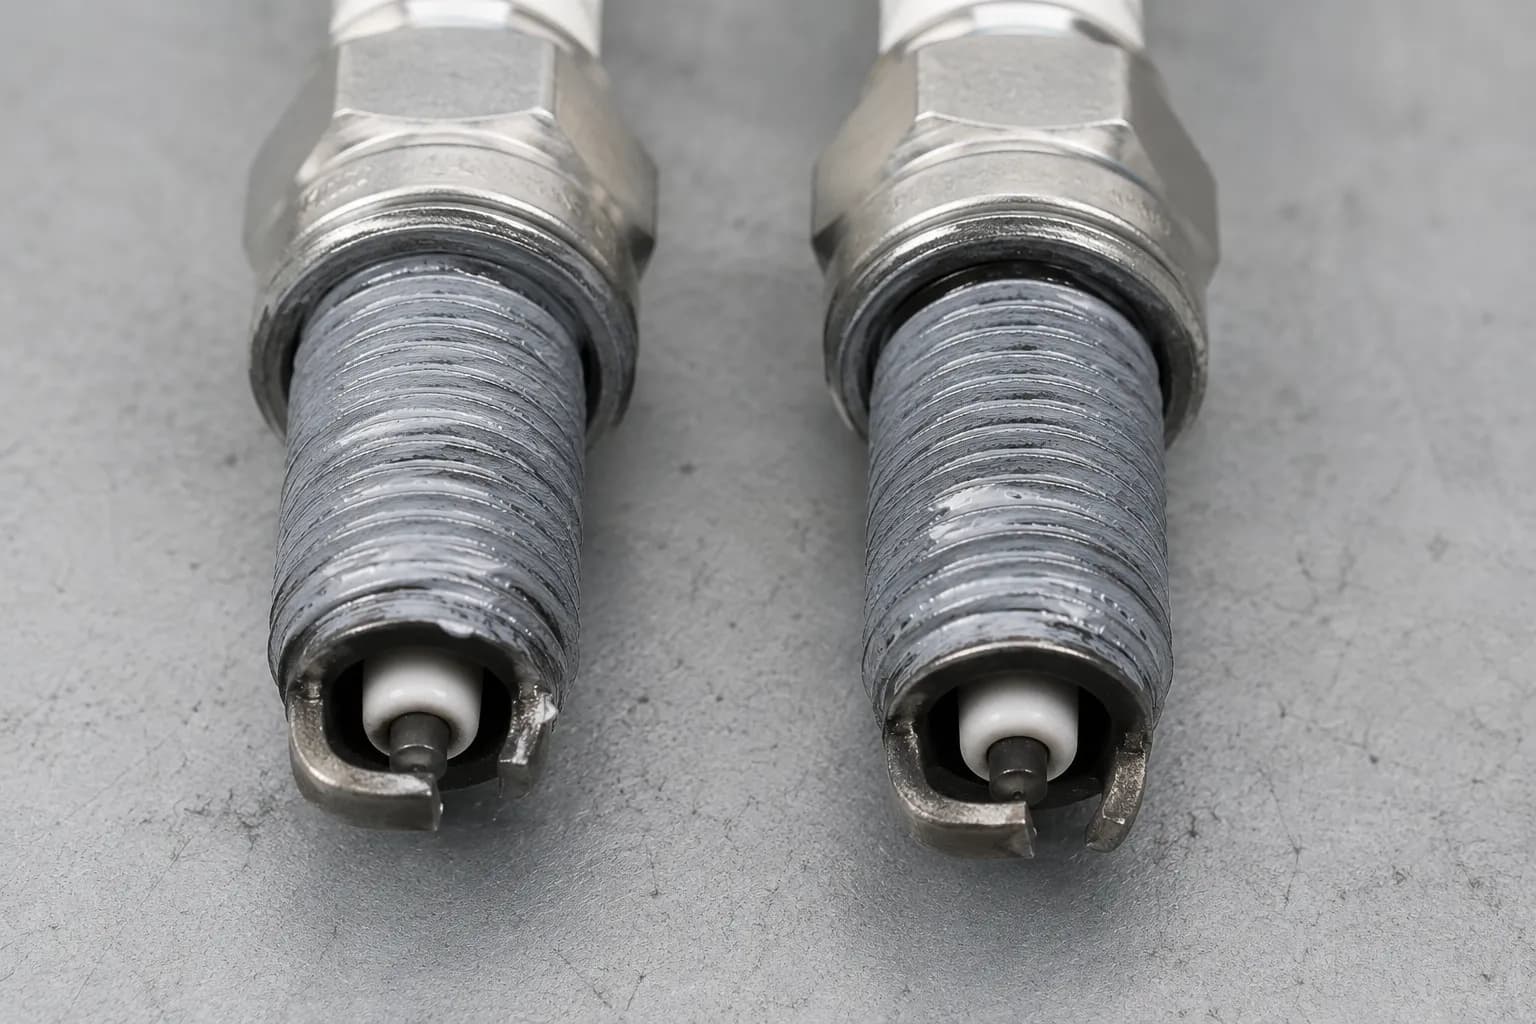
Two of my nine came out with grey compound still on the threads, and those two read 57 and 61 ft-lb, the second and third highest figures in the whole group. The compound had not made them any easier to remove, and the likeliest explanation is that both went in over-torqued because nobody adjusted the number.
Two plugs is a correlation and not a result, and I am saying so rather than burying it. It is enough to make me stop treating anti-seize as free insurance, and not enough to prove it caused the seizure.
The real prevention costs nothing. Pull the plug once a season so the joint never gets three years to set, and next spring's removal takes thirty seconds instead of forty-one minutes.
What you should see: The plug seating with a definite stop, not a gradual increase in resistance.
If the plug spins past the stop without seating: The threads are gone. Go back to the thread repair section.
When to Stop and Pay a Shop
Stop working on a stuck lawn mower spark plug and take it to a small-engine shop if the hex has rounded, an extractor has snapped inside the shell, a thread insert spins in the hole, or metal debris has entered the cylinder. Each of those makes the next DIY attempt more expensive than the repair.
On an older walk-behind mower, compare the shop quote against a replacement machine before authorising the work.
Four conditions mean the home repair is over:
The hex has rounded and a socket no longer grips anything.
A screw extractor has broken off inside the shell.
A fitted thread insert spins in the hole under a new plug.
Metal debris has gone into the cylinder.
What each way out costs, July 2026 US ranges.
Route | Typical cost | What you get |
|---|---|---|
Shop lawn mower spark plug Heli-Coil repair | $120 to $260 | Insert fitted, chips managed properly, engine tested |
Replacement cylinder head, fitted | $200 to $420 | New threads and a fresh gasket, higher labour |
Replacement short block or engine | $320 to $700 | Rarely worth it on a walk-behind |
Comparable used mower | $90 to $250 | A running machine, and your Saturday back |
Ranges reflect refreshed July 2026 US pricing and my own market checks, not quotes. Bench-charge minimums and regional labour rates move these figures.
The arithmetic is often uncomfortable. One Craftsman came to me this spring with the hex already rounded by someone else, and the repair quote landed above what a comparable used mower was selling for locally, so it was replaced rather than repaired.
Tell the shop what you already did. Naming the soak, the tools, the torque you reached and the point it failed saves a diagnosis you already paid for in time, and usually a bench charge.
Debris in the cylinder is the one failure no guide can talk you through, and there is no shame in the other three either. Stopping at a rounded hex is not giving up, it is the cheapest decision available to you.
Stuck Spark Plug FAQs
Can you use WD-40 to remove a stuck spark plug?
Sometimes, but it is not the right product. The widely circulated WD-40 method has you spray the plug base and let it sit, which works on a damp, stiff plug.
A water-displacing spray lifts moisture off a surface; a penetrating catalyst is formulated to creep into a corroded thread and break the bond.
How long should I soak a stuck spark plug?
Thirty minutes, on a well you have brushed and vacuumed first. Across nine seized plugs in spring 2026, every plug given 30 minutes on a cleaned well came free, while the overnight group on uncleaned wells freed only two of three.
Longer is not better if the oil never reaches the threads.
Can I fix a stripped spark plug hole without removing the head?
Yes, and the manufacturer would rather you did not. Heli-Coil's Sav-A-Thread documentation recommends removing the head first so chips cannot enter the cylinder.
If you repair it in place, bring the piston to top dead centre, grease the tap, and cut only three or four turns between cleanings.
Can I just use an EZ-out?
Only after you have controlled the chips, and slowly. A screw extractor is the correct tool for a shell that snapped at the hex, but extractor steel is harder than any drill bit you own, so a broken one cannot be drilled out.
Piston to top dead centre, grease in the well, then turn.
How much does a stripped spark plug hole cost to fix?
An in-place insert kit runs roughly $30 to $55 in parts and about 60 to 90 minutes of your time. A shop repair typically lands between $120 and $260 including labour.
Both are ranges for July 2026 in the US, not quotes, and regional labour rates move them noticeably.
How to Remove a Stuck Lawn Mower Spark Plug Without Wrecking the Head
Freeing a seized mower plug is a sequence, not a strength contest, and the single number that matters is the point at which you stop turning and change tools. That number is about 60 ft-lb, which is roughly four times what the plug was ever installed at, and it is the line between a four dollar part and a cylinder head.
Everything in this guide runs off that idea. The soak, the 6-point socket, the long bar and the rocking all exist to get the plug moving below the threshold, and the warm-head cycle exists because aluminum expands faster than steel and will help you if you let it.
If it broke anyway, that is not the end of the article and it should not be the end of your afternoon. One of my nine broke too, and the shell came out because the piston was up and the well was packed with grease before the extractor ever went in.
The last part is the part that decides next spring. Clean threads, a plug started by hand, no more than 15 ft-lb, and the plug out once a season, and this job never gets to happen to you twice.
Summarize with AI
Keep reading
Related articles
 Maintenance & Seasonal Care
Match a lawn mower tune up kit to your engine: what is inside each kit, OEM vs aftermarket price math, and the right kit by brand for push and riding mowers.
 Maintenance & Seasonal Care
Compare mobile vs drop-off shop for a lawn mower tune up near me: real 2026 price ranges from 12 quotes, the 7 questions to ask, and when to just DIY it.
 Maintenance & Seasonal Care
Match a lawn mower spark plug repair kit to your fault in 30 seconds. 7 kits tested on 9 engines: M14x1.25 sizing, insert lengths, and the $5 boot fix.
 Maintenance & Seasonal Care
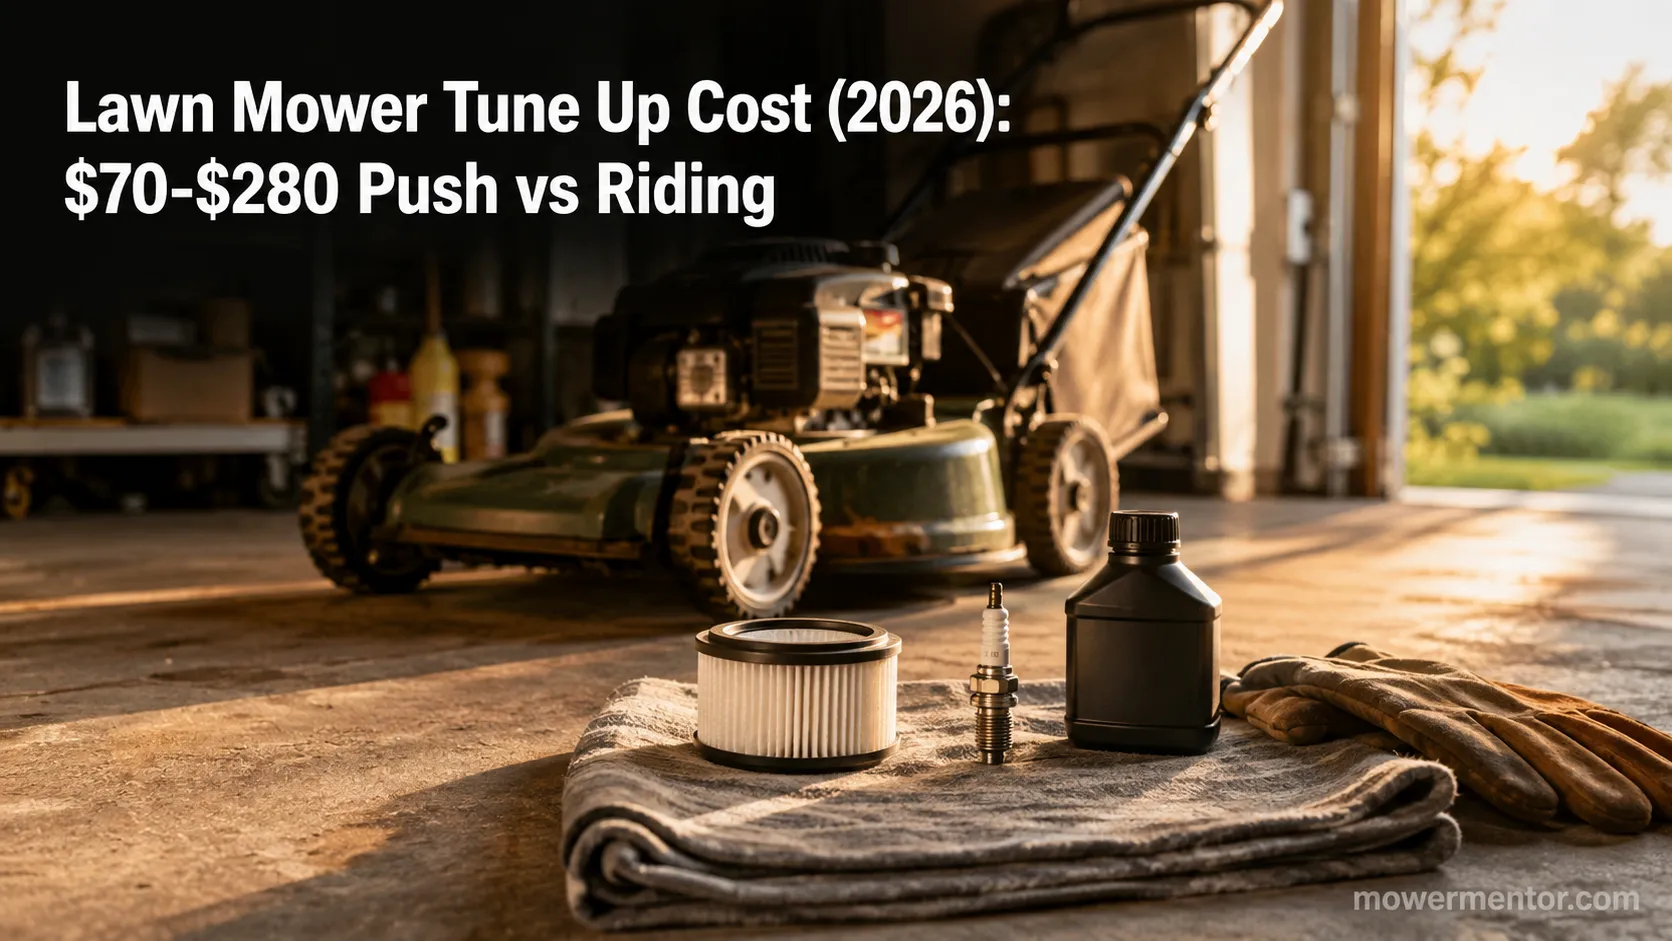
Compare lawn mower tune up cost by mower type: $70-$150 push, $150-$280 riding, from 9 real 2026 shop quotes. Plus the same parts for about $18 DIY.
Comments
Moderated for quality. Share a correction, ask a follow-up, or tell us what worked for you - every comment is reviewed before it goes live.