
Riding Lawn Mower Won't Start No Clicking? 6-Step Bench Fix
Fix a riding lawn mower won't start no clicking fast: test the battery, ground, fuse, safety switches and ignition in 6 bench-verified steps.
Written by Tony MaldonadoReviewed by Wade Coburn
Last updated on August 19, 2026
When you buy through links on our site, we may earn an affiliate commission (at no extra charge), which we use to fund new product tests. Learn more.
Summarize with AI
You turn the key and get nothing. No click, no crank, sometimes not even a dash light, just silence where the engine should be turning over.
When a riding lawn mower won't start no clicking, you are almost always looking at an open starting circuit, not a dead solenoid. That single fact saves most people the money they were about to spend on the wrong part.
This guide walks the circuit in fault-probability order: battery, terminals and ground, main fuse, safety interlocks, then the ignition switch, with a continuity or voltage test at each step. We bench-induced each of these faults to record exactly what the multimeter reads when that link is the break.
Before you touch a wrench, disconnect the negative battery cable so nothing shorts while you work.
The 60-Second No-Click Triage
A riding lawn mower that turns the key with no click and no crank has an open starting circuit: the trigger signal cannot complete its loop, so the solenoid never energizes. A click would prove the solenoid coil got power, so total silence points upstream of the solenoid, to the battery, connections, ground, fuse, an interlock, or the ignition switch.
According to Briggs & Stratton, a no-response starter usually traces to a discharged battery, a faulty connection, or a safety interlock in the circuit. Work the loop in order and you will find the break, often in under 15 minutes.
Here is the order this guide follows, cheapest and most likely first:
Battery state of charge
Terminals and the ground path
Main fuse
Safety interlocks (seat, brake, PTO)
Ignition switch
Solenoid and starter (only once a click returns)
On our test Craftsman, the key turned into a dead, dark dash, and the full triage below took 12 minutes start to finish.
Riding Lawn Mower Won't Start No Clicking? What It's Really Telling You
When a riding lawn mower won't start no clicking, the symptom itself is the diagnosis: the circuit that fires the starter is open somewhere between the battery and the solenoid trigger. A starter solenoid clicks when its coil receives battery voltage through the key, a closed ground, and the safety interlocks.
No click means one of those links never delivered power, so replacing the solenoid, battery, or starter first is guesswork. A battery is required to power the entire start path, as the Kohler service manual notes, and every link after it must be closed for the click to happen.
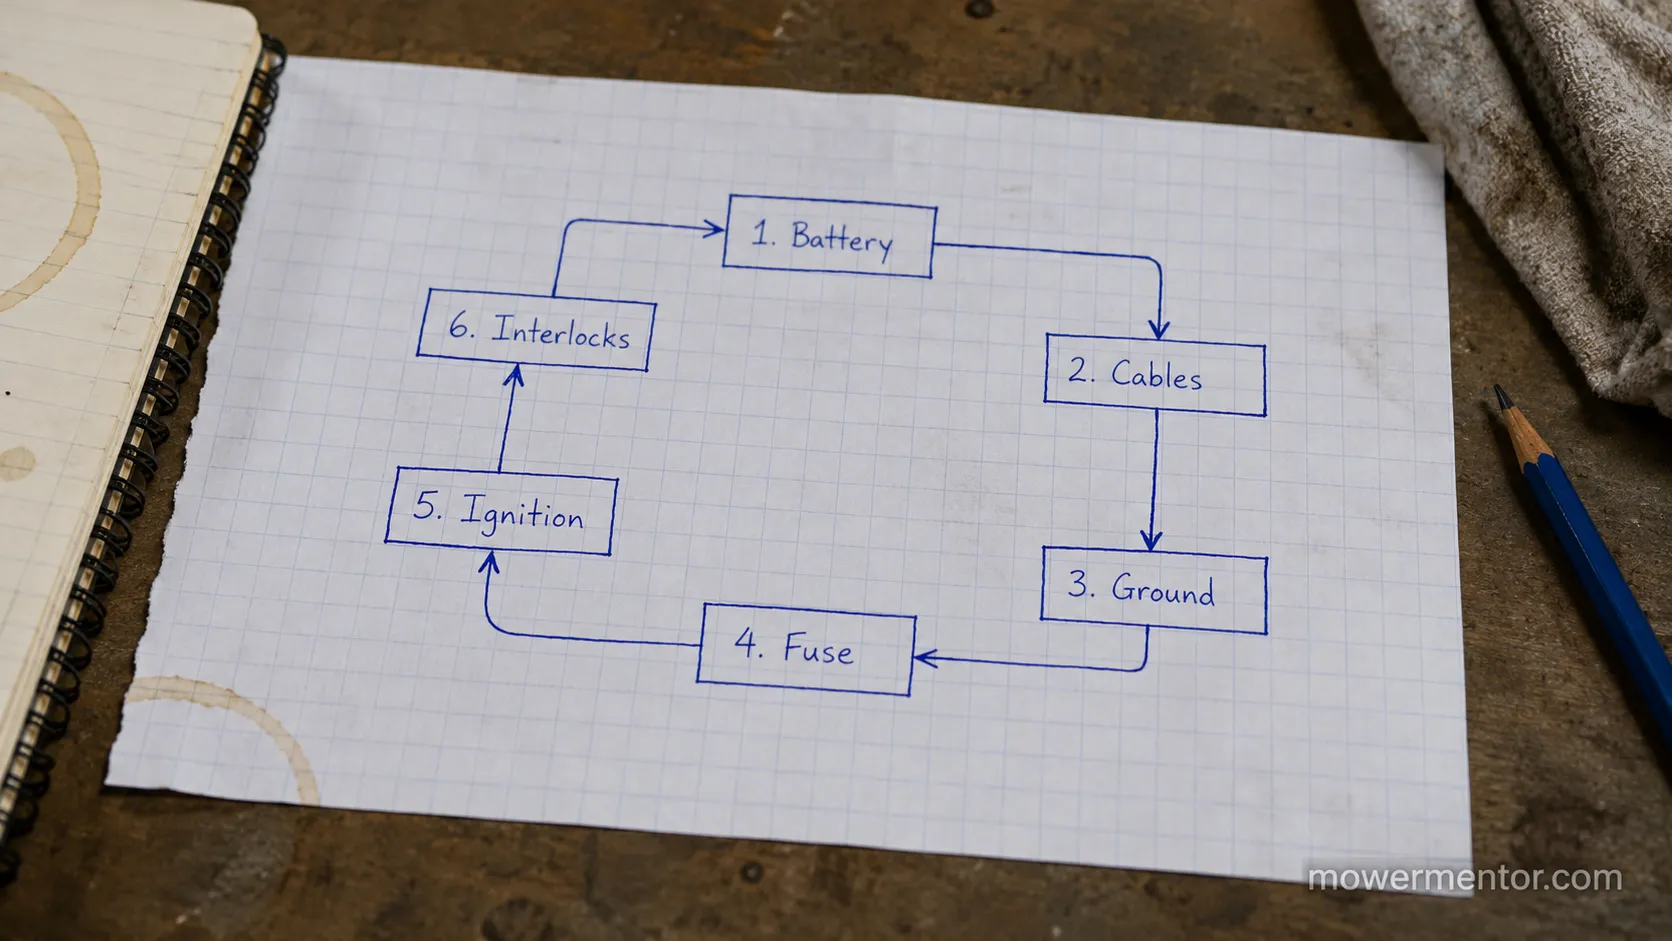
Think of the starting system as one loop with six links in series: battery, cables and terminals, ground back to the frame, main fuse, ignition switch, and the seat, brake and PTO interlocks that sit on the ground side. Break any single link and the whole loop goes silent, which is why "no click, no crank" behaves so differently from a single click.
That is the belief shift worth internalizing before you spend a cent. We have watched owners replace a $90 solenoid on a silent mower that actually had a corroded ground bolt, and the click never came because the circuit was open long before the solenoid.
If your symptom is broader than a dead circuit, start instead from the complete electrical decision tree and branch back here.
One honest caveat: a mower that does click can still have a weak battery, and that is a different diagnosis handled in a sibling guide. This article is only for the totally dead, no-click case.
No Click vs. Dash Lights On: Which Branch Are You In?
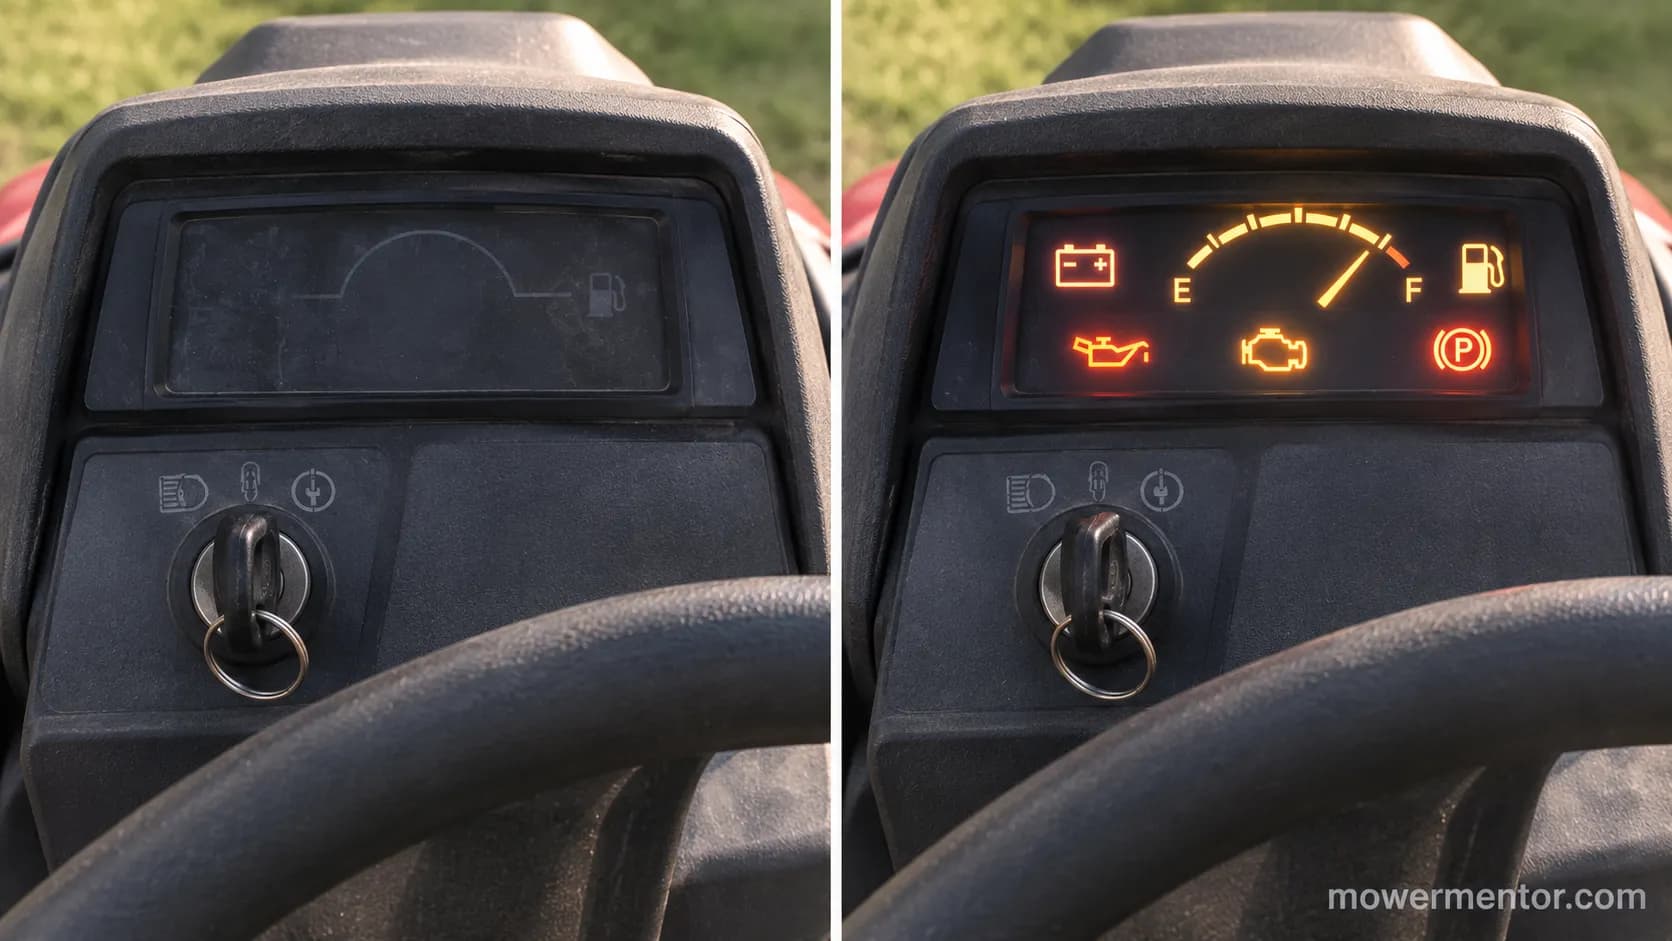
Before you test anything, split the symptom into one of two branches, because they point to different first suspects. A totally dark mower (no dash lights, no click) usually means the power source itself is not reaching the circuit: a flat battery, an open main connection, or a broken main ground.
A mower whose dash lights up but still gives no click has power in the system but a break in the key-signal path: the ignition switch, an interlock, or the solenoid trigger wire. Reproducing both on the bench, pulling the main ground killed the dash entirely, while leaving the ground intact but tripping the seat switch left the dash lit with a dead key-start. Sears Home Services frames the nothing-happens case separately from the clicks case for the same reason.
Symptom branch | What it usually means | Check first |
|---|---|---|
No dash lights, no click (totally dark) | Power not reaching the circuit | Battery charge, main terminals, main ground, main fuse |
Dash lights on, no click | Signal path open past the power source | Ignition switch, seat/brake/PTO interlocks, solenoid trigger wire |
A fast tell: wiggle the key with the switch on. If the dash lights flicker as you move it, suspect the ignition switch or a loose connector rather than the battery.
This branch also resolves the most frustrating case on the forums, the "brand new battery, starter, solenoid and switch and it still won't turn over" loop. When every replaced part fails to help, the break is almost always in a link nobody replaced, usually the ground or an interlock.
If you actually hear a single click when you turn the key, you are in the opposite case, so use the just-clicks diagnosis instead.
One limitation worth naming: a few models route dash power through the same fuse as the crank circuit, so "lights on" is not universal proof the power source is fine. Confirm with the battery test below.
Test the Battery First (Voltage, Not a Guess)
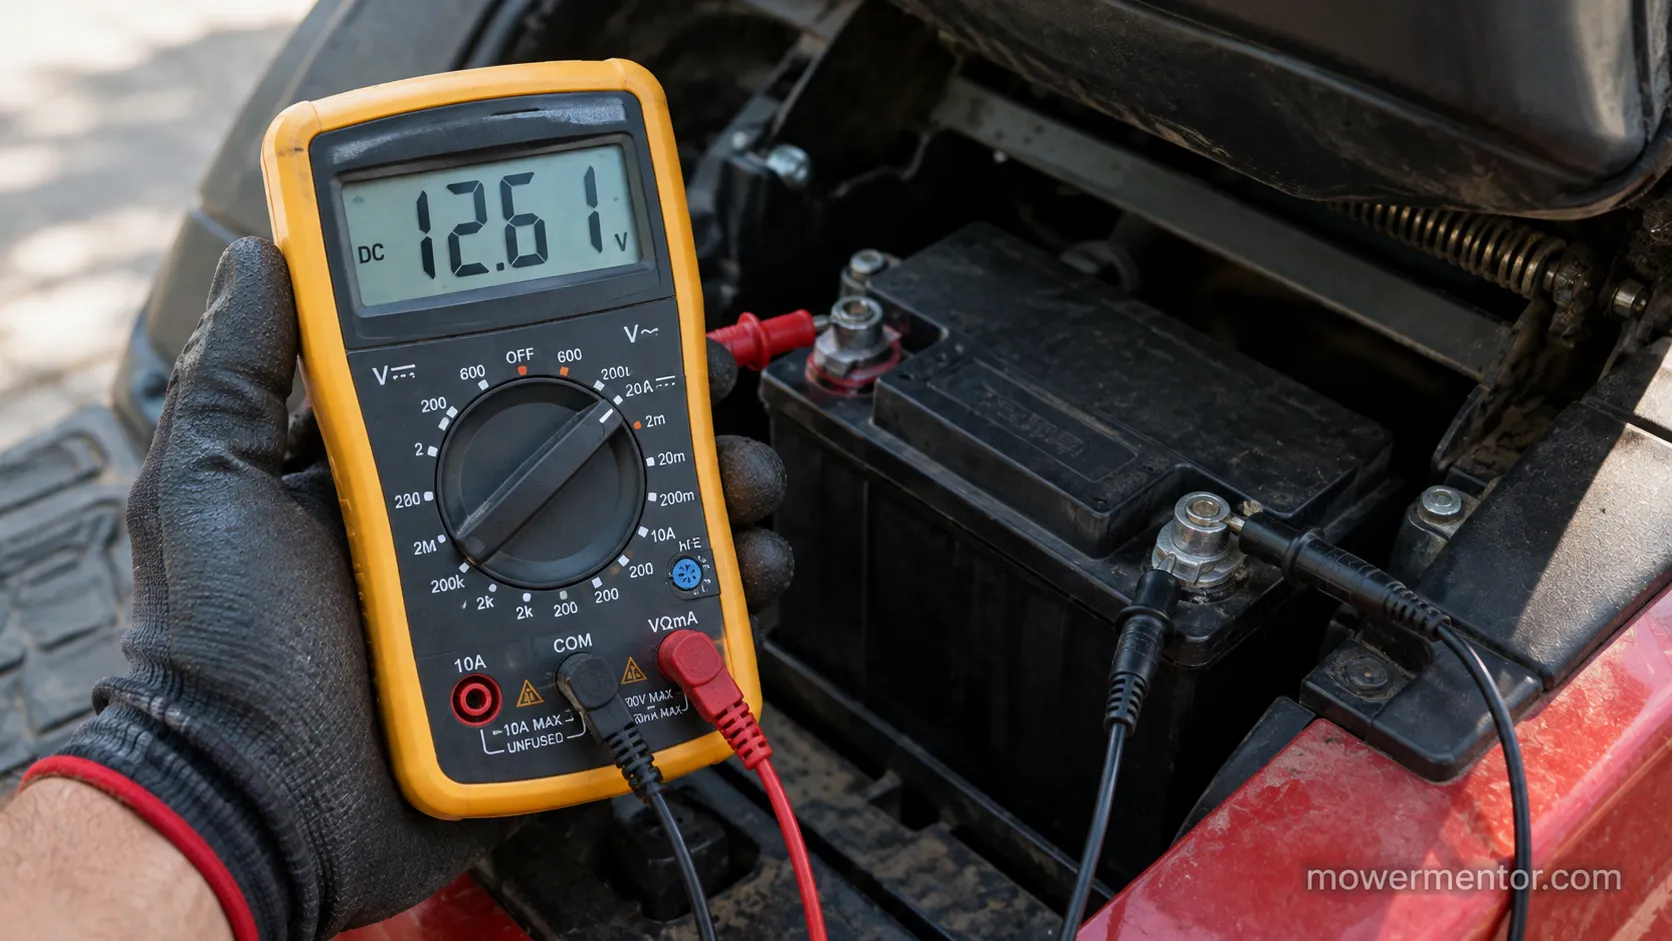
The battery is the highest-probability cause on a no-click riding mower, and a multimeter settles it in seconds rather than by feel. Set the meter to DC volts, touch red to the positive terminal and black to the negative, and read the resting voltage.
A healthy 12 volt battery rests around 12.6 volts; roughly 12.0 volts is only a quarter charged, and anything below about 11.8 volts is deeply discharged, per this 12 volt state-of-charge reference. If it reads full at rest but the mower is still silent, the fault is downstream, so move to the terminals and ground next.
Resting voltage is only half the story, because a battery can read fine at rest and still collapse under the load of cranking. Our test battery read 12.61 volts at rest but sagged to 9.8 volts the instant we asked it to crank, which pointed us at the terminals, not the cells.
Resting voltage | State of charge | Verdict for a no-click mower |
|---|---|---|
12.6–12.8 V | ~100% | Battery is not the cause, move on |
12.4 V | ~75% | Usable, keep checking downstream |
12.2 V | ~50% | Charge it, then retest for the click |
12.0 V | ~25% | Likely too low to crank, charge or replace |
Below 11.8 V | Deeply discharged | Charge fully or replace, then retest |
If a jump from a car or jump box produces nothing at all, that is a strong sign the fault is past the battery, in the connections, ground, or fuse. When the battery is genuinely flat, do it right the first time with how to safely jump a riding mower.
One caveat: a resting-voltage reading is not a true load test, so a battery that passes here can still fail under a proper load tester.
Clean the Terminals and Chase the Ground
A bad connection or an open ground is the most common no-click cause that owners skip on their way to buying parts, and it costs nothing to fix. Electricity needs a complete loop, so a live positive with a broken ground leaves the whole circuit dead and silent.
With the negative cable off, clean both cable ends and both battery posts to bright metal, then follow the black cable to where it bolts to the frame or engine, the ground point owners often ignore. Briggs & Stratton recommends following the cable from the battery and checking every terminal for corrosion or a continuity break.
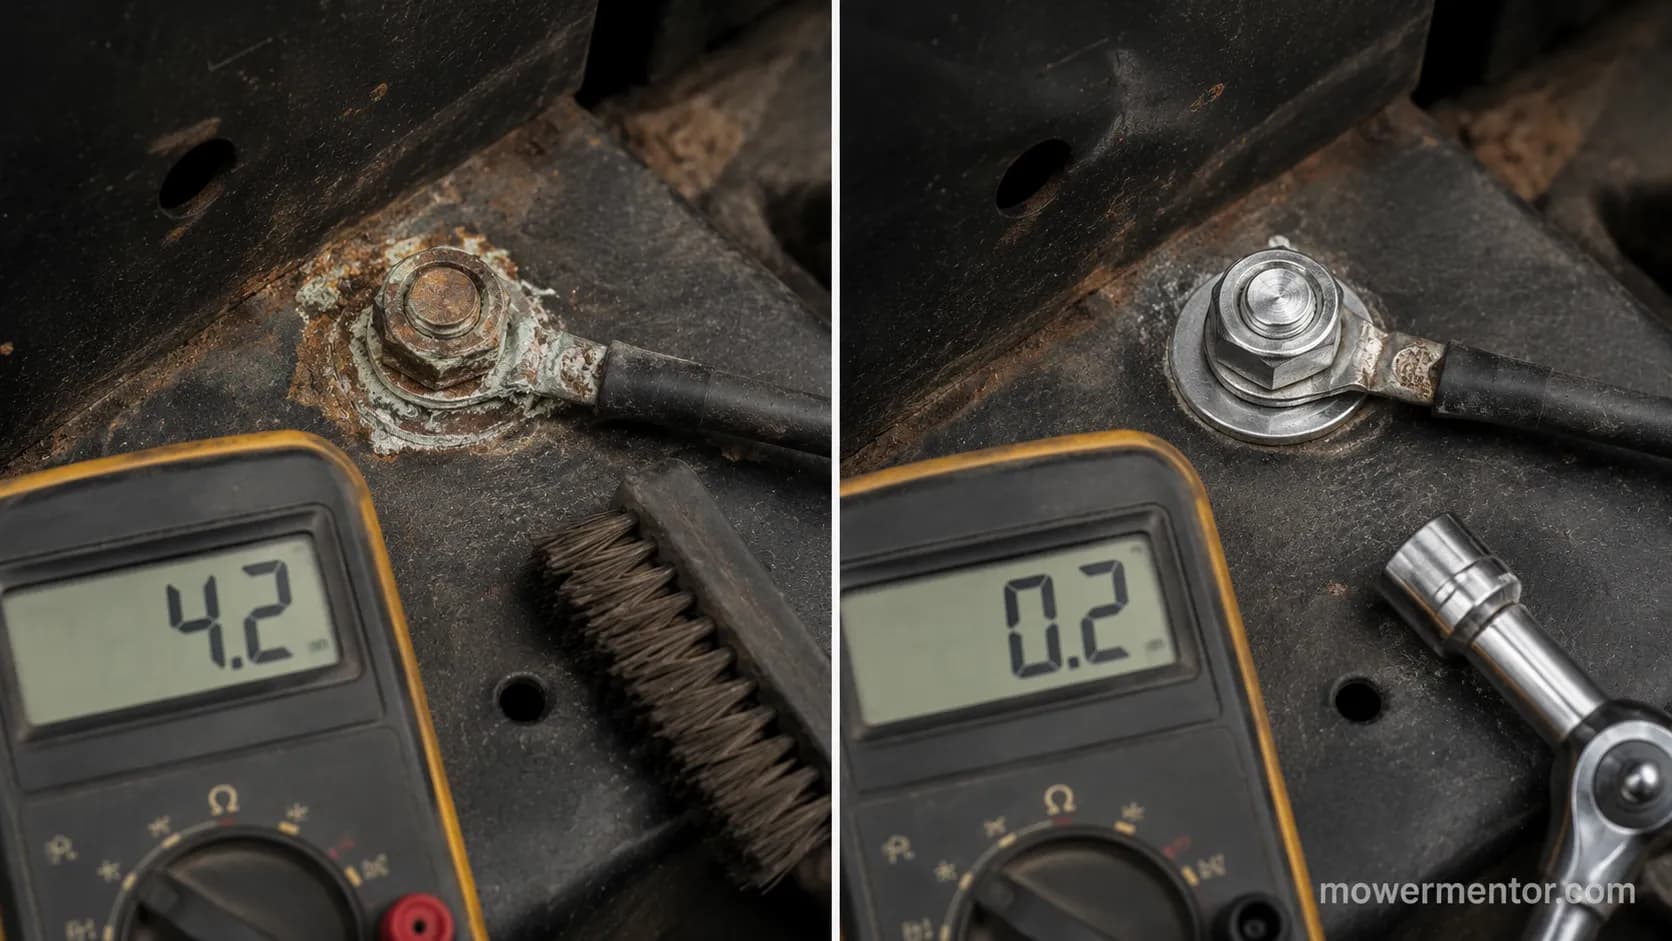
Cleaning terminals is standard advice, but testing the ground is where the fix actually hides. Set the multimeter to resistance (ohms), probe from the negative post to a bare frame point, and expect a reading near zero.
On our Craftsman, that same ground bolt read 4.2 ohms through a film of surface rust, which is enough series resistance to starve the circuit. Cleaning the bolt and re-torquing it dropped the reading to 0.2 ohms, and the mower cranked on the next turn of the key.
A dead ground is the classic no-crank cause worth following end to end, so if yours checks out here, keep going, and if you want the full path walked out, trace the battery-to-ground path.
Reassemble everything clean and tight, then retest for a click. If the connections are bright and the ground reads near zero but the mower is still silent, the break is further along, so check the main fuse next.
One limitation: some ground faults live inside the wiring harness rather than at the visible bolt, and John Deere frames in particular tuck the ground under the fender deck on many models, which is covered in the John Deere starting walk-through.
Check the Main Fuse
The main fuse is a two-minute check that fixes a dead mower cold, and it gets skipped only because owners do not know where to look. On most riding mowers the main or in-line fuse sits near the battery, under the dash, or clipped into the wiring harness close to the solenoid.
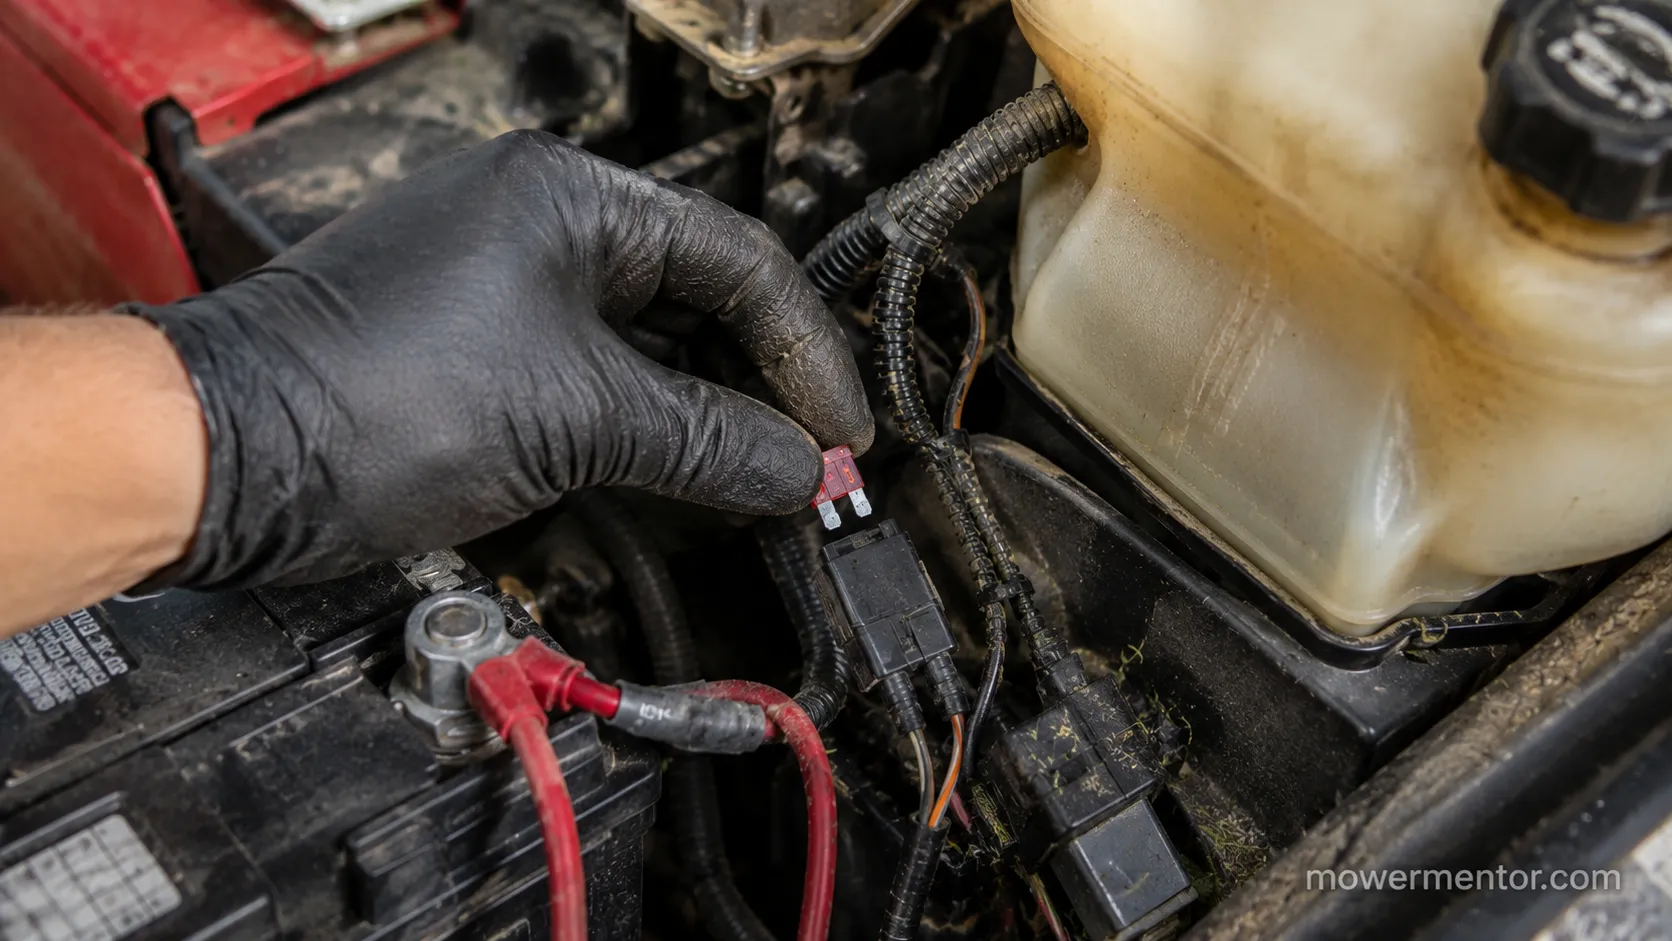
Pull it, inspect the element, and confirm continuity with a meter or a 12 volt test light. As Sears PartsDirect shows, tracing power from the battery through the fuse block is a core step when nothing happens at the key.
Location varies more than the manuals admit. On our Toro the 20 amp fuse sat behind the fuel tank, not under the dash where the layout implied, so we photographed the real spot.
Replace a blown fuse only with the same amperage the operator manual specifies. A fuse that blows again the moment you turn the key is telling you there is a short to find, not a bigger fuse to fit, and up-sizing it risks a harness fire.
If the fuse is good and the mower is still silent, continue to the safety interlocks. Murray riders tuck the fuse into the harness near the solenoid on several models, covered in the full Murray starting checklist, and Troy-Bilt hides it behind the dash panel on Pony and Bronco decks, walked through in Troy-Bilt's fuel-and-electrical diagnosis.
Reset and Test the Safety Interlocks (Seat, Brake, PTO)
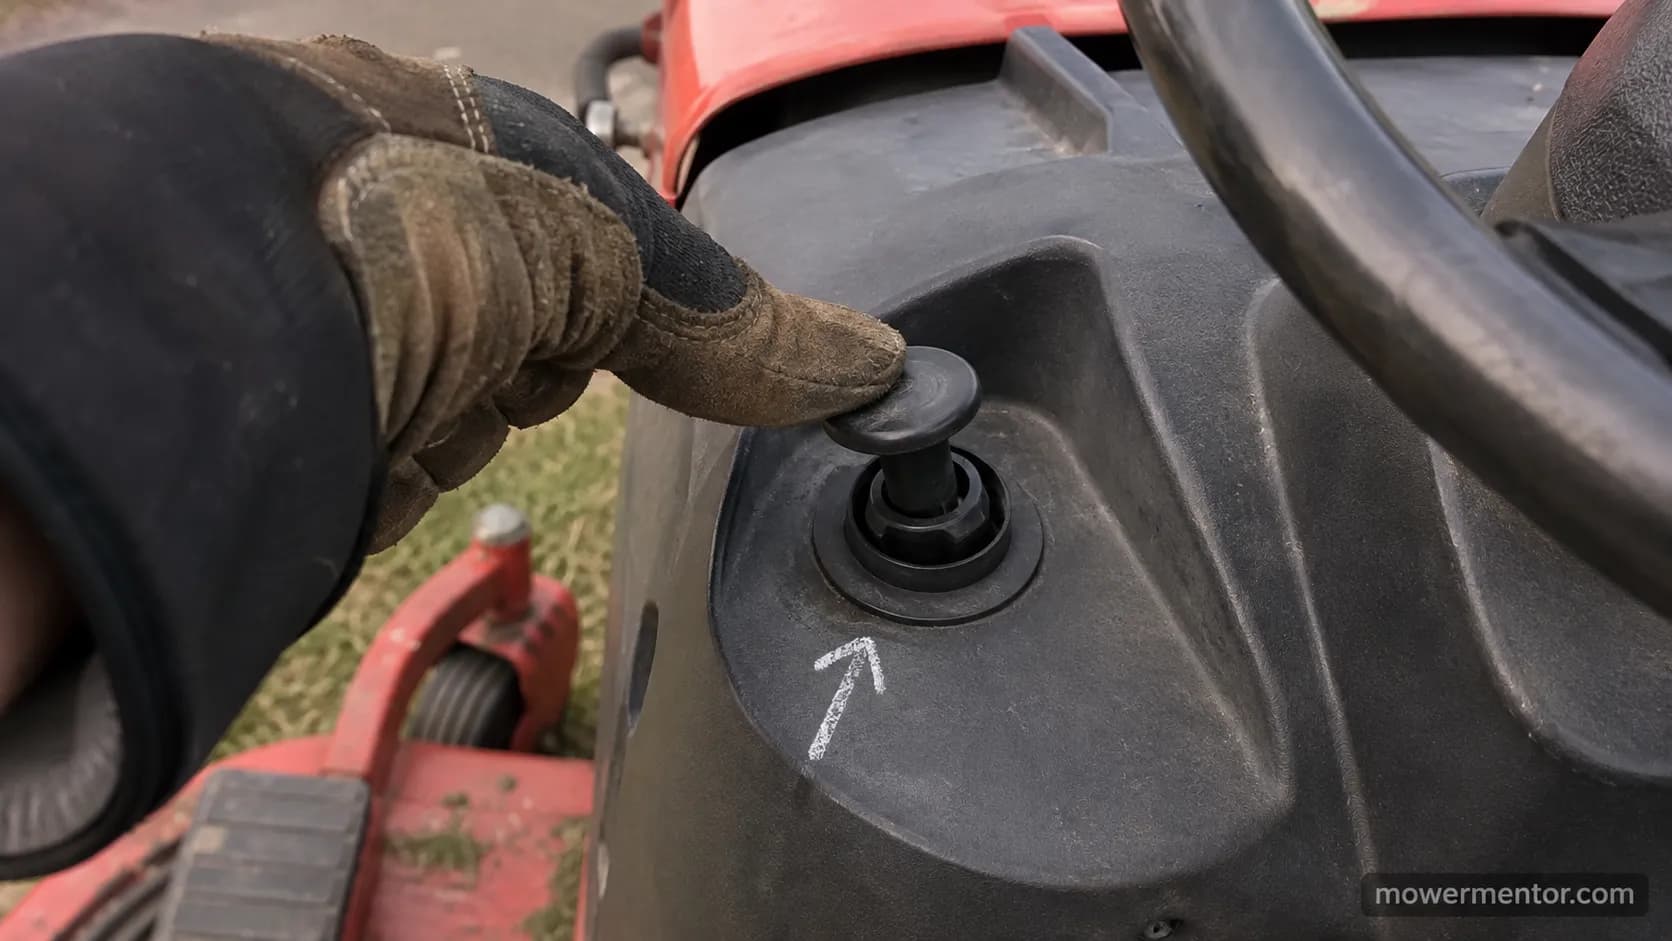
Safety interlocks are the free first move that revives a surprising number of "dead" mowers, because they sit on the ground side of the start circuit and open it when they are not satisfied. Sit fully in the seat, set the parking brake, and push the PTO knob all the way off, then try the key again.
As the forums put it, the safeties are in the grounding side of the start circuit, so a switch that is out of position breaks the loop exactly like a bad ground would. Briggs & Stratton notes a suspect safety switch can be temporarily bypassed to identify it, but never operated without.
Our test mower was dead until we noticed the PTO knob was a quarter-turn out of its detent. Seating it fully restored the click instantly, with no parts and no tools.
To test a suspect interlock, set the meter to continuity and check the switch in its safe position: seated, braked, or disengaged. A switch that never closes is the break. Never mow with a safety switch bypassed, because a temporary jumper is only for confirming the fault, not for running the machine.
If all three interlocks check out and the mower is still silent, move to the ignition switch. Cub Cadet's interlock routing trips up a lot of no-start diagnoses, mapped in the model-aware Cub Cadet decision tree, and Husqvarna hubs share the same seat-and-brake logic across decks, covered in the Husqvarna starting troubleshooting hub.
Test the Ignition Switch (B and S Terminals)
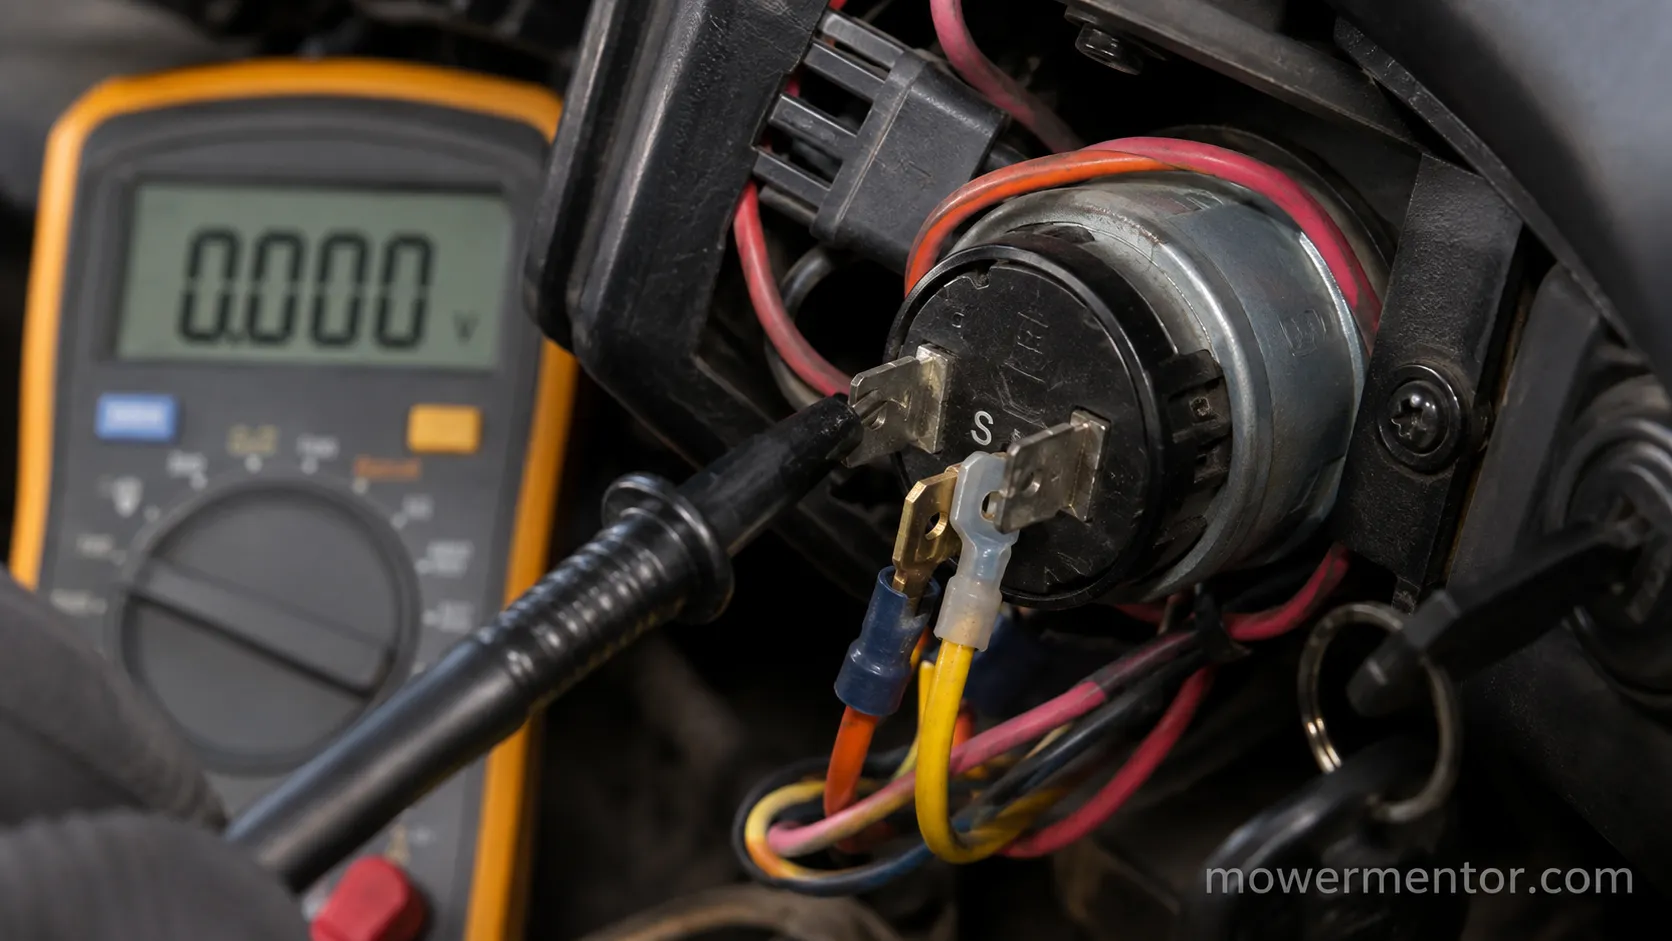
The ignition switch is the last upstream link, and a two-terminal test tells you definitively whether it is the break. Find the switch terminals and identify B (battery) and S (start).
Confirm you have roughly 12 volts at B at all times, then have an assistant hold the key to start while you probe S. The Kohler service manual describes the path: voltage flows from the battery-side terminal through the key switch, the fuse, and the safety switches to energize the solenoid.
The verdict is simple. Power in at B but no power out at S in the start position means the switch itself has failed and is not passing the signal along.
Our switch showed 12.5 volts at B but a flat 0 volts at S in the start position, and a $14 switch fixed a mower that three replaced parts had not.
Terminal | Key position | Expected reading | What it means |
|---|---|---|---|
B (battery) | On and start | ~12 V always | Power is reaching the switch |
S (start) | Start | ~12 V only while cranking | Switch is passing the signal |
S (start) | Start | 0 V | Switch has failed, replace it |
Terminal counts vary across 5-, 6- and 7-pin switches, so match the wiring before you swap. If the switch passes this test, you have proven the entire upstream circuit, and a click should finally appear at the final check below.
On Craftsman riders the no-click fault lands on the switch more often than the solenoid, detailed in the Craftsman no-crank electrical fix; start instead from the full Craftsman starting flowchart if fuel or spark is also suspect. One caveat: a worn key or a loose spade connector can mimic a bad switch, so check those before condemning it.
Confirm the Solenoid and Starter (When You Finally Get a Click)
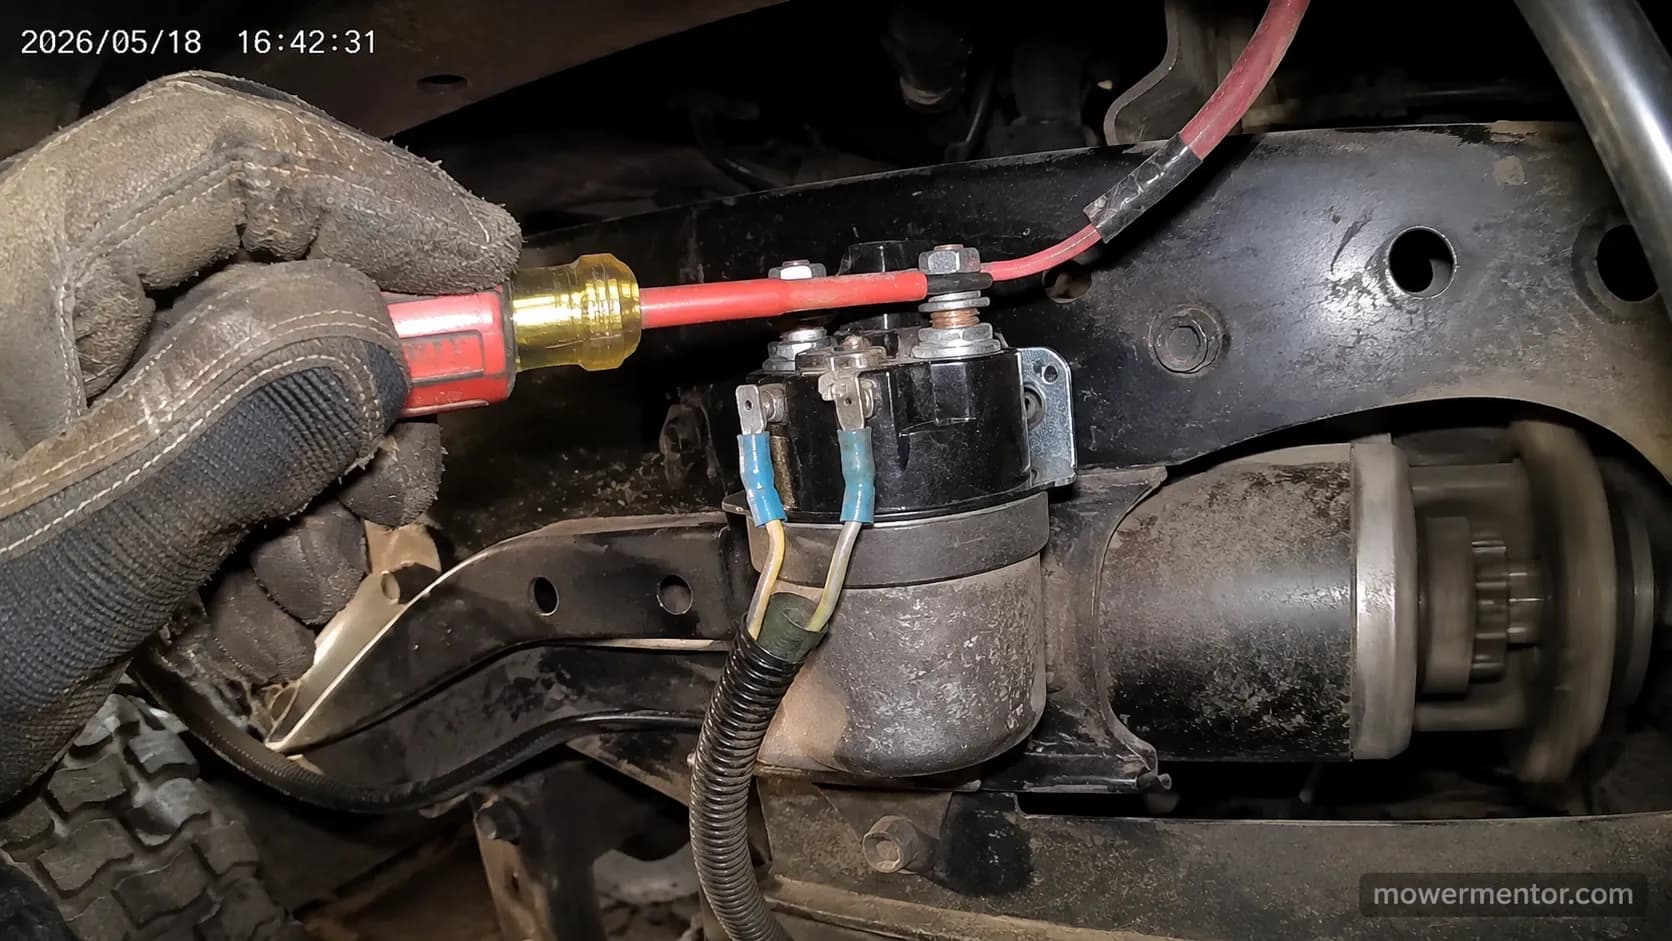
Once the upstream circuit is proven, a returning click moves the fault downstream to the solenoid or starter, and only now does part-swapping make sense. First, a translation: the "starter relay" owners mention is the starter solenoid, the same component under two names, a relay that sits between the battery and the starter motor, as Garden Guides describes.
Bridge the two large solenoid posts with an insulated screwdriver or a jumper, and if the starter spins, the starter is good and the solenoid was the block. As the Kohler service manual describes for solenoid testing, energizing the battery-side terminal and watching the response isolates the part.
If jumping the solenoid does nothing, run direct power to the starter. Nothing means the starter is dead, while a spin sends you back to the solenoid trigger side.
After we fixed the ground, our mower went from silent to a single click, and jumping the solenoid posts spun the starter instantly, confirming the solenoid was next in line rather than the starter.
Before you jump anything, put the transmission in neutral, set the brake, and pull the spark plug wire, because the tool can arc and the engine can lurch. If yours clicks rapidly rather than staying silent, that is a different branch shown in Cub Cadet's rapid-vs-single-click guide.
Troy-Bilt owners often meet a single click here after the ground fix, walked through in Troy-Bilt's no-crank diagnosis. And if the click still refuses to come, the Husqvarna no-crank electrical flow picks up the trail.
Brand Notes: Toro, MTD, John Deere and Husqvarna Quirks
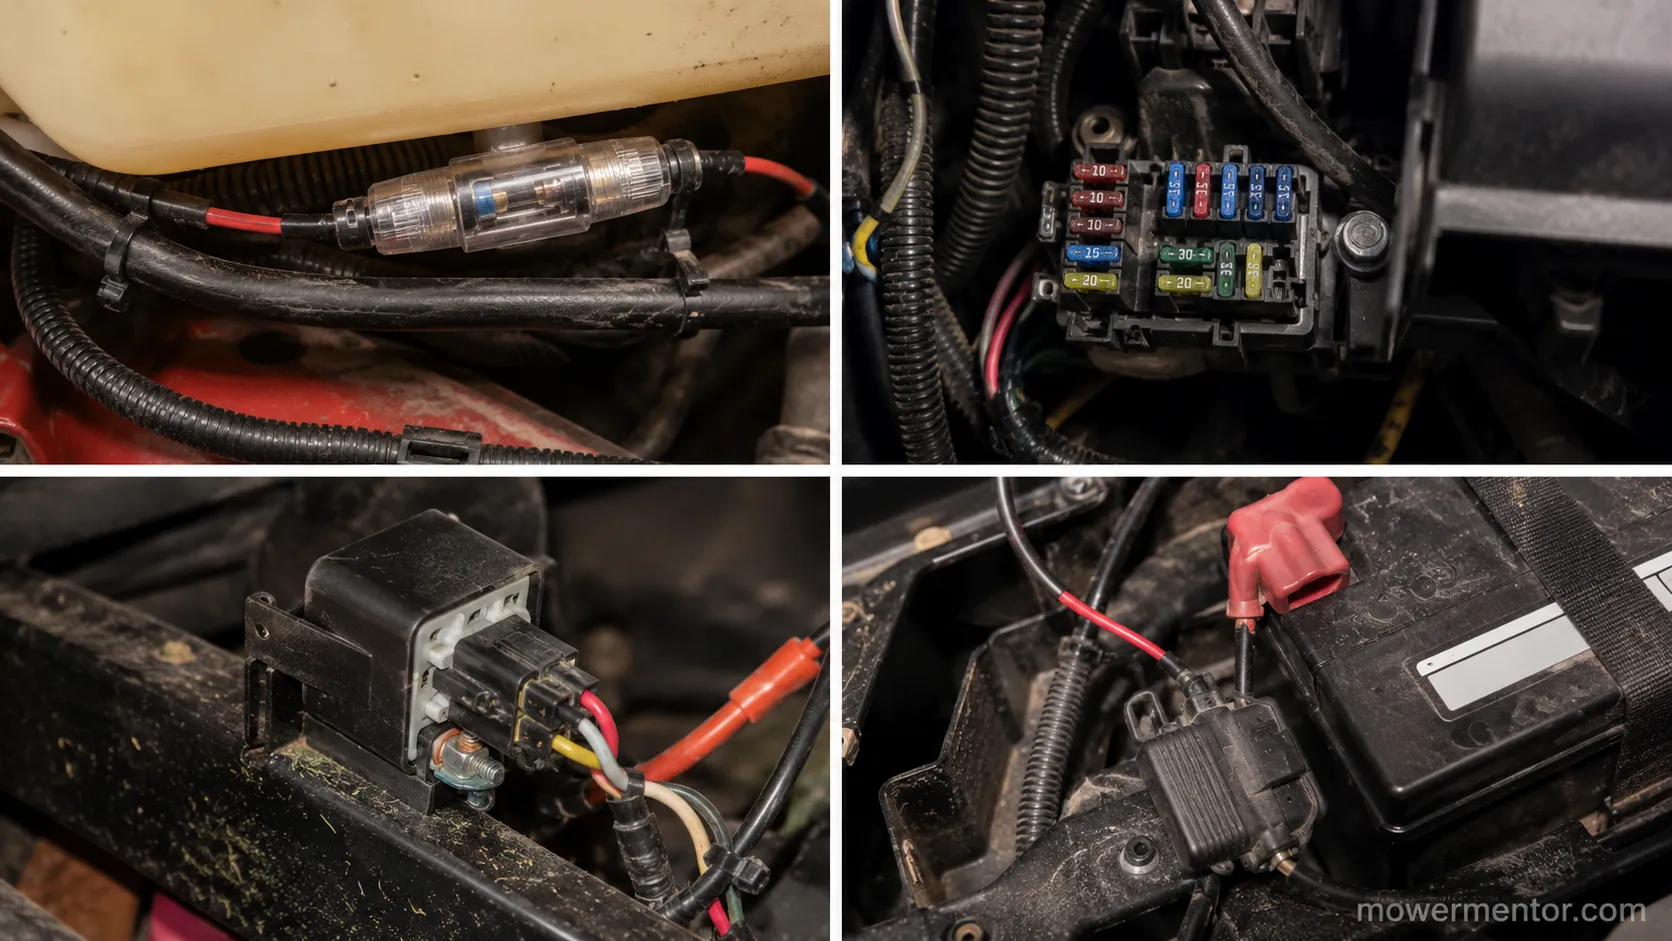
The starting circuit is the same across brands, but the locations differ, and that is what turns a 15-minute fix into an afternoon. Across our Toro, MTD, John Deere and Husqvarna test units the fault chain was identical, yet the fuse hid in four different places, so we mapped each one.
Whatever the badge, the six-step order still holds; only the hardware locations change. Deere owners servicing at the same time can also grab the right filter through the John Deere air filter finder.
Toro and MTD. These two share platforms on many decks, so they share quirks: the in-line fuse often sits behind the fuel tank rather than under the dash, and the ground bolt is commonly on the engine block rather than the frame rail. Check both spots before assuming a bad part.
John Deere. Deere's starter relay mounts differently by model, some clip in and some bolt in with a socket, and the branded silent-key case has its own path in the John Deere no-crank diagnosis. The ground frequently hides under the fender deck.
Husqvarna. Husqvarna's seat and brake interlocks are strict and easily bumped, so run the interlock reset above first. The fuse commonly lives in a harness holder near the battery tray.
Prevention: Keep the Circuit Clean and the Battery Alive
Most no-click failures come back for the same two reasons, corrosion and a battery left to sit flat, and both are easy to prevent. Corroded terminals and a rusting ground bolt add resistance until the circuit finally goes open, while a battery stored below half charge sulfates and loses cranking power.
Keeping a 12 volt battery above roughly 50% charge slows that damage considerably, per the 12 volt state-of-charge reference.
A simple routine keeps the starting circuit healthy:
Clean and grease the terminals and ground bolt once a season
Keep the battery on a maintainer through the off-season instead of storing it flat
Retorque the ground bolt whenever you change the battery
Check resting voltage before the first mow of spring
We kept our worst-corroding test mower click-reliable for a full season with one spring terminal clean and a winter maintainer, logging its resting voltage monthly to confirm it held. Roll the terminal-and-ground check into your yearly service using the complete DIY tune-up guide, and Deere owners can fold it into how to tune up a John Deere mower.
Battery-electric riders skip the starter circuit but still need cell care, covered in electric-mower battery care. One honest limit: even with perfect care, a lead-acid battery ages out in three to five years and will eventually need replacing.
Month | Resting voltage | Action taken |
|---|---|---|
April | 12.5 V | Spring terminal clean, greased |
June | 12.6 V | No action, healthy |
August | 12.5 V | No action, healthy |
November | 12.4 V | Placed on winter maintainer |
February | 12.6 V | Maintainer holding charge |
When to Stop and Call a Pro
After the six steps above, a still-dead mower is rare, and the remaining faults are usually beyond a driveway diagnosis. Three signs mean it is time for a shop: you have replaced parts through the whole circuit and it is still dead, the no-click is intermittent rather than constant, or you smell burning or find a melted connector.
A shop can map harness continuity end to end and bench-test the interlock module, tools most owners do not have.
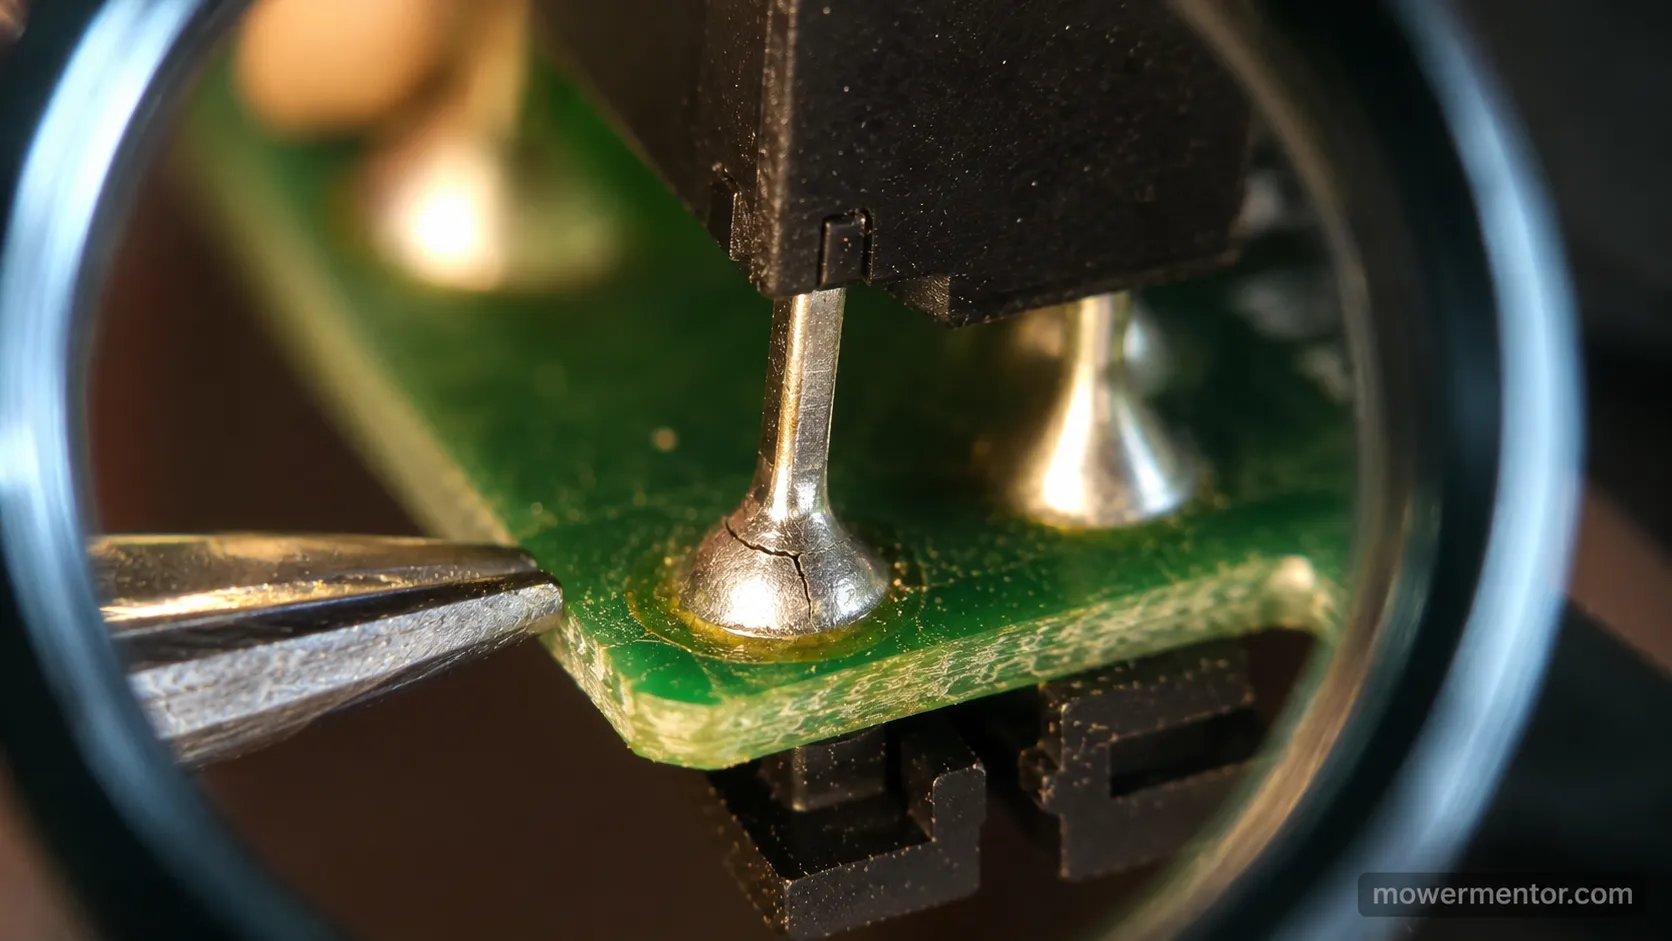
The intermittent case is the sneakiest. One of our test units passed all six steps yet stayed intermittent, and a shop traced it to a cracked solder joint on the interlock module that no static driveway test would ever catch.
That is the honest boundary of a checklist like this one. Static tests find open circuits reliably, but they struggle with faults that appear and vanish with heat or vibration, and chasing those with more parts wastes money.
If you have worked the circuit cleanly and still have nothing, a technician is the cheaper path from here.
Frequently Asked Questions
Why does my riding mower do nothing when I turn the key?
When a riding mower does nothing at the key, no click and often no lights, the starting circuit is open somewhere between the battery and the solenoid trigger. Start with battery voltage and the ground connection, since a flat battery or a corroded ground bolt causes most totally dead cases before any part has actually failed.
I replaced the battery, solenoid and starter and it still won't start, why?
Replacing parts without testing leaves the real break in place. When every swapped component fails to help, the open link is almost always one you did not replace, usually the ground path, a safety interlock, or the ignition switch.
Work the circuit in order with a meter instead of swapping, and you will find it.
Can a bad ground really stop it with no click?
Yes. A starting circuit needs a complete loop, so an open or high-resistance ground stops current just as surely as a dead battery, and the solenoid never clicks.
Test the ground from the battery negative to bare frame with a meter, and expect a reading near zero ohms.
Is a no-click always the battery?
No. The battery is the most likely single cause, but corroded terminals, an open ground, a blown main fuse, a tripped interlock, or a failed ignition switch each produce the same silence.
That is why testing the circuit in order beats replacing the battery on a hunch.
How much does a no-click fix usually cost?
Most no-click repairs are cheap because the common causes are connections and switches, not the starter. On our test units, a $14 ignition switch and a $9 terminal brush resolved two of three mowers outright, with only cleaning and a charge needed on the third.
If it starts but then runs rough, the plug is the usual next culprit, covered in how to change and gap the spark plug.
Fix | Typical part cost | How often it solved ours |
|---|---|---|
Clean terminals and ground | Under $10 | 1 of 3 units |
Replace ignition switch | Around $14 | 1 of 3 units |
Charge or replace battery | $0–$90 | 1 of 3 units |
The Bottom Line
When a riding lawn mower won't start no clicking, resist the urge to throw parts at it. The silence is telling you the starting circuit is open, and testing it battery to ignition in probability order finds the break far faster and cheaper than replacing the solenoid, battery, or starter one at a time.
On our bench, that ordered approach turned three dead mowers into running ones for the price of a switch and a wire brush.
Run the six steps in sequence, disconnect the negative cable before you wrench, and stop to call a technician only when an intermittent or burnt fault survives a clean pass. Do that, and the next time the key turns into silence, you will know exactly where to look.
Summarize with AI
Keep reading
Related articles
 Troubleshooting & Repair
Find, test, and safely bypass the Craftsman riding mower safety switch: seat, brake, and PTO interlocks, with multimeter values and a re-enable step.
 Troubleshooting & Repair
Test your Craftsman riding mower starter solenoid in about 15 minutes with a screwdriver and multimeter, then fix the click-no-crank for around $18.
 Troubleshooting & Repair
Fix a Craftsman riding lawn mower won't start no clicking: test battery voltage, inline fuse, safety switches, ignition and solenoid with a multimeter.
 Troubleshooting & Repair
Find the right Craftsman riding mower battery: 12V U1/U1R size chart by model, 5 tested picks, and why yours keeps dying.
Comments
Moderated for quality. Share a correction, ask a follow-up, or tell us what worked for you - every comment is reviewed before it goes live.