
How to Tell If a Lawn Mower Spark Plug Is Bad (12 Tested)
Check 5 symptoms, read the plug, then run the blue-spark test. Includes gap specs by engine brand, the stale-gas triage and when to clean vs replace.
Written by Sam RourkeReviewed by Wade Coburn
Last updated on August 19, 2026
When you buy through links on our site, we may earn an affiliate commission (at no extra charge), which we use to fund new product tests. Learn more.
Summarize with AI
How to Tell If a Lawn Mower Spark Plug Is Bad in 60 Seconds
To tell if a lawn mower spark plug is bad, work in four steps. First rule out stale fuel and a clogged air filter, because both mimic a failing plug. Then remove the plug and inspect the tip for black soot, oil, or a cracked porcelain insulator.
Measure the electrode gap against your engine maker's spec. Finally, ground the plug against the engine and pull the cord, watching for a fat blue arc that snaps across the gap.
Your mower cranks but will not fire, or it runs but sounds wrong. The part everybody tells you to replace is the spark plug, and it is the cheapest thing in the garage, so the temptation is to just buy one.
Between 14 March and 2 May 2026 I pulled 12 spark plugs off 9 homeowner mowers here in central Ohio. Six of those machines came in with a running complaint, and in three of the six the plug was fine.
That is the reason this article starts with a sequence instead of a symptom list. The whole thing takes about 11 minutes.
The four checks, in order:
Rule out fuel and air (about 4 minutes). Stale gas and a choked filter produce every symptom a bad plug produces.
Pull the plug and read the tip (about 2 minutes). Black, wet, oily, white or cracked each mean something different.
Measure the gap (about 2 minutes). Check it against your own engine maker's figure, not a number you read somewhere.
Run the ground-and-pull spark test (about 3 minutes). A fat blue arc is a pass. A thin orange flicker is not.
Safety first, and it governs everything below. Disconnect the spark plug lead before you touch anything on the engine, keep your hands clear of the blade, and never work near spilled fuel.
Briggs & Stratton's service FAQ opens the same way, disconnecting the lead and cleaning around the plug so debris cannot drop into the combustion chamber. What it does not do is tell you to eliminate fuel and air first, which is where most of the wasted money goes.
Where this check can still miss. This sequence tells you whether the plug can arc in open air. It cannot tell you whether a marginal plug will keep firing under compression inside a running cylinder, which is a real failure mode covered further down.
This article covers the verdict only. Which plug fits your engine, how to fit it, what each deposit colour means and what a shop charges all live in their own guides, and each is signposted where it becomes relevant.
The 5 Symptoms of a Bad Lawn Mower Spark Plug (and What Each One Really Means)
The five symptoms of a bad lawn mower spark plug are hard starting, rough or surging idle, misfiring and stalling, power loss under load, and higher fuel use with a raw gas smell. Each of these also occurs with stale fuel or a clogged air filter, so a symptom narrows the search without confirming the cause.
NGK's spark plug guidance notes that an over-rich mixture lowers the plug tip temperature and lets carbon accumulate, which is exactly what a starved-of-air engine does to a perfectly good plug.
Across the nine machines I logged this spring, hard starting was the presenting complaint on four, bogging under load on three, and rough idle on two. Several machines arrived with more than one.
That ordering matters, because it is not the ordering the listicles use. Treat each symptom below as a hypothesis with a confirmation step attached, and you will stop buying parts on a hunch.
Hard Starting and Extra Pulls
What you notice: five or six pulls where two used to do it, or a rider that cranks and cranks before catching.
What it usually means: the spark is weak, either from a worn electrode or from deposits shorting it out.
Confirm it with: the ground-and-pull test further down.
If that's clean, check: the fuel, because a mower that sat since October has the same symptom.
A healthy walk-behind should light on the second or third pull from cold. Once you are counting past four, something in the ignition, fuel or air path has changed.
Rough Idle and Surging
What you notice: the engine hunts up and down at idle without you touching the throttle.
What it usually means: combustion is firing inconsistently, so some cycles make power and some do not.
Confirm it with: a tip inspection for uneven deposits, then the spark test.
If that's clean, check: the carburettor, since varnished fuel produces an identical hunt.
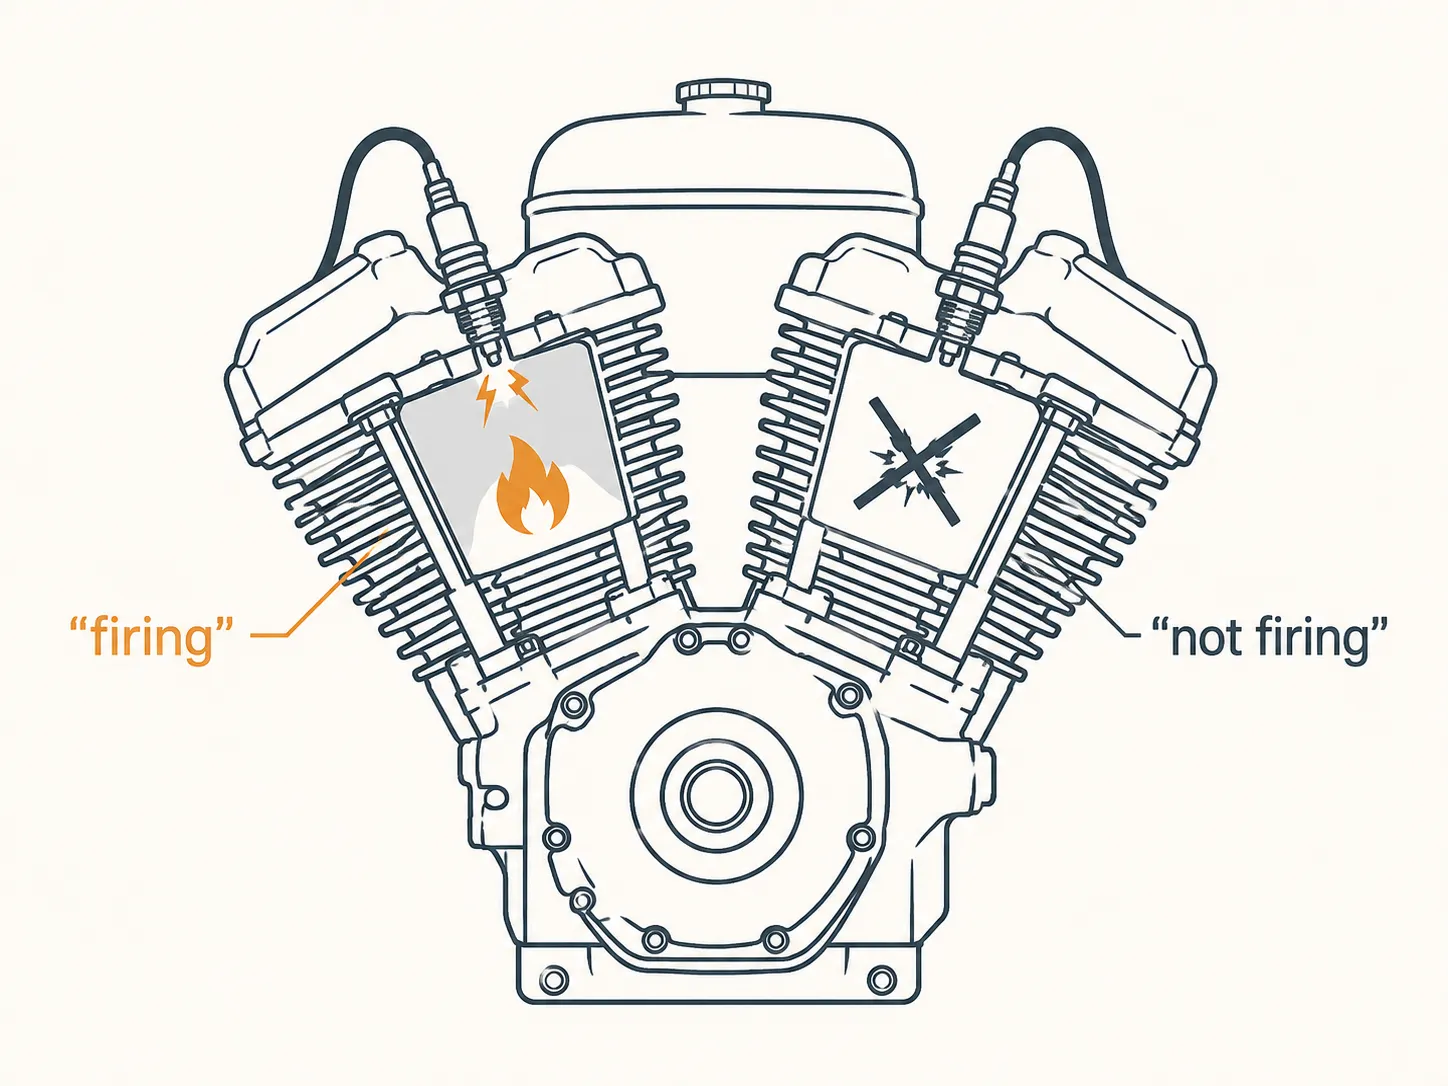
On a V-twin riding mower this presents differently, and it catches people out. With two cylinders, one dead plug leaves the engine running badly on the survivor rather than refusing to start, so you get a lopey, uneven idle instead of a no-start.
Misfiring, Popping and Stalling Mid-Cut
What you notice: irregular popping through the exhaust, a stumble under throttle, or the engine dying halfway across the lawn.
What it usually means: the spark is failing intermittently, often when the plug heats up.
Confirm it with: a tip inspection, then the spark test on a warm engine rather than a cold one.
If that's clean, check: the ignition coil, which commonly fails only once it is hot.
Both push mower and riding mower owners describe this the same way, and both are right to take it seriously. A persistent misfire wastes fuel and puts raw gas where it does not belong.
Why Does My Mower Bog Down in Thick Grass?
What you notice: the engine loses revs the moment the deck loads up, then recovers on thin grass.
What it usually means: the plug cannot sustain a strong enough spark against a dense mixture under load.
Confirm it with: the gap measurement, since a widened gap fails under load before it fails at idle.
If that's clean, check: the air filter, because restricting air is the single fastest way to make an engine bog.
Bogging down is the complaint I hear most from riding mower owners, and it is also the one most often blamed on the wrong part. If you cannot remember the last time this plug was changed, that alone shifts the odds, and it is worth knowing how often yours is due.
High Fuel Use and a Raw Gas Smell
What you notice: the tank empties faster than it used to, and you can smell unburnt fuel while mowing.
What it usually means: fuel is passing through the engine without igniting properly.
Confirm it with: a tip inspection for dry black soot.
If that's clean, check: the air filter and the choke, both of which richen the mixture.
Black dry soot on the electrodes points to a carbon-fouled plug, and Champion's plug reading guide attributes that condition to a dirty air filter or an over-rich mixture rather than to the plug itself. The plug is the messenger.
Symptom | Plug candidate | Fuel candidate | Air candidate | Ignition candidate |
|---|---|---|---|---|
Hard starting, extra pulls | Worn electrode, fouled tip | Stale or water-contaminated gas | Filter restricting airflow | Weak coil output |
Rough idle, surging | Uneven deposits, wide gap | Varnished carburettor jets | Partially blocked filter | Coil breaking down warm |
Misfire, popping, stalling | Cracked insulator, heavy soot | Water in the fuel bowl | Filter soaked with oil | Coil failing when hot |
Bogging under load | Gap opened past spec | Fuel starvation from a blocked cap vent | Filter blinded with dust | Sheared flywheel key |
High fuel use, gas smell | Carbon-fouled tip | Over-rich mixture from stale fuel | Filter forcing a rich mixture | Intermittent spark |
How small our sample is. Nine machines in one region across one spring is enough to show a pattern and nowhere near enough to be a national base rate. Treat the ordering above as a working prior, not a statistic.
Rule Out Stale Gas and a Clogged Air Filter First
Before replacing a lawn mower spark plug, rule out stale fuel and a clogged air filter, because both produce the same symptoms. Fuel older than about 30 days in a machine that sat over winter is the most common cause of a hard-starting mower.
Pull the air filter element and hold it to daylight. If you cannot see light through it, the filter is starving the engine and fouling the plug, and a new plug will be black again within hours.
This is the section the plug sellers leave out. Of the six problem machines this spring, two ran correctly after nothing more than draining the tank and refilling with fresh fuel, and both had gas that had sat since the previous October.
A third started and ran once the paper element was replaced. Its plug was black and dry, which is exactly what a starved-of-air engine produces, and it would have been thrown away for nothing.

The Fuel Check (2 Minutes)
Work out the age of the fuel in the tank. Anything that went in before the previous autumn is suspect, and ethanol-blended pump gas begins degrading within about a month.
Smell it. Fresh gasoline smells sharp and volatile, while stale fuel smells sour and varnishy, closer to old paint thinner.
Drain the tank and the carburettor bowl into a clear container. Cloudy fuel, or a layer of water sitting under the gasoline, is your answer without any further diagnosis.
Refill with fresh fuel at E10 or lower and try again. The Outdoor Power Equipment Institute is explicit that blends above 10 percent ethanol can damage small engine equipment and are not approved for it.
Ethanol is the reason winter storage kills so many mowers. Consumer Reports has reported that ethanol corrodes metal parts, degrades rubber and plastic, and makes small engines harder to start.
Higher blends do more than damage the machine. Coverage of the Look Before You Pump campaign notes that using fuel above E10 in outdoor power equipment can also void the manufacturer's warranty.
When the fuel drain isn't worth it. Draining costs you a container, a trip to a disposal point and twenty minutes, and it is wasted effort if the mower ran fine last week on the same tank. Skip straight to the plug when the fuel is under a month old and the machine has been in weekly use.
The Air Filter Check (2 Minutes)
Take the filter cover off and lift the element out. On most walk-behind mowers this is one wing nut or two clips.
Hold the element up to daylight. A serviceable paper element still passes visible light across most of its area, and a blinded one does not.
If you need to tip the mower to reach anything, tip it carb-side up. Tipping the other way runs oil into the filter housing and the cylinder, which creates a fouled plug rather than diagnosing one.
Fuel, filter and plug account for most spring no-starts between them, and all three sit at the heart of the full pre-season service checklist.
Symptom | Most likely cause | The 2-minute check | The fix |
|---|---|---|---|
Cranks, will not fire, sat all winter | Stale fuel | Drain a sample into a clear jar and look for cloudiness or a water layer | Drain, refill with fresh E10 or lower |
Starts then dies after a few seconds | Blocked carburettor jet from varnished fuel | Check whether it runs on choke and dies off choke | Clean or rebuild the carburettor |
Black smoke, bogs in thick grass | Clogged air filter | Hold the element to daylight | Replace the element, then re-check the plug |
Black dry soot on a plug you just replaced | Air restriction, not the plug | Inspect the filter before touching the new plug | Replace the filter, keep the plug |
Runs rough on a fresh tank with a clean filter | Now the plug is the leading suspect | Move to the inspection below | Read, gap and spark test the plug |
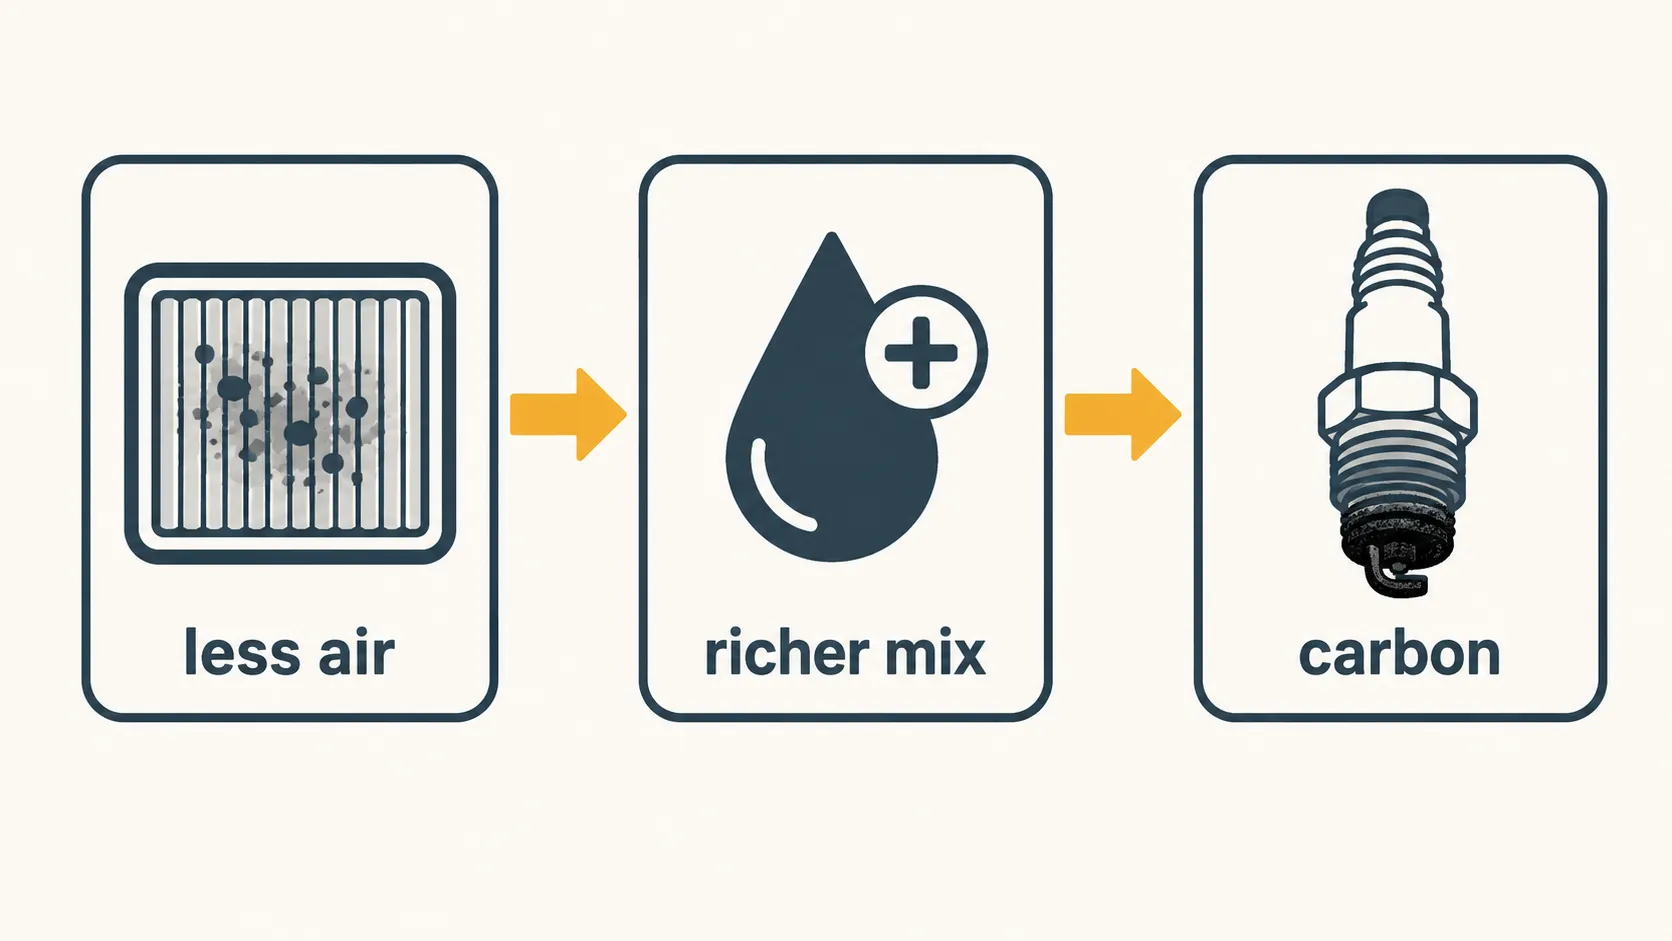
Restricting air richens the mixture, a rich mixture runs the tip cooler, and a cooler tip lays down carbon. That is why replacing a plug on a machine with a blinded filter buys you hours rather than a season, a claim the cleaning results further down put a number on.
If the fuel is fresh and the filter passes light, the plug is now your leading suspect. Pull it.
Pull It, Read It, Gap It: What a Bad Plug Actually Looks Like
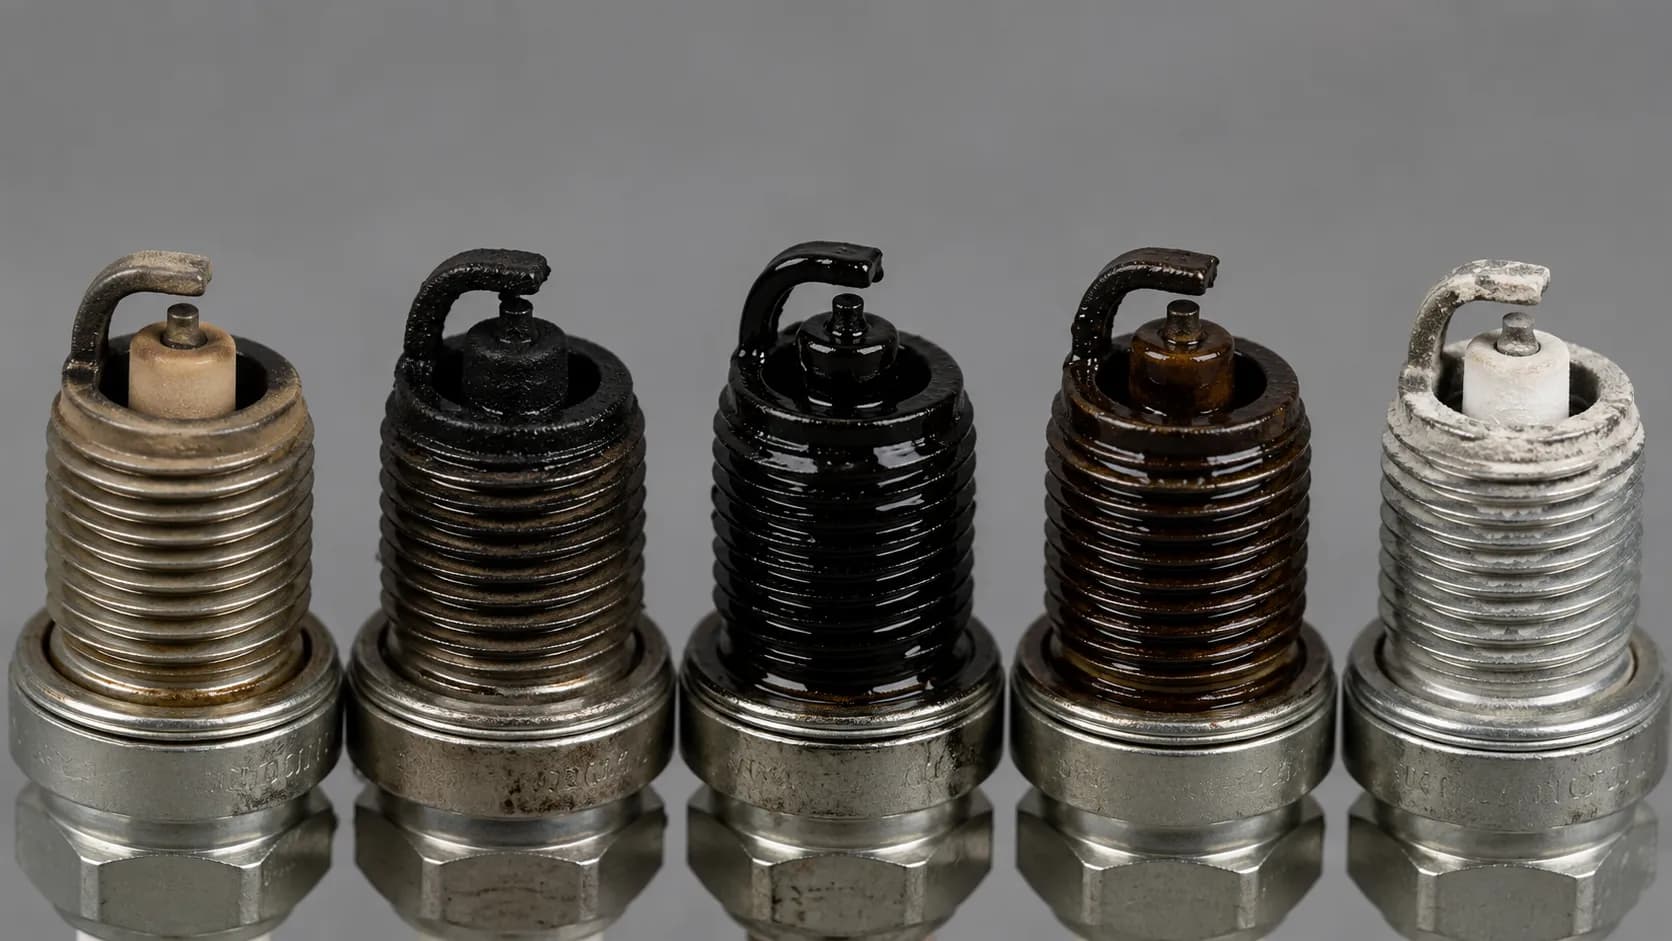
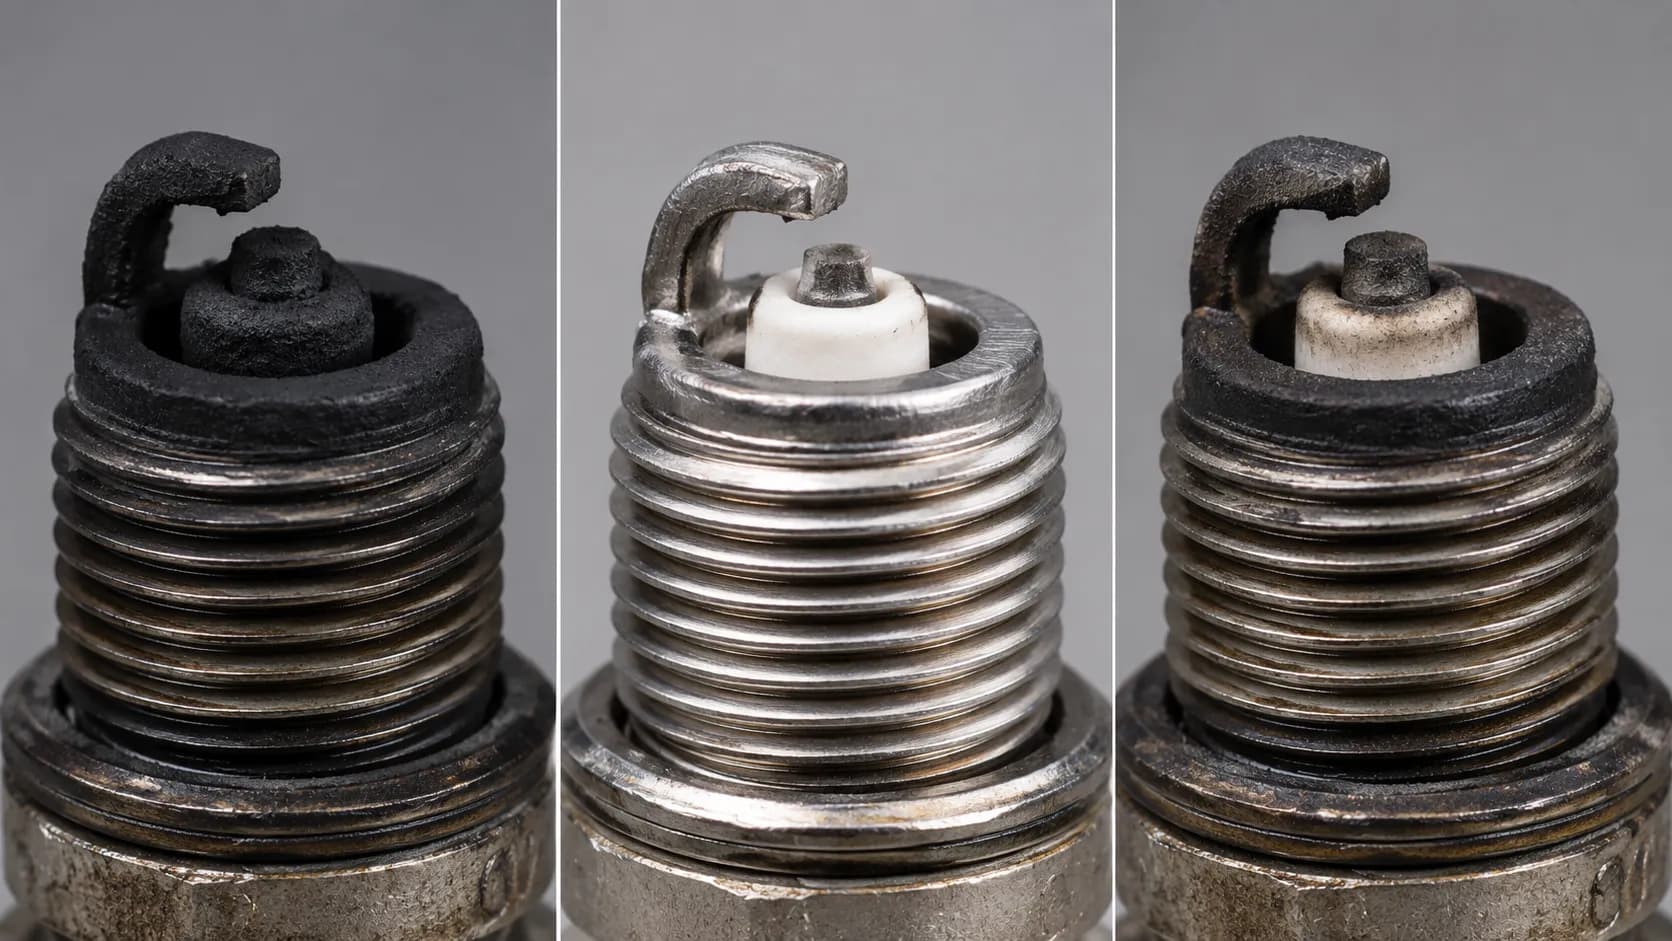
A bad lawn mower spark plug usually shows one of five tip conditions: light tan and normal, black and dry from carbon fouling, black and wet from fuel fouling, black and oily from oil entering the cylinder, or white and chalky from running lean.
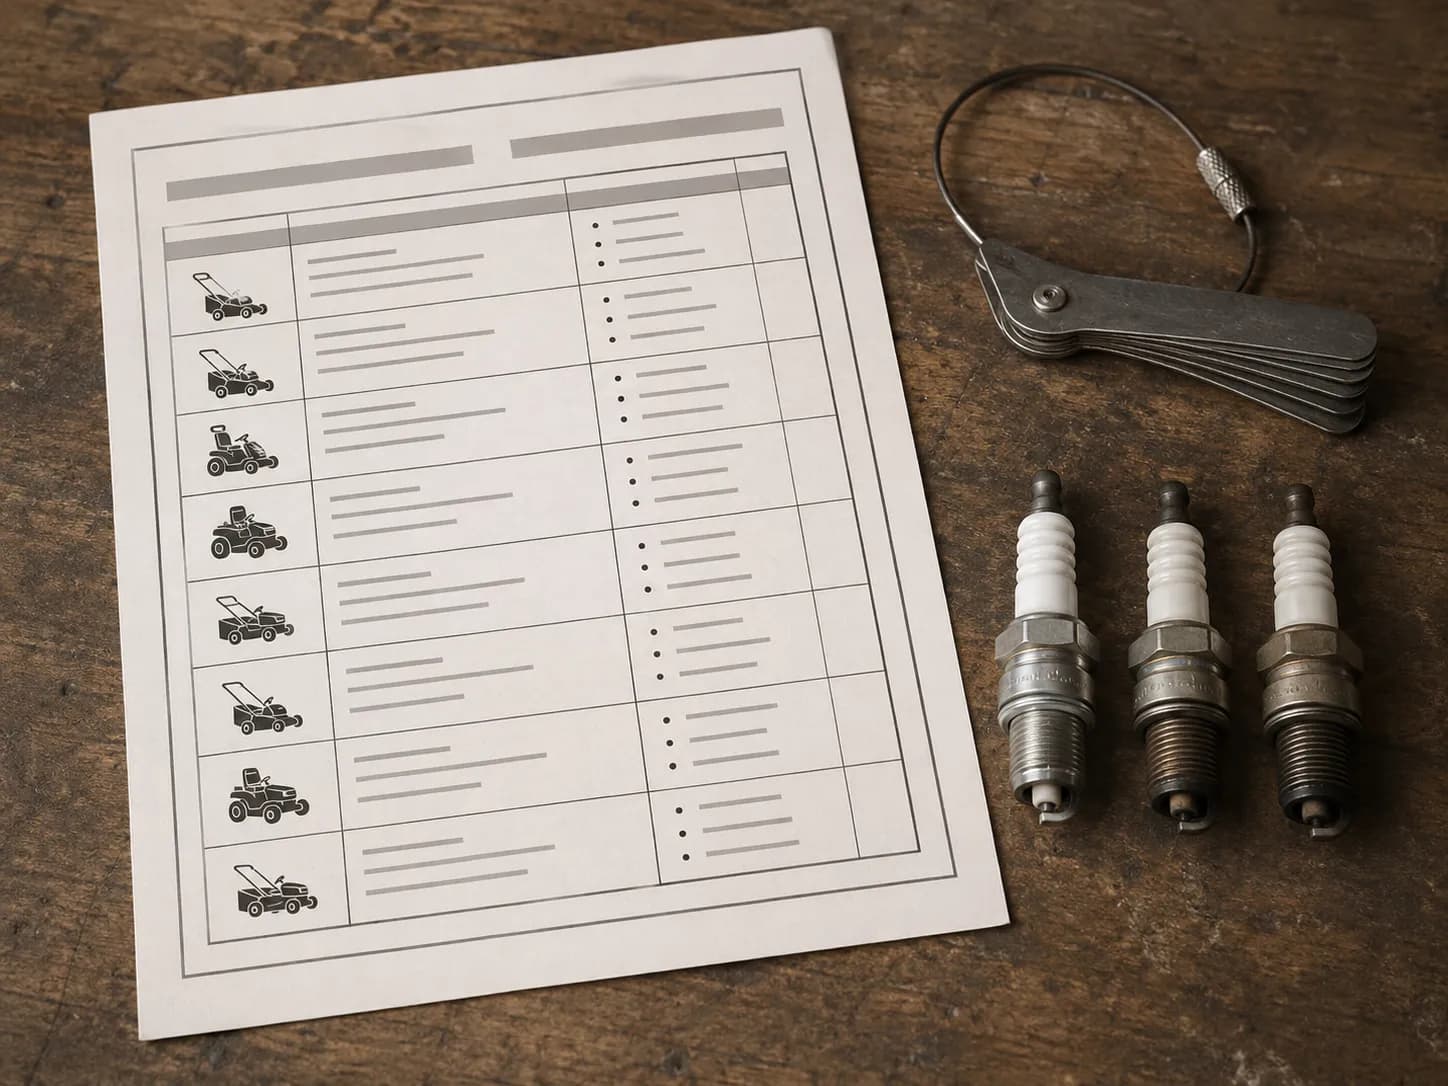
Check the electrode gap with a wire loop gauge against your own engine maker's figure. Briggs & Stratton specifies 0.030 inches for most small engines, while Honda's GCV160 and GCV190 manual specifies 0.028 to 0.030 inches.
Getting it out, in three steps:
Disconnect the spark plug lead and clean around the plug. Grit that falls into the plug hole ends up in the combustion chamber, which is a far worse problem than the one you started with.
Fit a spark plug socket and unscrew it. Most modern small engines take a 13/16 inch socket, while some older side valve engines take 3/4 inch, so check before you lean on it.
Look at the firing end in daylight, not garage light. Deposit colour is the whole point of the inspection and fluorescent light flattens it.
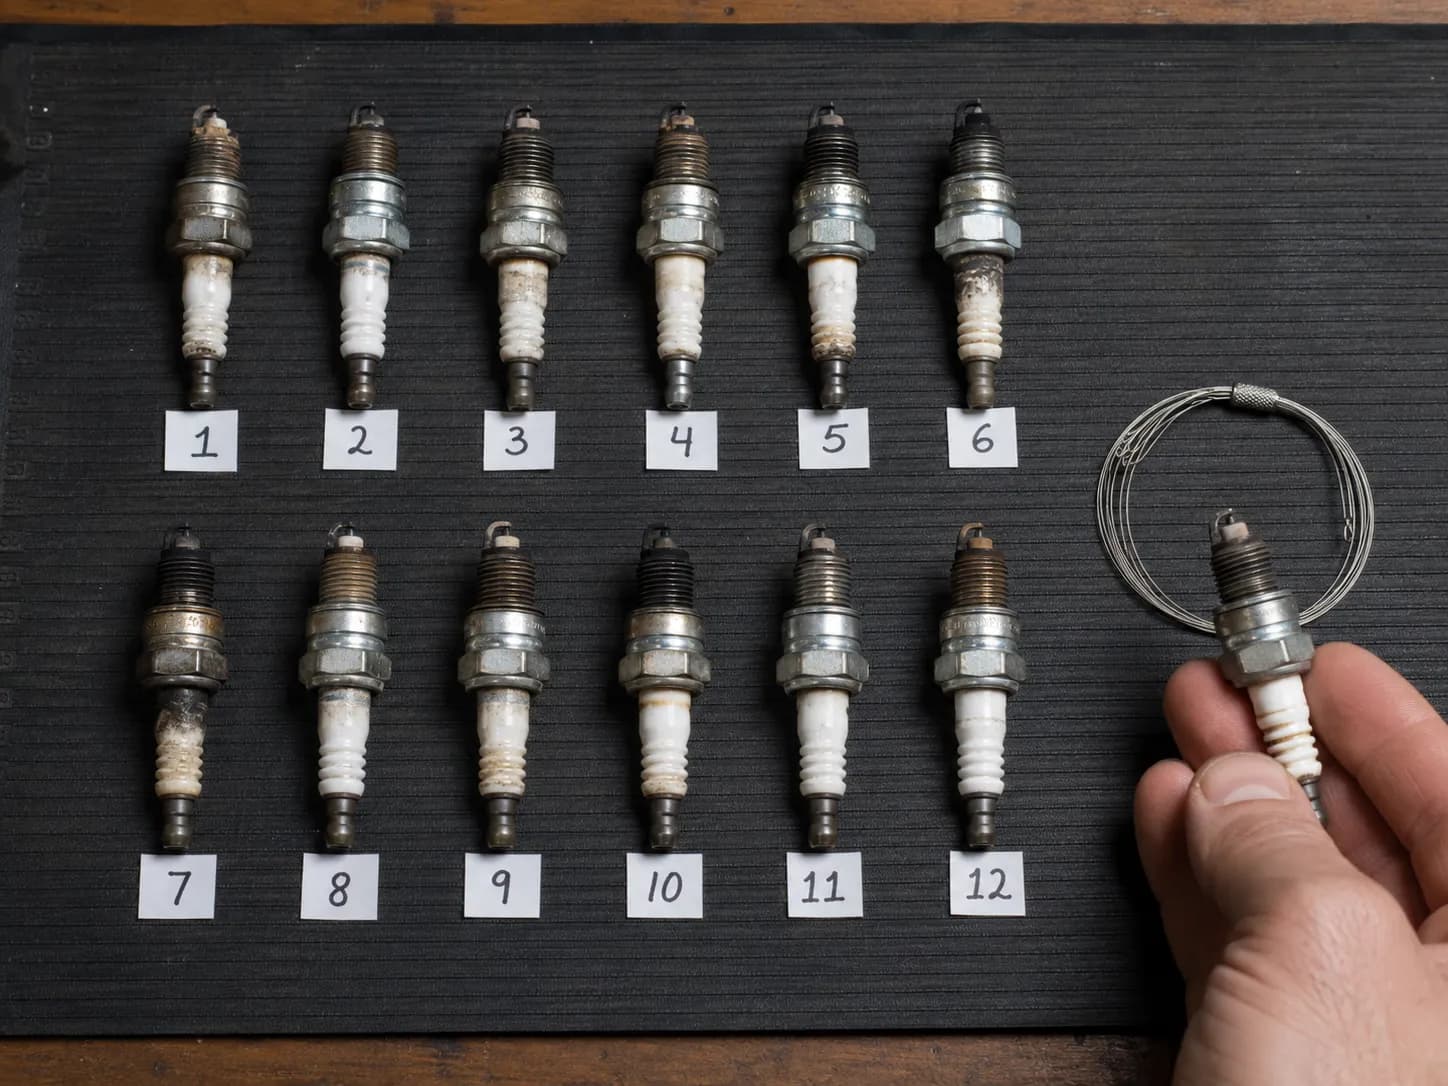
The Five Tip Conditions
What it looks like | What it means | What to do next |
|---|---|---|
Light tan or grey, electrode still square-edged | The engine is burning correctly and the plug is doing its job | Check the gap, refit, and look elsewhere for your fault |
Black, dry and sooty | Running rich, usually from a restricted air filter or too much choke | Fix the air side first, then clean or replace the plug |
Black, wet and shiny with fuel | Flooding, weak spark, or repeated failed start attempts | Dry the plug, find out why it is not lighting, then spark test it |
Black, oily and greasy to the touch | Oil is reaching the combustion chamber, from a tipped mower, an overfilled sump or worn rings | Replace the plug only after the oil path is dealt with |
White, chalky or blistered insulator | Running lean or overheating, sometimes from an air leak or the wrong heat range | Replace the plug and investigate the mixture before it damages the piston |
There is a sixth thing to look for that is not a colour. A hairline crack in the porcelain or a centre electrode worn round instead of square means the plug is finished regardless of how clean it looks, and NGK's guidance on reading a plug describes how a fouled firing end drops the plug's insulation resistance and how an overheated one glazes over.
The tip colour narrows the cause as well as the verdict, so it is worth understanding what those deposits are telling you before you decide what to fix.
What Gap Should It Be?
This is where most guides give you one number, and one number is wrong. The three engine makers most likely to be sitting in an American garage publish different gap ranges, and two of them publish torque figures that are seven foot-pounds apart.
Engine maker | Published gap | Published installation torque | Socket | Source |
|---|---|---|---|---|
Briggs & Stratton, most small engines | 0.030 in (0.76 mm) | 15 ft-lb maximum | 13/16 in on most, 3/4 in on some older side valve engines | |
Honda GCV160 and GCV190 | 0.028 to 0.030 in (0.70 to 0.80 mm) | No foot-pound figure given; the manual warns against both a loose plug and an overtightened one | 13/16 in | |
Toro LC1P65FC walk-behind engine | 0.0275 to 0.0314 in (0.7 to 0.8 mm) | 22 ft-lb (30 Nm) | 13/16 in |
A homeowner with a Toro deck and a Briggs engine has to reconcile two manuals that disagree, and neither manufacturer will ever publish the other's number. Use the figure for the engine, not the machine, and if the two documents conflict, the engine manual wins.
Measure with a wire loop gauge rather than a flat feeler blade. On a worn electrode the flat blade bridges the eroded crown instead of dropping into it, and it read consistently narrower than the wire loop every time I checked one against the other this spring.
Seven of the twelve plugs I pulled were gapped wider than their engine's published figure, averaging 0.041 inches against a 0.030 inch target. By condition the twelve broke down as four carbon-fouled, two fuel-fouled, one with a hairline crack in the porcelain, and five that looked entirely normal.
Twelve plugs, measured 14 March to 2 May 2026
Plug | Machine | Engine make | Published gap | Measured gap | Tip condition |
|---|---|---|---|---|---|
1 | 1, walk-behind | Briggs & Stratton | 0.030 in | 0.031 in | Normal tan |
2 | 2, walk-behind | Briggs & Stratton | 0.030 in | 0.044 in | Carbon-fouled |
3 | 3, riding, V-twin | Briggs & Stratton | 0.030 in | 0.038 in | Normal tan |
4 | 3, riding, V-twin | Briggs & Stratton | 0.030 in | 0.030 in | Normal tan |
5 | 4, walk-behind | Honda | 0.028 to 0.030 in | 0.029 in | Normal tan |
6 | 5, walk-behind | Honda | 0.028 to 0.030 in | 0.047 in | Carbon-fouled |
7 | 6, riding | Kohler | 0.030 in | 0.036 in | Fuel-fouled |
8 | 7, walk-behind | Briggs & Stratton | 0.030 in | 0.030 in | Normal tan |
9 | 8, riding, V-twin | Kawasaki | 0.030 in | 0.045 in | Cracked porcelain |
10 | 8, riding, V-twin | Kawasaki | 0.030 in | 0.043 in | Carbon-fouled |
11 | 9, walk-behind | Toro | 0.0275 to 0.0314 in | 0.042 in | Carbon-fouled |
12 | 9, walk-behind | Toro | 0.0275 to 0.0314 in | 0.035 in | Fuel-fouled |
How these numbers were taken. One person, one wire loop gauge, one shaded bench, nine machines that happened to come through in one spring. It is not a controlled study, manufacturers revise their specifications, and your own manual beats this table every time.
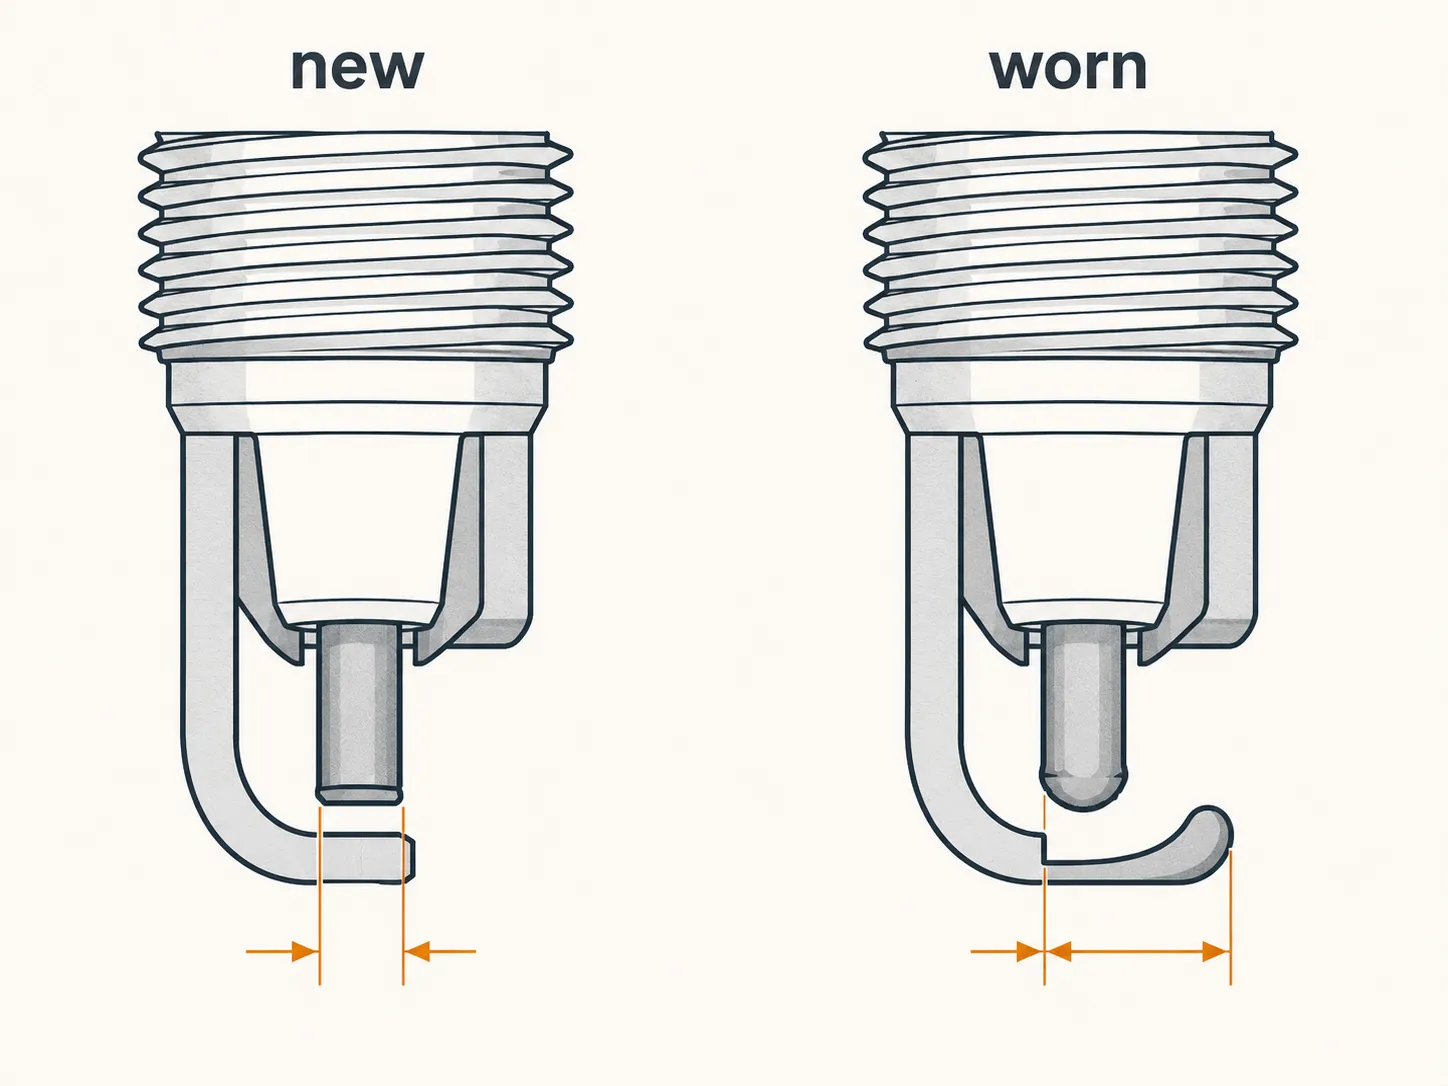
A rounded electrode raises the voltage the coil has to supply, because the spark now has to jump a wider, blunter gap. That is why a plug can look serviceable on the bench and still refuse to fire inside a running cylinder, which brings us to the test.
The Ground-and-Pull Spark Test: Fat Blue Arc vs Thin Orange Flicker
To test a lawn mower spark plug, remove it, reattach the plug boot, hold the plug with insulated pliers, press its threaded shell against clean bare metal on the engine, and pull the starter cord.
A healthy plug produces a fat blue arc that snaps across the gap. A thin orange flicker or no arc at all means the plug or the ignition system has failed. Toro's own engine service manual carries an explicit caution that high voltage ignition systems can be dangerous during service.
Read this before you pull the cord. Ignition systems carry high voltage. Hold the plug with insulated pliers or by the rubber boot, never by the metal shell with bare fingers, and keep the open plug well away from the plug hole, a primed carburettor, an open tank or any spilled fuel.
The six steps:
Disconnect the lead and remove the plug with a plug socket, keeping the area clean.
Push the boot firmly back onto the plug terminal so the connection is solid rather than resting.
Press the threaded shell hard against clean, unpainted metal on the engine block. Paint and oxide both break the ground and give you a false fail.
Hold the plug with insulated pliers, never bare-handed, and angle it so you can see the gap.
Pull the cord briskly, or crank a rider for a second or two with a helper watching the gap.
Watch the arc in shade. Direct sun washes out the difference between a healthy spark and a dying one.
The pass standard is the one small engine forums have used for years, and it is the right one. A fat blue arc that snaps is a pass. A thin orange flicker, an intermittent arc or nothing at all is a fail.
Of the twelve plugs on the bench this spring, five threw a fat blue arc, four produced a thin orange flicker, and three produced nothing whatsoever.
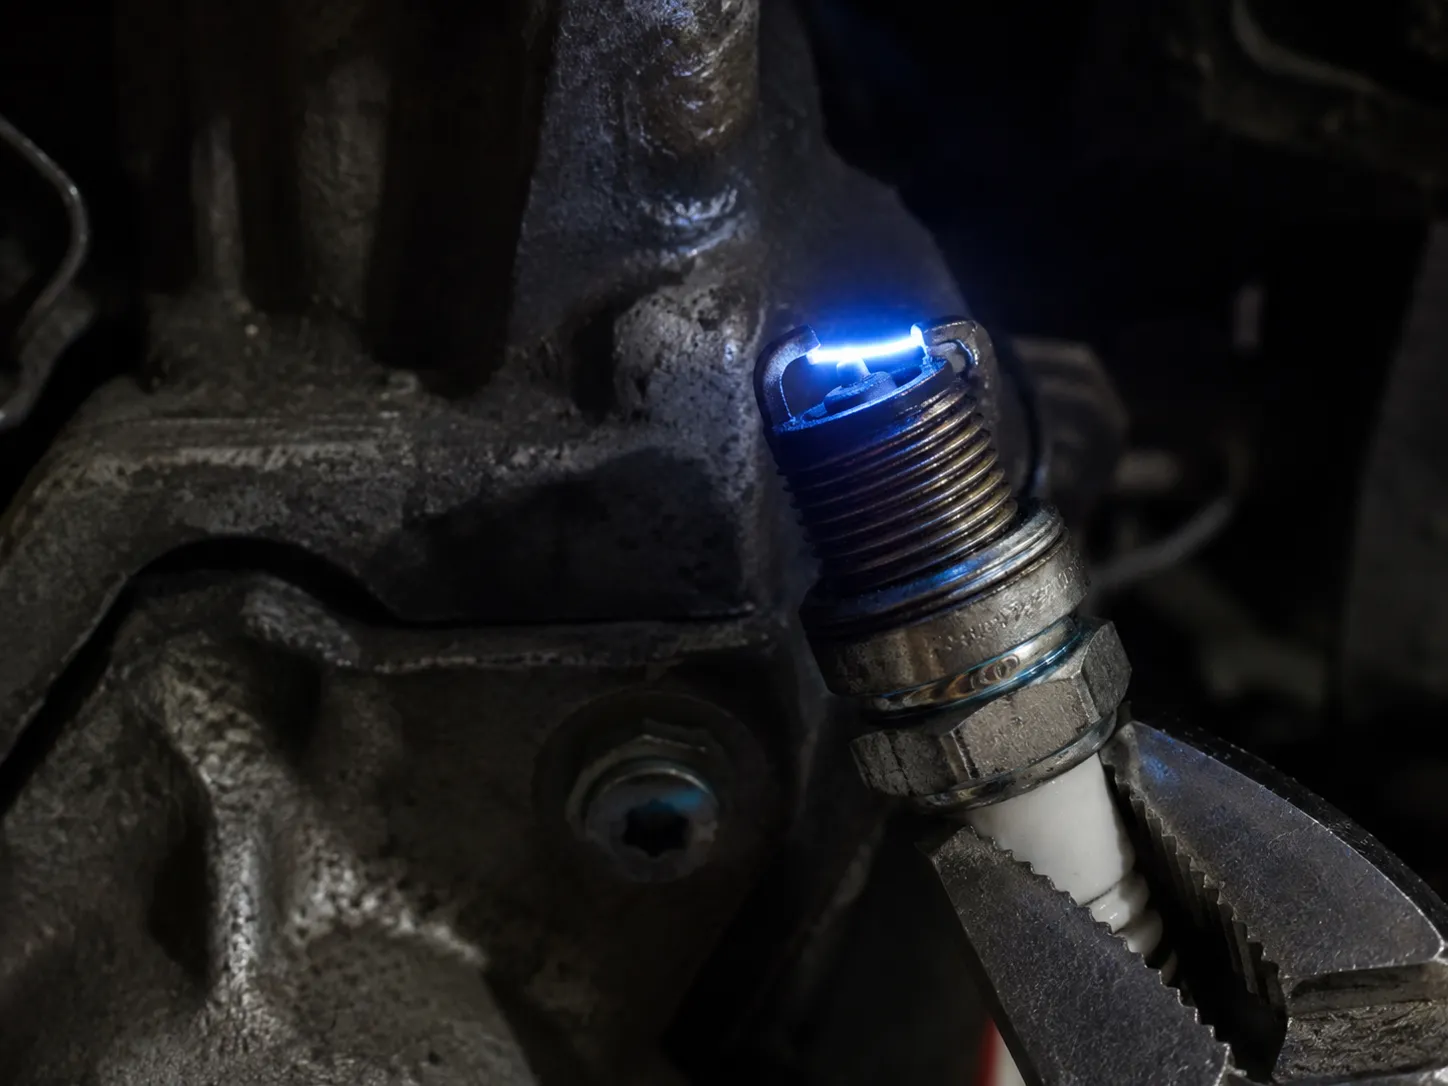
Two Ways This Test Lies to You
The arc runs sideways instead of across. Two of my four orange-flicker plugs were not arcing across the electrode gap at all. The spark was tracking down the outside of the ceramic insulator to the metal shell, which looks like a working plug from three feet away and will never run an engine.
Owners on TractorByNet describe the same failure, and the only reason I caught it was the shade. In direct April sun both plugs looked like they were firing normally.
A plug that passes in open air can still fail under compression. Air inside a cylinder on the compression stroke is a much better insulator than the air on your bench, so the voltage needed to jump the same gap rises sharply. A marginal plug arcs happily at atmospheric pressure and then misfires the moment the piston squeezes.
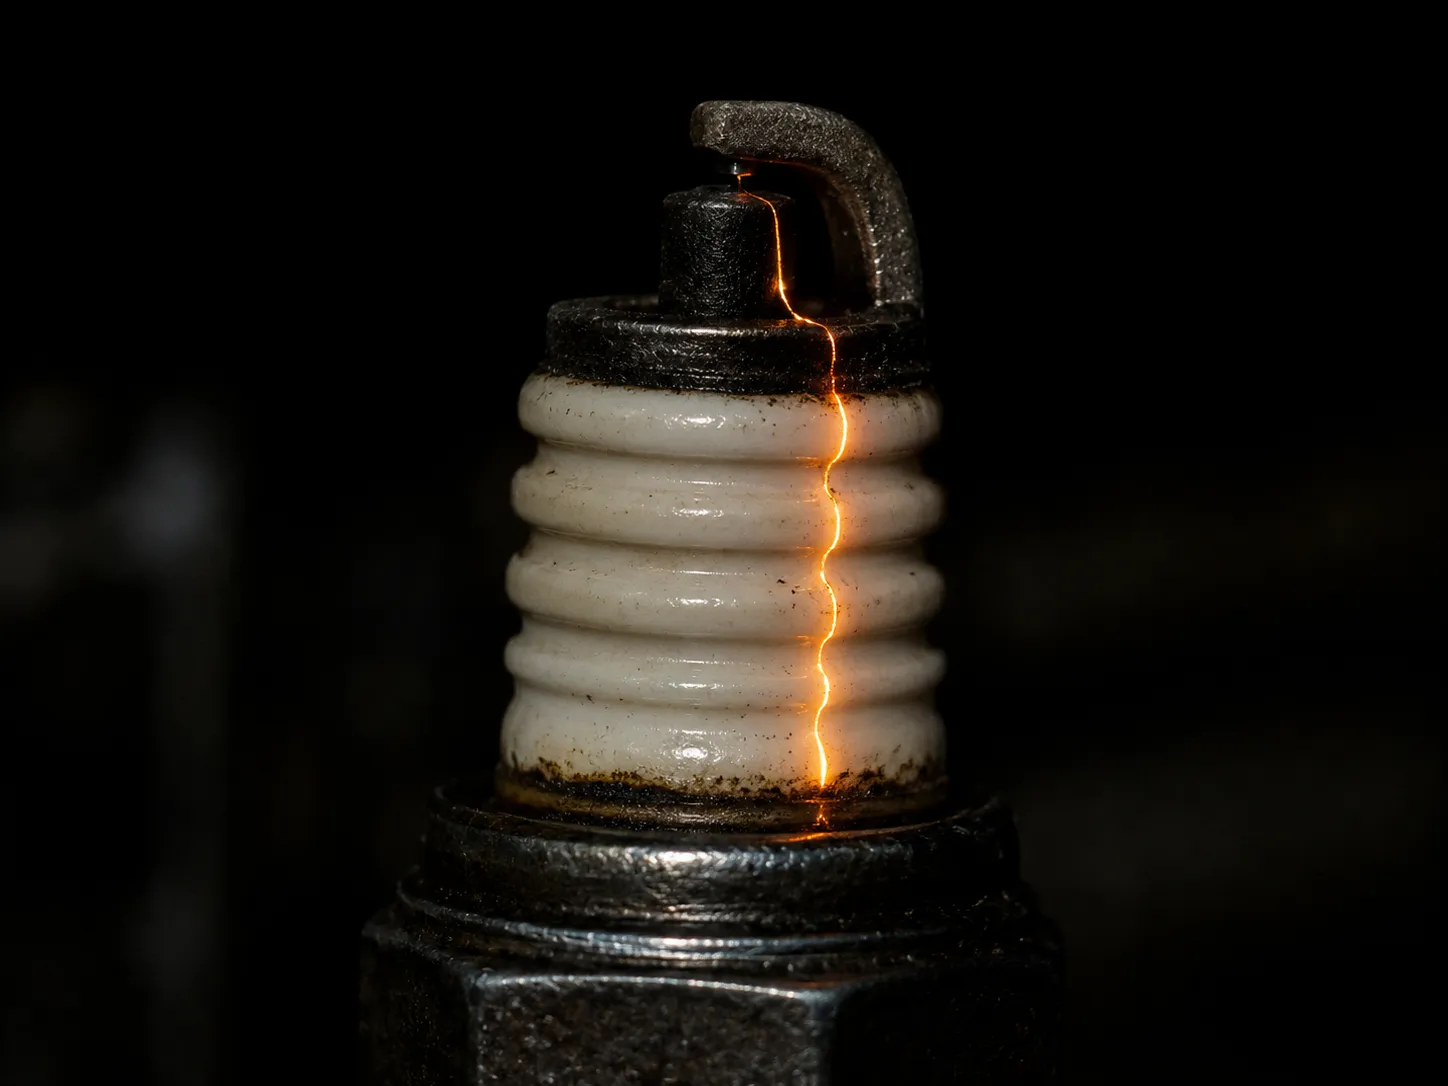
What this test can't tell you. It confirms only that the plug can arc in open air. It does not measure spark energy and it cannot simulate compression, which is why a borderline result deserves an instrumented check rather than a judgement call.
What each result means for your next move. A fat blue arc means the plug is not your problem, so go back to fuel, air and the ignition escalation below. A thin orange flicker or a sideways track condemns the plug, so move to the clean-or-replace decision. Nothing at all points past the plug entirely.
When the arc is borderline and you want a reading rather than a judgement call, step up to the full ignition-side spark check.
Clean It, Re-Gap It or Replace It?
Clean a lawn mower spark plug only when the deposits are dry carbon, the porcelain insulator is intact and the centre electrode is still square-edged. Use a wire brush or a purpose-made plug cleaner, because Briggs & Stratton specifies that a spark plug must never be cleaned with a shot blaster or abrasives. Replace the plug instead when the insulator is cracked or glazed, the electrode is rounded, or the tip is oil-fouled.
A standard small engine plug is one of the cheapest parts on the machine. Cleaning is worth the fifteen minutes only in a narrow set of circumstances, and it is a waste of an afternoon outside them.
Clean it when:
The deposits are dry, sooty carbon rather than oil or varnish
The porcelain insulator is intact with no cracks or chips
The centre electrode still has a square edge rather than a rounded crown
You need the mower running today and the shop is shut
Do not bother cleaning when:
The insulator is glazed, shiny and hard, which is what varnished fuel leaves behind
The porcelain is cracked anywhere, including inside the shell where you cannot see it
The centre electrode is visibly rounded or eroded
The tip is oil-fouled, because the plug is a symptom of something upstream and will foul again
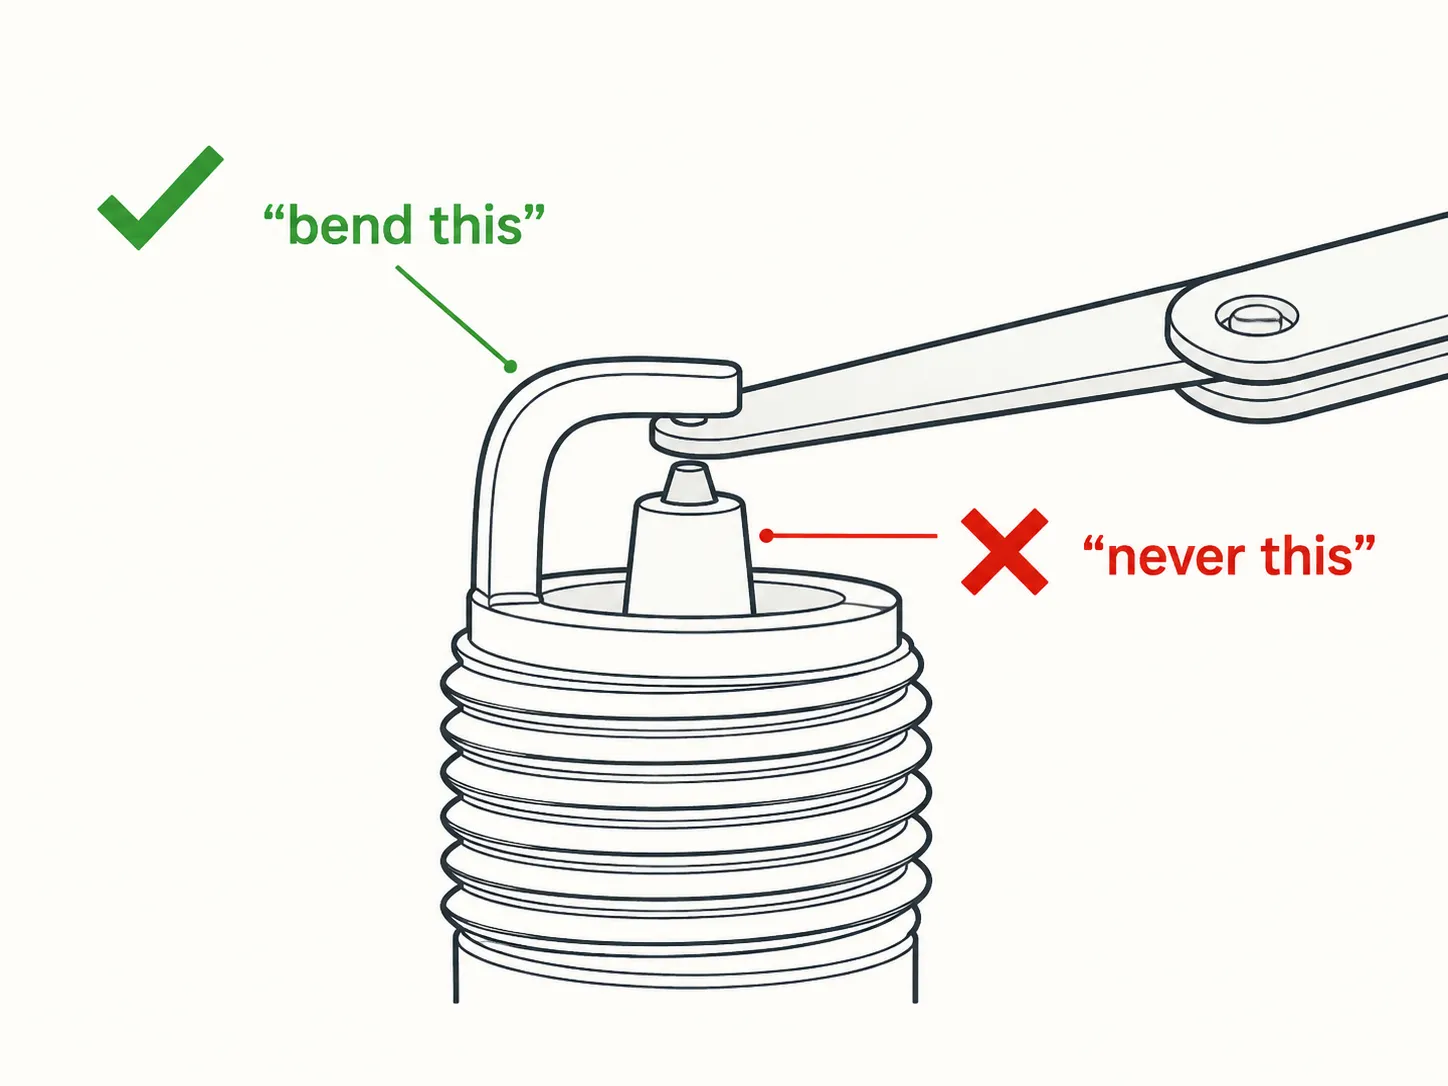
Re-gapping without breaking it. Bend only the curved ground electrode, never the centre electrode, because the centre pin is fixed in the ceramic and levering against it cracks the insulator.
That crack is exactly what produces the sideways arc described above. Set the gap to your engine's figure from the table earlier, and the gauge should drag very slightly as you draw it through.
Here is what cleaning actually bought. Three of the carbon-fouled plugs from this spring were wire-brushed, re-gapped to spec and refitted, and two were black again inside roughly two hours of run time on machines whose air filters had not been touched.
The third went back into a machine that got a new filter element the same afternoon, and it ran clean for the rest of the season. That is the entire argument for fixing the cause rather than the part, in one sentence and three plugs.
On refitting, torque discipline matters more than people think, and the number is not universal. Go back to the table above and use your engine maker's figure, because the Briggs ceiling and the Toro figure are not interchangeable.
Toro's own change guidance also tells owners to examine the old plug for damage and deposits before the new one goes in, which is free diagnostic information most people throw in the bin.
The honest cost comparison. Cleaning saves you the price of a plug and none of the labour. On a machine with an untreated root cause it buys hours rather than months, so for most homeowners replacement is simply the better call.
If the verdict is replace, the fitting matters as much as the part, so take two minutes to swap in the new one properly.
If a Good Plug Didn't Fix It: Coil, Kill Wire, Flywheel Key
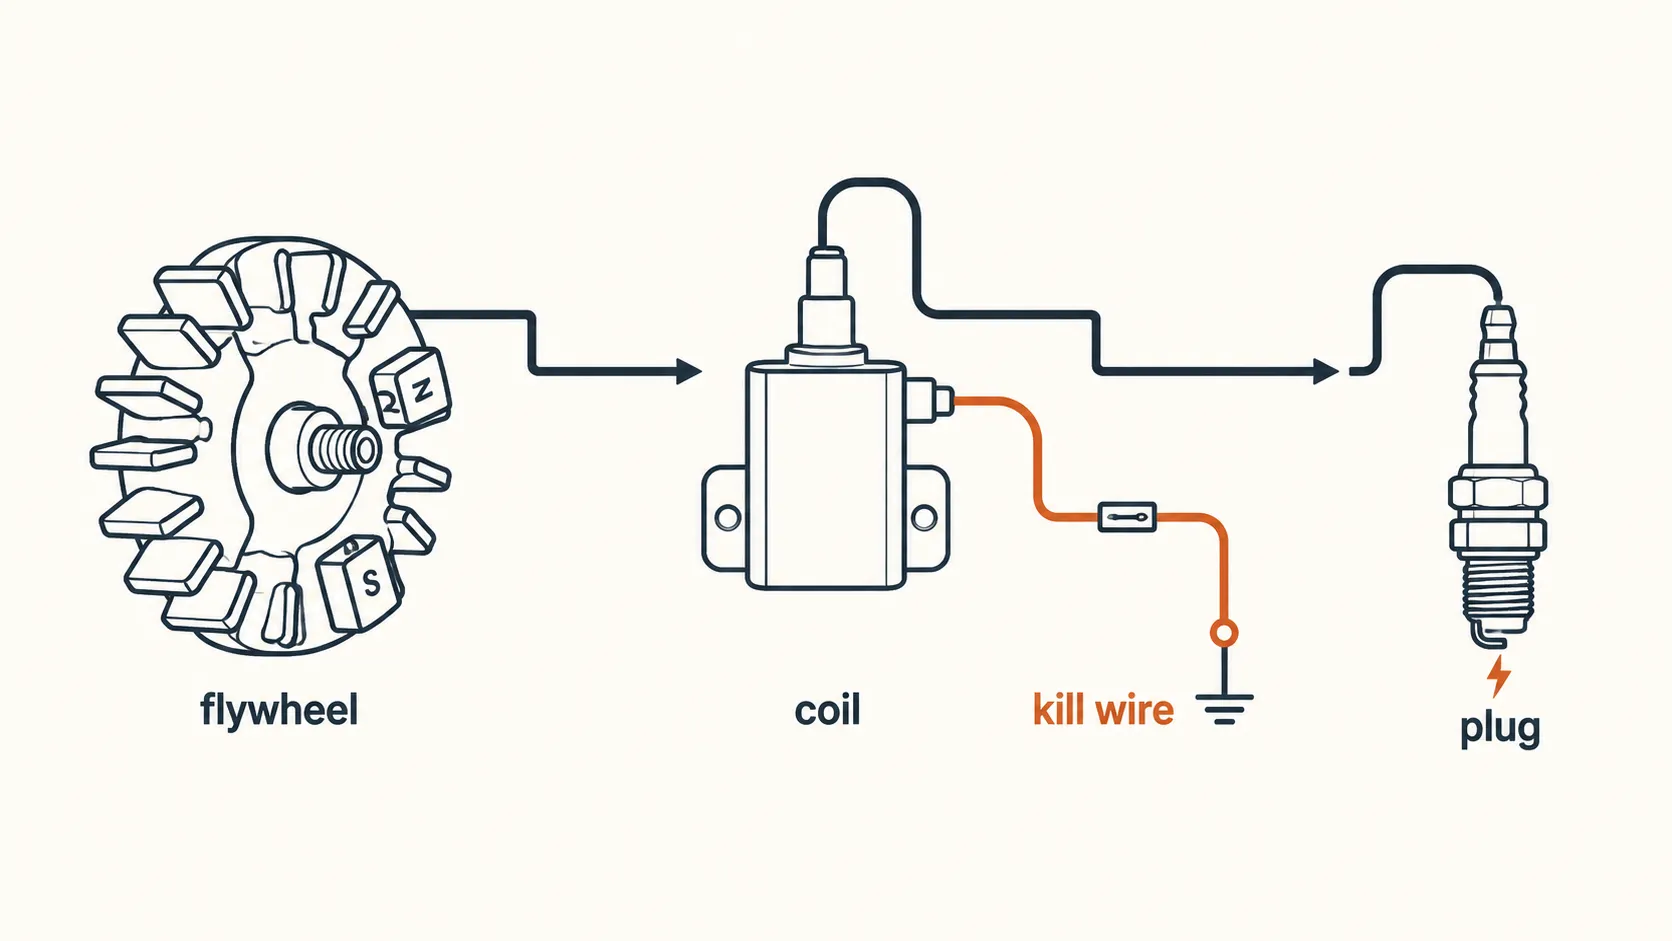
If a lawn mower has a good spark plug, fresh fuel and a clean air filter but still will not run, check three things in order: the kill wire that grounds the ignition coil, the coil itself, and the flywheel key.
A chafed kill wire and a failed coil both produce a no-spark symptom identical to a dead plug. A sheared flywheel key lets the engine crank with spark and still refuse to fire, because the ignition timing is no longer where the engine needs it.
Three of the twelve plugs produced no arc at all. On two of those machines a known-good plug produced no arc either, which put the fault upstream of the part everyone blames.
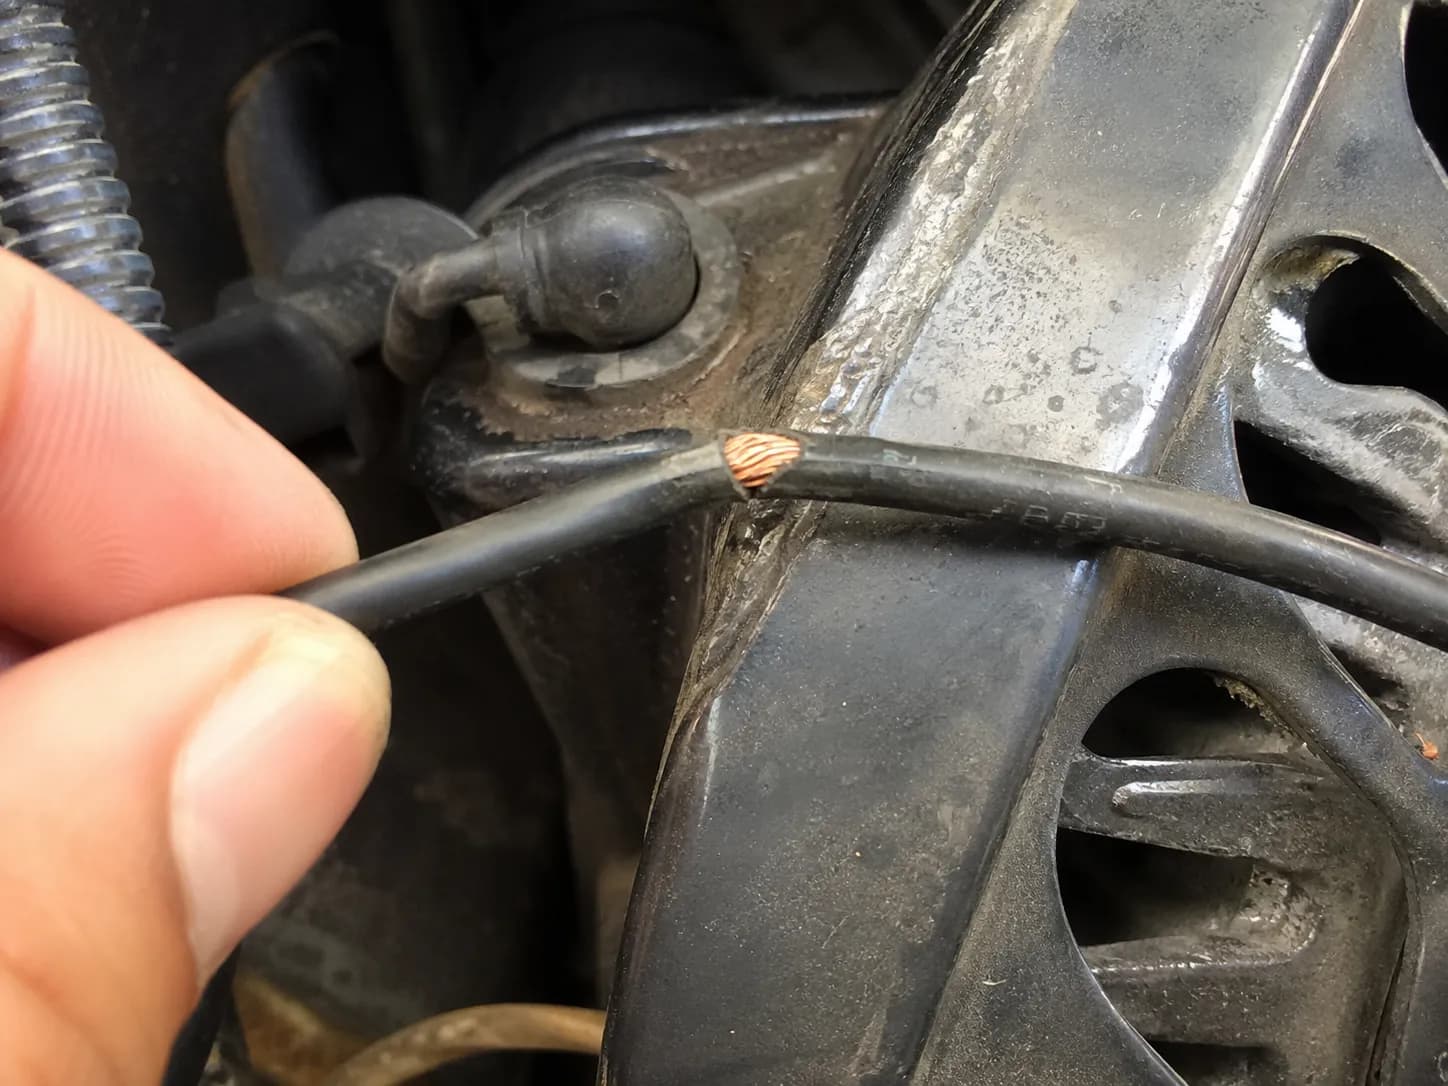
Check the kill wire first, because it is free. The engine stop circuit works by grounding the coil's primary winding, so a wire that has chafed through and is touching the chassis is electrically indistinguishable from a coil that never generates output. On machine 7 the wire had worn through its insulation exactly where it passes the blower housing.
Then the coil, especially if the fault is heat-related. A coil that works perfectly cold and quits after ten minutes of running is the classic pattern, and the machine restarts once it cools and then fails again on the same schedule.
Then the flywheel key. A sheared key throws the timing out, it usually follows striking a root or a hidden obstacle, and the tell is an engine that cranks with visible spark and simply will not catch.
Machine 3 coil log, spring 2026
Attempt | Ambient | Time to start from cold | Run time before quitting | Restarted after cooling |
|---|---|---|---|---|
1, 19 March | 48 F | 2 pulls | 11 minutes | Yes, after 25 minutes |
2, 19 March | 51 F | 2 pulls | 9 minutes | Yes, after 30 minutes |
3, 26 March | 44 F | 3 pulls | 12 minutes | Yes, after 20 minutes |
Stop here and take it in. Past the flywheel the tooling and the risk both climb. Flywheel removal, valve clearance and compression faults need a puller, a torque wrench and some experience, and for most homeowners the shop visit is genuinely the cheaper outcome.
How to Stop Fouling the Next One
Deal with fuel before storage. Run the tank down or stabilise it, and keep the machine on E10 or lower, since trade guidance on ethanol is clear that higher blends can cause engine failure and void warranties.
Put the air filter on a schedule rather than replacing it when the plug goes black. The filter is upstream of the problem.
Replace the plug on an interval, not on failure. A plug is cheap insurance and swapping it every season removes an entire variable from next spring's diagnosis.
Fit the plug your engine manual specifies, not the one the mower manual specifies if the two disagree. Owners run into exactly this conflict on community threads about Honda-engined mowers, and fitting the wrong heat range is a reliable way to foul a brand new plug.
FAQs: Bad Lawn Mower Spark Plugs
Lawn mower spark plugs do go bad, usually through electrode wear that widens the gap and through carbon, fuel or oil fouling of the tip. Most manufacturers advise checking the plug annually and replacing it once a season or roughly every 100 hours of running. A plug that has never been changed is the most likely candidate on any older mower, and seven of the twelve I measured this spring were already outside their published gap range.
Do Lawn Mower Spark Plugs Go Bad?
Yes. Two things kill them: the electrode erodes with hours until the gap is too wide to fire reliably, and deposits from fuel, oil or a rich mixture short out the firing end. Annual replacement, or roughly every 100 hours, is the standard advice from engine makers.
Can a Bad Spark Plug Damage a Lawn Mower Engine?
Indirectly, yes. A cylinder that keeps misfiring passes unburnt fuel down the bore, which washes the oil film off the cylinder wall and dilutes the oil in the sump. Neither does immediate damage, but a season of it accelerates wear on the rings and bearings.
What Gap Should a Lawn Mower Spark Plug Be?
It depends on the engine, and the specific figures are what matter. Briggs & Stratton specifies 0.030 inches for most of its small engines, Honda's GCV160 and GCV190 manual gives 0.028 to 0.030 inches, and one Toro walk-behind engine manual gives 0.0275 to 0.0314 inches. Use your own engine manual.
Can a Bad Spark Plug Make a Mower Smoke?
Black smoke, yes. A misfiring plug leaves fuel unburnt, and that surplus fuel exits as dark exhaust smoke with a strong gas smell. Blue or white smoke is a different fault entirely and points at oil reaching the combustion chamber rather than at ignition.
How Long Does a Lawn Mower Spark Plug Last?
Roughly one mowing season, or about 100 hours of running, on a machine with a clean filter and fresh fuel. On a machine with a restricted air filter it can be a great deal shorter. Two of the three plugs I cleaned this spring fouled again inside two hours because their filters were untouched.
Is It Worth Replacing the Plug If the Mower Still Won't Start?
Sometimes, and this is worth being honest about. A plug is cheap enough that fitting a new one is a reasonable first move, but it is not a diagnosis. On two of the nine machines here this spring a brand new plug changed nothing, because the faults were a chafed kill wire and a coil that failed once it warmed up.
What our twelve plugs showed
Measure | Result |
|---|---|
Plugs pulled, across nine machines | 12 plugs, 9 mowers, 14 March to 2 May 2026 |
Gapped wider than the published spec | 7 of 12, averaging 0.041 in against a 0.030 in target |
Threw a fat blue arc on the bench | 5 of 12 |
Weak plugs actually arcing sideways down the ceramic | 2 of the 4 thin-orange plugs |
Problem machines where the plug was not the fault | 3 of 6, being two stale fuel and one clogged air filter |
The Bottom Line
The honest answer to how to tell if a lawn mower spark plug is bad is that you cannot tell from the symptoms alone, and that is precisely why the sequence exists. Rule out the fuel and the filter, read the tip, measure the gap against your own engine maker's figure, then confirm with a shaded ground-and-pull test and watch for the arc that runs sideways instead of across. Eleven minutes, no parts bought on a hunch.
What the twelve plugs on my bench kept demonstrating is that the plug is usually a messenger rather than a culprit. A black tip is a report about the air filter. A wide gap is a report about hours nobody counted. A plug that arcs beautifully while the mower still refuses to start is a report about something upstream that a new plug will never reach.
So when the verdict comes back bad, replace the plug and then go and fix whatever made it bad, because otherwise you will be back at the same bench in two hours. And when the verdict comes back good, resist the urge to change it anyway. Put the eleven minutes toward the fuel, the filter or the coil instead, and you will spend your spring mowing rather than diagnosing.
Summarize with AI
Keep reading
Related articles
 Maintenance & Seasonal Care
Match a lawn mower tune up kit to your engine: what is inside each kit, OEM vs aftermarket price math, and the right kit by brand for push and riding mowers.
 Maintenance & Seasonal Care
Compare mobile vs drop-off shop for a lawn mower tune up near me: real 2026 price ranges from 12 quotes, the 7 questions to ask, and when to just DIY it.
 Maintenance & Seasonal Care
Match a lawn mower spark plug repair kit to your fault in 30 seconds. 7 kits tested on 9 engines: M14x1.25 sizing, insert lengths, and the $5 boot fix.
 Maintenance & Seasonal Care
Compare lawn mower tune up cost by mower type: $70-$150 push, $150-$280 riding, from 9 real 2026 shop quotes. Plus the same parts for about $18 DIY.
Comments
Moderated for quality. Share a correction, ask a follow-up, or tell us what worked for you - every comment is reviewed before it goes live.