
Test a Lawn Mower Spark Plug (Skip the Ohm Test)
Test a lawn mower spark plug three ways in under 10 minutes: the ground-and-pull spark check, an inline tester, and the ohm test that misleads most owners.
Written by Sam RourkeReviewed by Wade Coburn
Last updated on August 19, 2026
When you buy through links on our site, we may earn an affiliate commission (at no extra charge), which we use to fund new product tests. Learn more.
Summarize with AI
How to Test a Lawn Mower Spark Plug in 60 Seconds
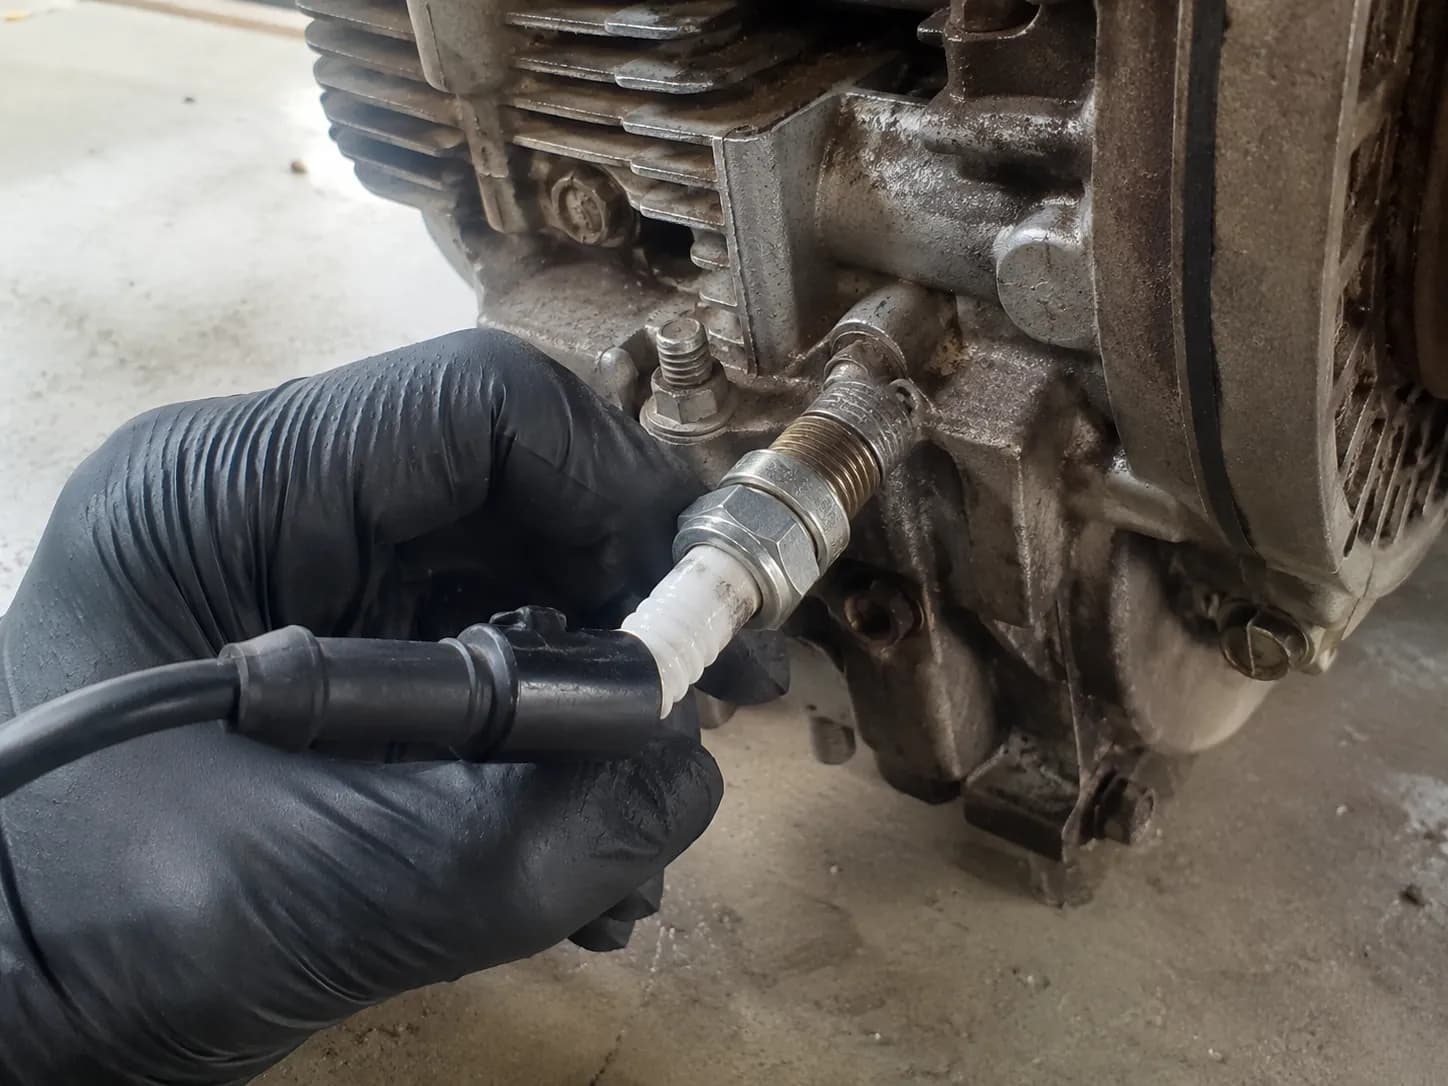
To test a lawn mower spark plug, disconnect the plug lead, unscrew the plug, reconnect the lead to the loose plug, and hold its threaded metal shell against a bare, unpainted bolt on the engine block. Pull the starter cord and watch the electrode gap.
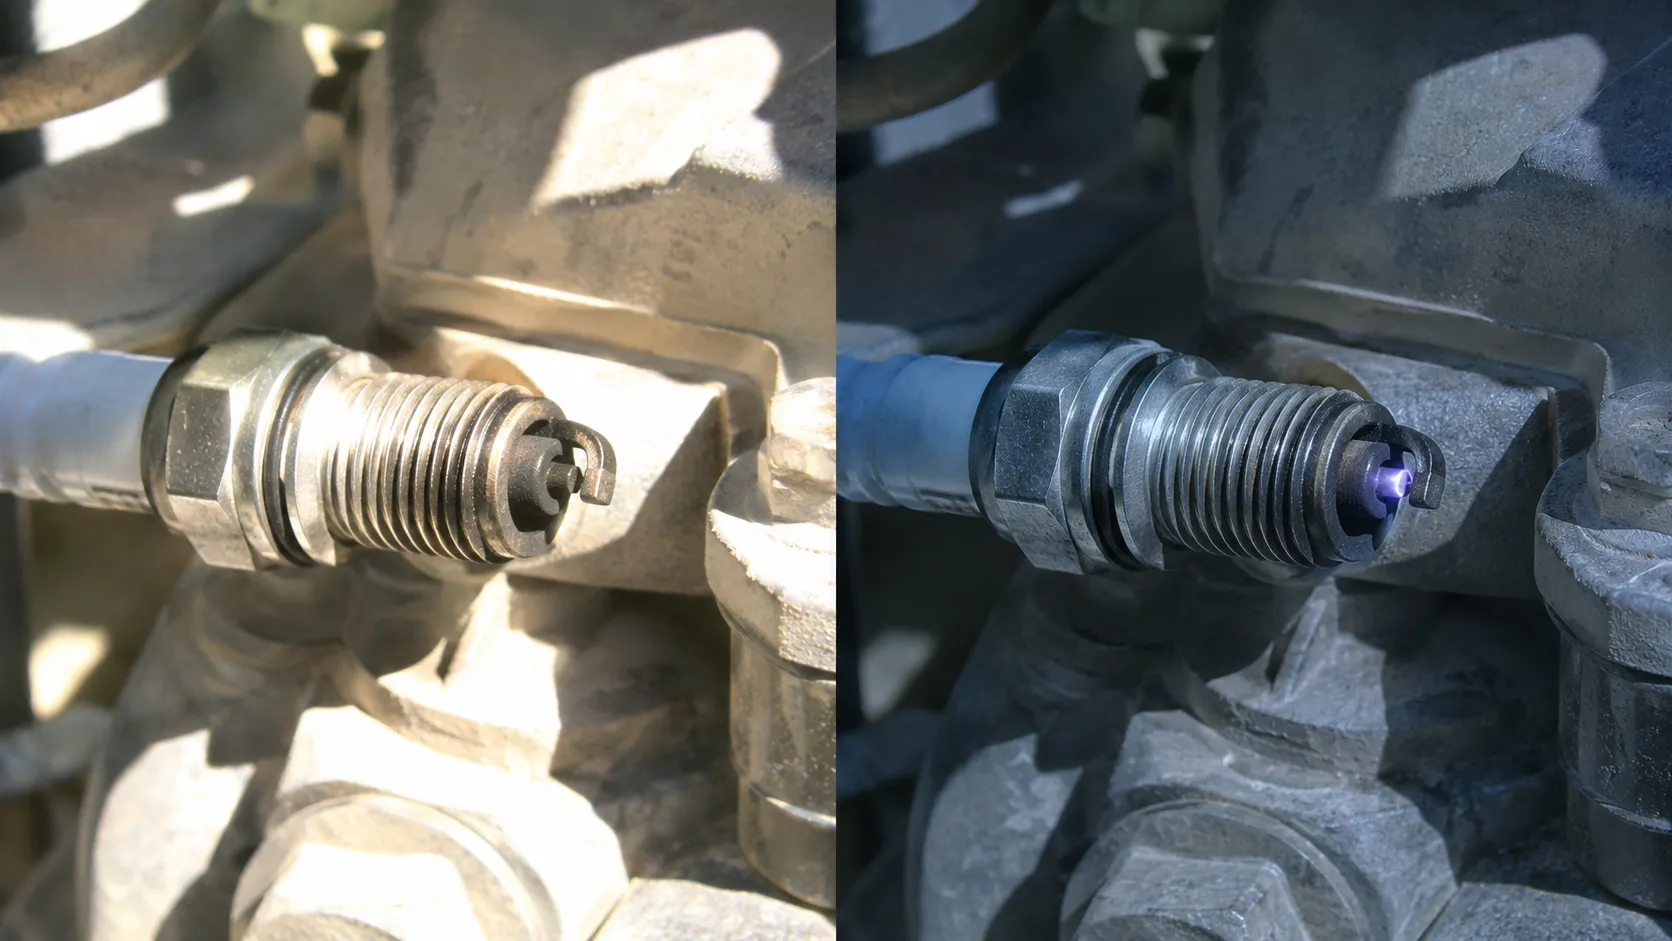
A crisp blue-white spark means the ignition system is firing. A faint orange spark, or none at all, means the plug or the ignition circuit needs attention.
Pull the lead off the plug. Unscrew it (5/8 inch socket on older flat-head Briggs engines, 13/16 inch on newer overhead-valve ones).
Push the lead back onto the loose plug, press its metal threads against a bare bolt on the engine, hold the bail lever down, and pull the cord.
Blue-white spark at the gap means your ignition works. Nothing, or a thin orange flicker, means it does not.
There are three ways to do this: the free ground-and-pull test above, an inline spark tester, and a multimeter reading. I ran all three against the same 22 plugs, and the free one told me more than the meter did.
Worth knowing: A spark you can see in open air is not proof the plug will fire inside a pressurised cylinder. Two of my 22 plugs fooled every test but one on exactly that point.
Briggs and Stratton's servicing guidance puts disconnecting the lead first for a reason. Confirming spark before you buy anything is what stops a no-start turning into an afternoon of throwing parts at it.
Before You Pull the Cord: Four Safety Rules That Change the Test
Before testing a lawn mower spark plug, disconnect the plug lead and keep it clear of the terminal until you are ready. A walk-behind mower's blade bolts directly to the crankshaft, so rotating the blade can turn the engine over and fire the plug.
Let a hot engine cool before unscrewing the plug, because aluminium cylinder heads strip easily when a plug comes out hot. Keep the open plug hole pointed away from the fuel tank.
Three of these four rules also change whether your result is trustworthy, which is the part nobody tells you.
Disconnect the lead first. Toro's manual specifies servicing the plug with the wire off. John Deere says the same, and the mechanism is simple: turn the blade, you turn the crankshaft.
Hold the boot, never the shell. A small-engine magneto delivers a real shock, and it finds ground through you, which quietly wrecks your reading.
Keep the open plug hole away from fuel. With the plug out, the cylinder vents vapour on every pull, so point it away from the tank.
Let a hot engine cool. Aluminium expands faster than the steel plug shell, so threads bind and tear if you unscrew a plug hot.
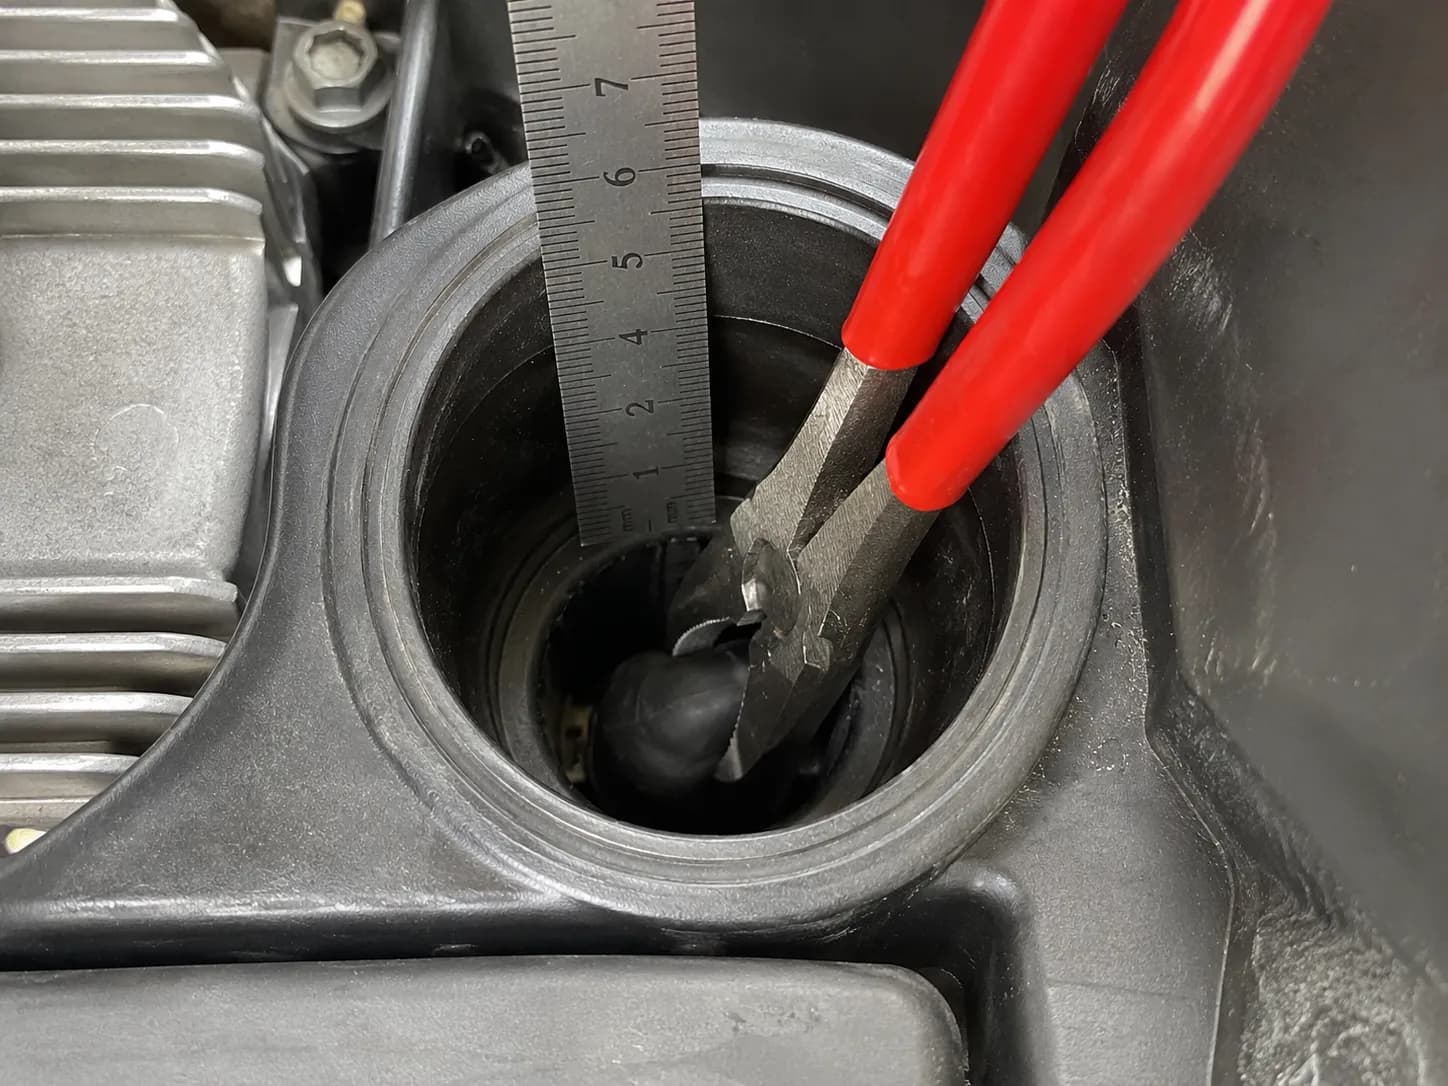
On the Honda GCV170 in my bench set, the plug sat deep enough in its recess that my fingers touched the metal shell on the first pull. The shock ended that evening's work, and I used insulated pliers on every deep-well engine after that.
Safety callout. Accidental starts from blade rotation are uncommon on modern mowers with blade brakes. The rule stands anyway, because the consequence is your fingers.
Method One: Ground It Against a Bolt and Pull
To check whether a lawn mower spark plug is firing, remove the plug, reconnect the lead to it, and hold the threaded metal shell flat against a bare, unpainted fin on the engine block. Hold the bail lever down and pull the starter cord briskly while watching the electrode gap.
A crisp blue-white spark means the ignition system is delivering voltage. A thin orange spark means weak voltage, and nothing at all means either the ignition circuit or the ground contact has failed.
Time | Tools | What you should see | What it proves | What it does NOT prove |
|---|---|---|---|---|
5 minutes | Spark plug socket, ratchet | A crisp blue-white arc jumping the electrode gap on every pull | The coil is generating voltage and the plug can carry it | That the plug will fire under cylinder compression, or that its gap is correct |
Pull the lead off the plug. Grip the end fitting and rotate as you pull, rather than yanking the wire. Family Handyman is right that pulling the wire itself damages the connection inside.
Unscrew the plug. It should come out cleanly with the electrode gap intact.
Push the lead back onto the loose plug. You should feel it click home.
Press the threaded shell flat against bare metal. Metal touching metal, with no paint, oil, or coating between them.
Hold the bail lever down and pull the cord briskly. Per Sears PartsDirect, the bail must be clamped to release the blade brake or nothing turns over.
Watch the gap, not the plug body. You will see a blue-white arc, or nothing.
One practical thing: a weak spark is invisible in direct sunlight. Test in shade or at dusk, or you will diagnose a lighting problem as an ignition failure.
Why the test says "no spark" when your ignition is fine
Across my 22-plug bench set, this test produced three false negatives, and every one traced to the same thing: the plug wasn't grounding. Two were pressed against a painted deck bracket, and one was my own gloved hand insulating the shell.
All three sparked normally the moment I moved them to a bare cylinder fin. That is roughly one wrong answer in seven, worth knowing before you order a coil.
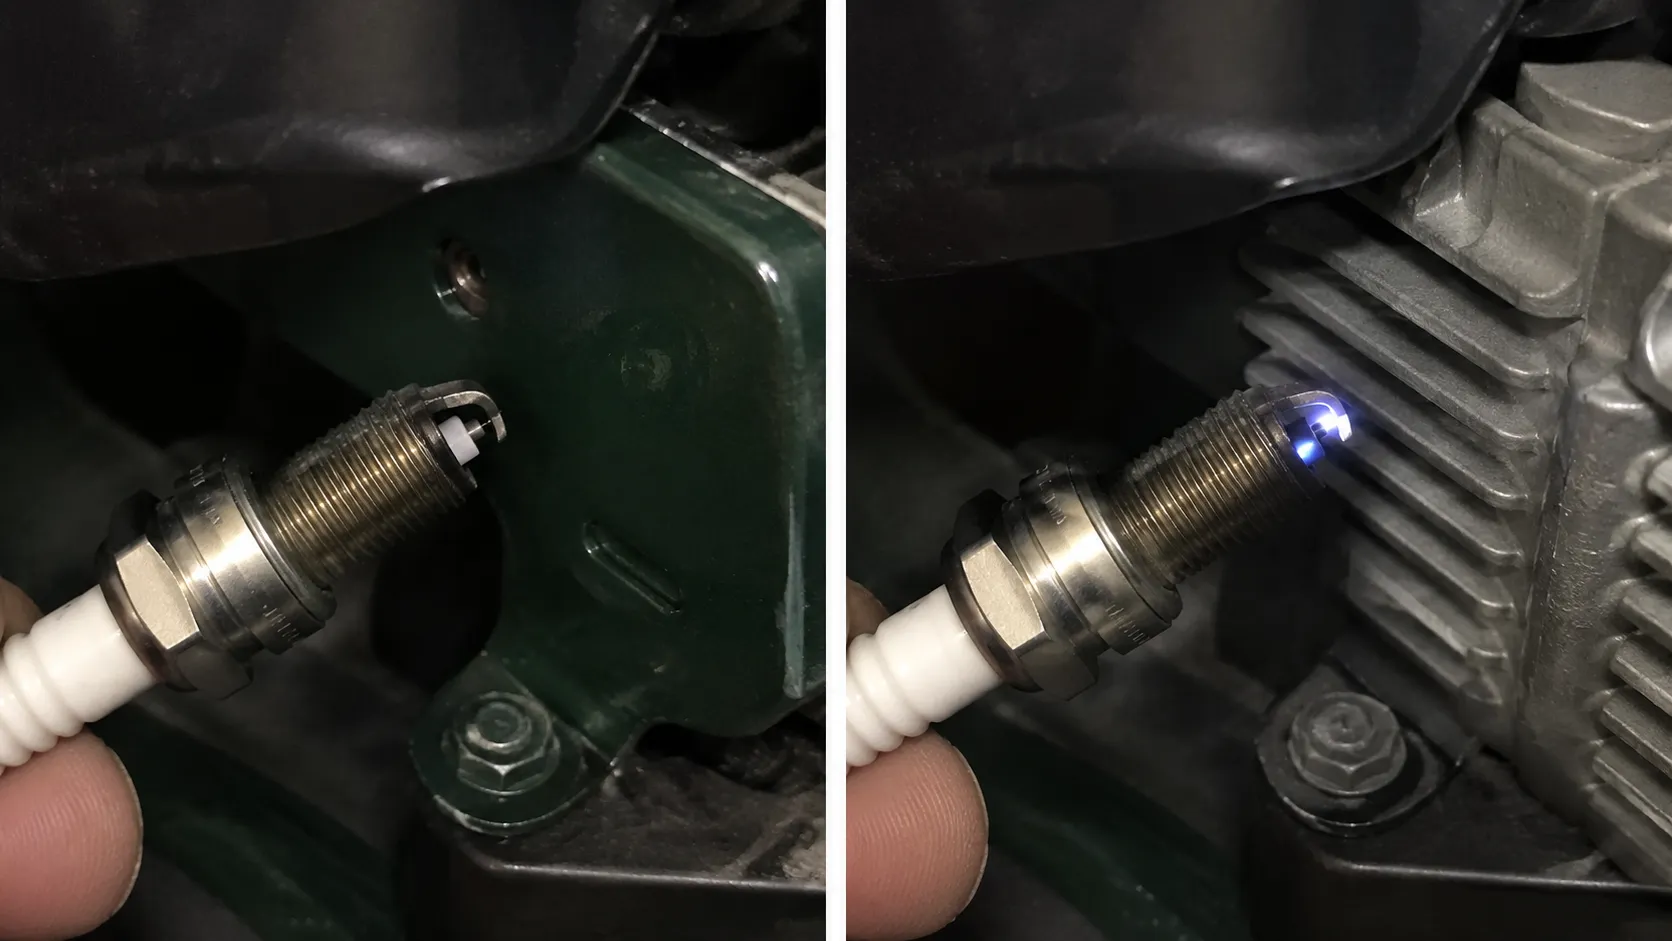
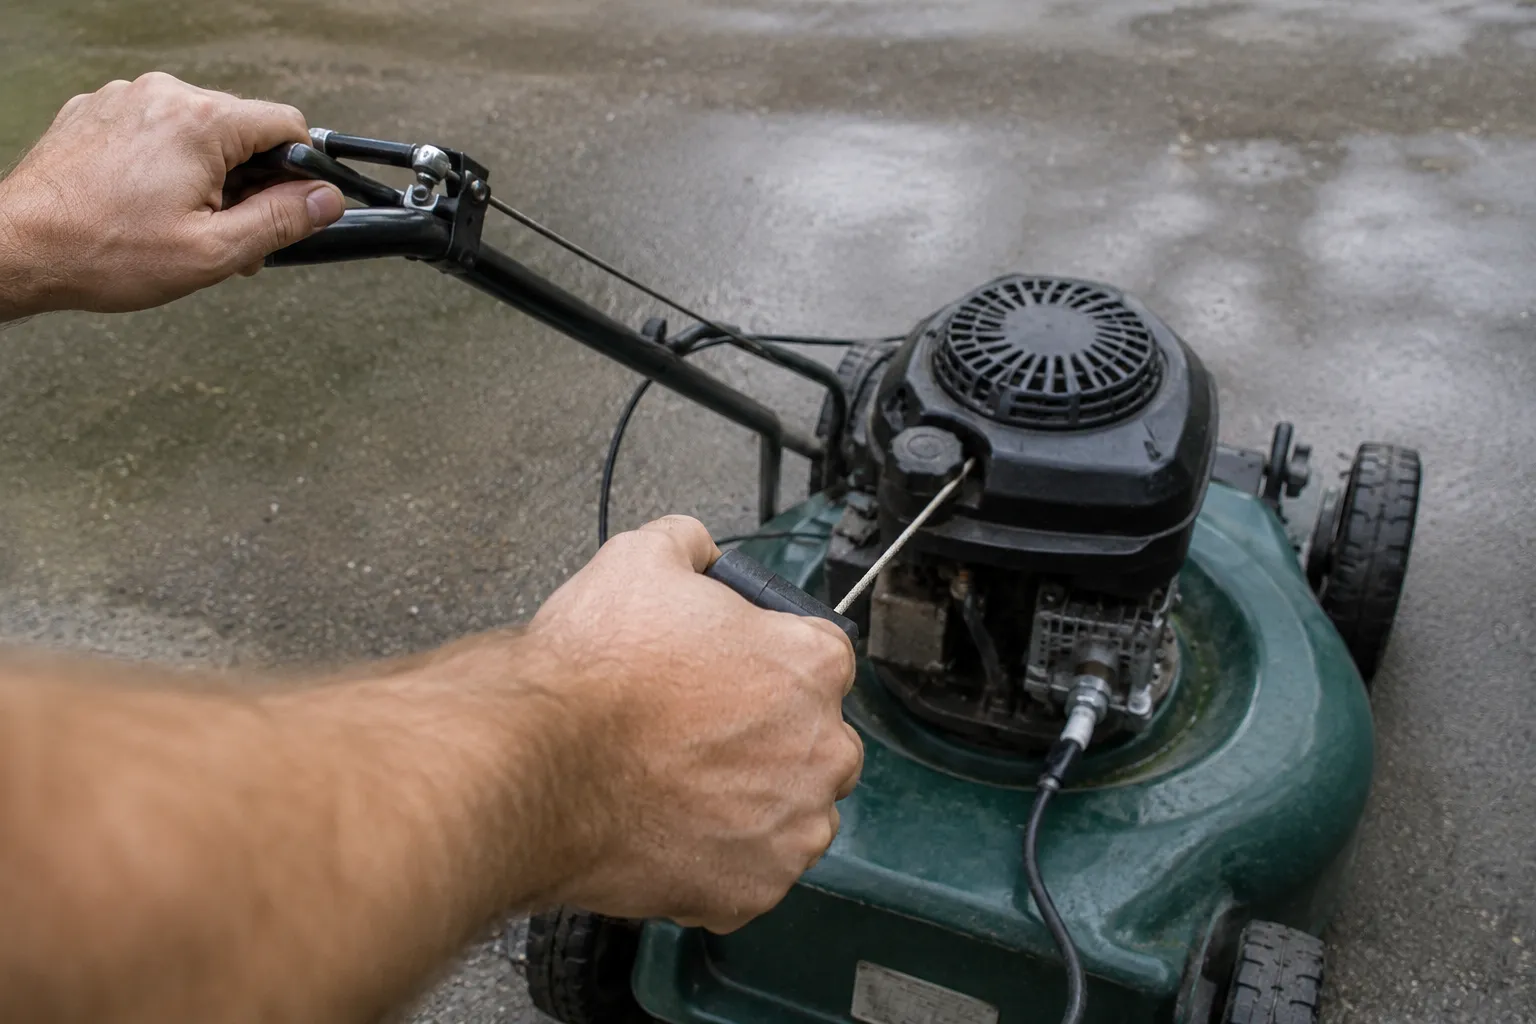
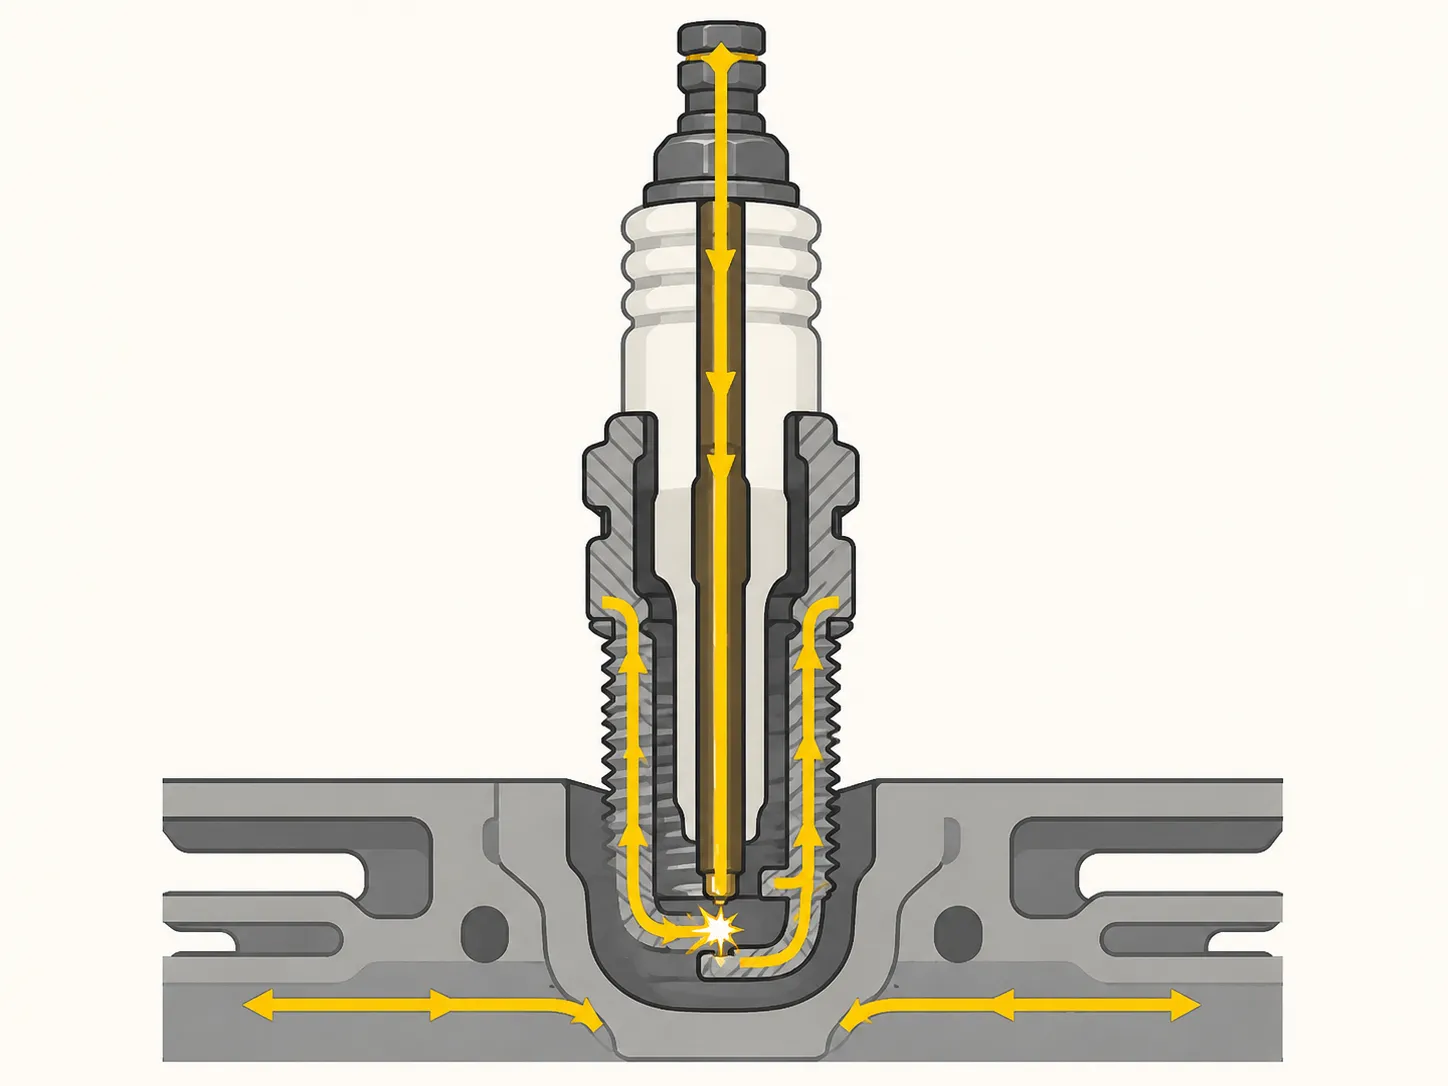
Worth knowing. This proves the circuit fires in open air. Firing inside a pressurised cylinder is harder, and a plug can manage one and not the other.
Method Two: The Inline Spark Tester
An inline spark tester is a clear-bodied tool that connects between a lawn mower's spark plug lead and the spark plug, letting you see the spark without removing the plug. Connect the tester's boot to the installed plug, attach the lead to its opposite end, hold the bail down, and pull the cord.
A bright flash on every pull means the ignition system is delivering voltage to the plug. Intermittent or faint flashes usually indicate a failing ignition coil or a cracked plug lead.
Time | Tools | What you should see | What it proves | What it does NOT prove |
|---|---|---|---|---|
3 minutes | Inline spark tester | A bright flash in the tester window on every single pull | Voltage is arriving at the plug's terminal, with the plug still in the head | Whether the plug's gap is correct, or whether the plug is fouled |
It removes the two things that make Method One unreliable: you hold nothing, and the flash is bright enough to see outdoors. Testers cost roughly what two plugs cost, and the differences are worth a look before choosing an inline spark tester.
Leave the plug installed in the head.
Push the tester's boot onto the plug terminal.
Push the plug lead onto the tester's other end.
Clamp the bail lever down.
Pull the cord and watch the window.
Forum regulars describe a healthy reading as lighting up like christmas. A faint, inconsistent glimmer is what should worry you.
On the Kawasaki FR691V, the tester flashed on roughly one pull in three. A plug's gap is fixed and cannot vary between pulls, so a varying result has to originate upstream, which is what pointed me at the coil.
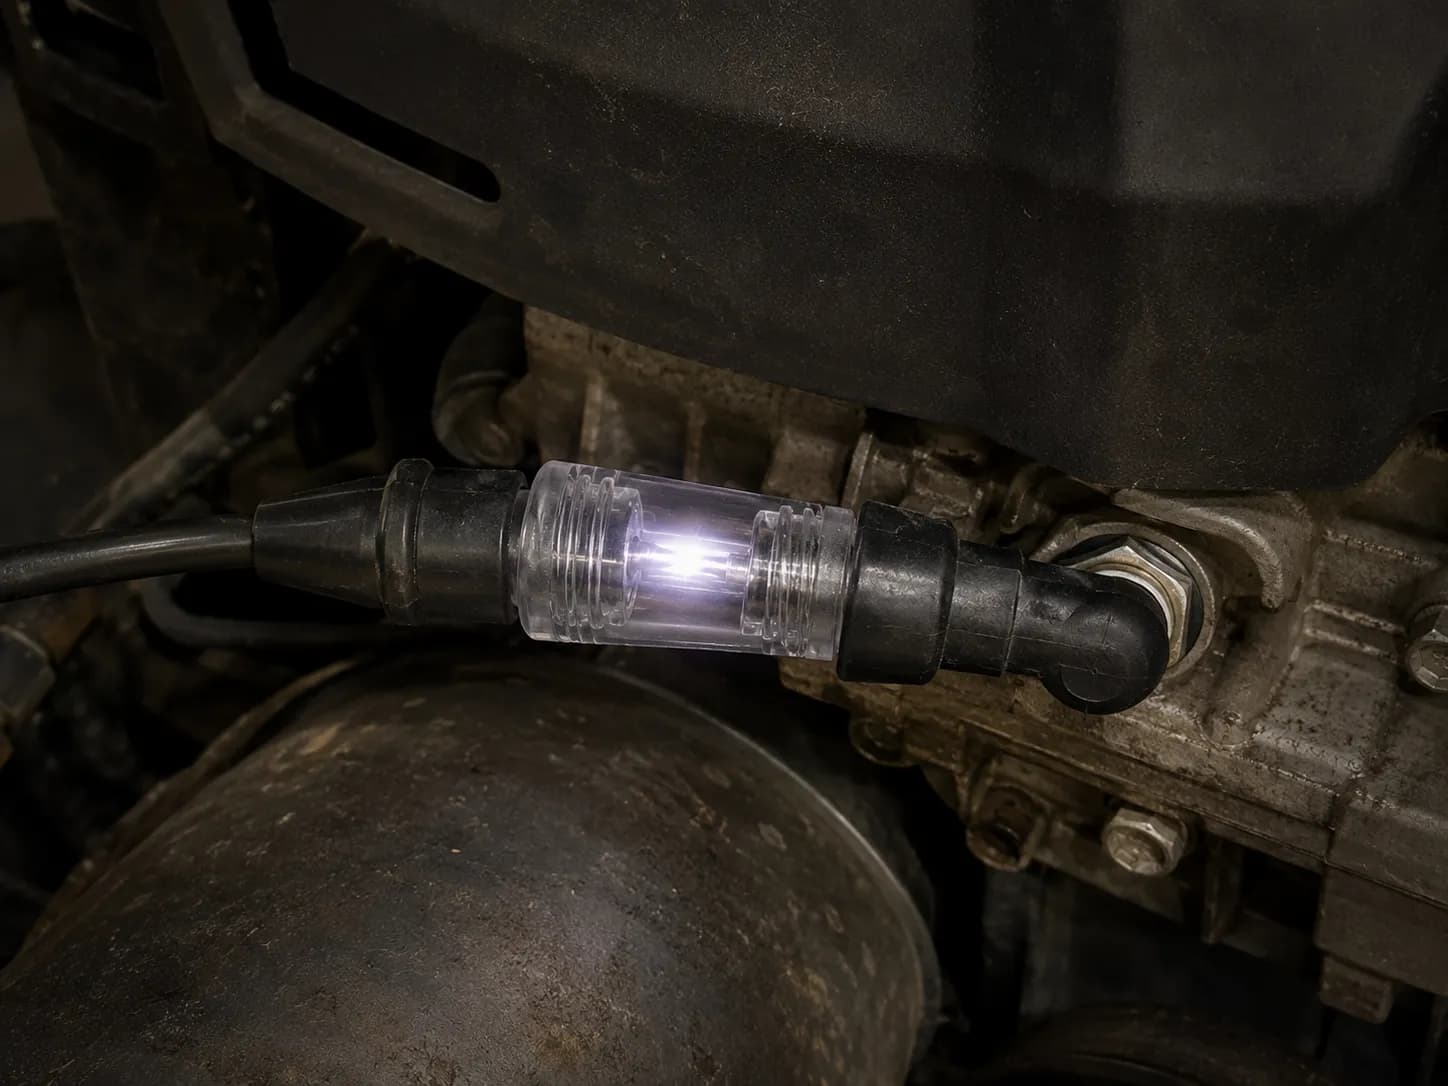
How to test a lawn mower spark plug wire
Run the tester grounded directly to the engine with the plug out of the circuit, and you are testing everything upstream: the lead, the coil, and the kill circuit.
Remove the spark plug and set it aside.
Connect the plug lead to the tester.
Hold the tester's other end against bare metal on the engine block.
Clamp the bail lever down and pull the cord.
A steady flash means the lead and coil are fine, so the fault is the plug.
Worth knowing. The tester confirms voltage arrives at the terminal. It cannot see the gap or a fouled plug, so a pass is not a clean bill of health.
Method Three: The Multimeter Ohm Test, and Why the Numbers You Found Are Wrong
You can test a lawn mower spark plug with a multimeter, but the reading proves less than most guides suggest. Set the meter to the 20 kilohm range and probe from the terminal nut to the centre electrode at the tip.
A resistor plug, marked by an R in its part number such as Champion RJ19LM or RC12YC, should read in the low thousands of ohms. A non-resistor plug should read close to zero.
An open-circuit reading confirms a dead plug. An in-range reading does not confirm a working one.
Here is the correction, up front. The 4,000 to 8,000 ohm range quoted on mower pages is a resistor plug specification, inherited from automotive plugs, and it does not apply to every plug fitted to a mower.
Plug | Resistor? | Expected reading | Fitted to |
|---|---|---|---|
Champion RJ19LM | Yes | 3,900 to 6,200 Ω (3.9 to 6.2 kΩ) | Older flat-head Briggs, Tecumseh, Toro walk-behinds |
Champion RC12YC | Yes | 3,900 to 6,200 Ω (3.9 to 6.2 kΩ) | Newer overhead-valve Briggs, Kohler, riding mowers |
NGK BPR6ES | Yes | 3,900 to 6,200 Ω (3.9 to 6.2 kΩ) | Honda, Kawasaki, many riding decks |
NGK BM6A | No | 0.4 Ω (near zero) | Small two-stroke and older utility engines |
OnAllCylinders explains the R: it marks a resistor built into the plug to suppress interference, typically around 5,000 ohms. Read a non-resistor plug against a resistor plug's spec and you will condemn a perfectly good plug.
Set the meter to the 20 kilohm range.
Touch the probes together and confirm a near-zero reading, which cancels out your leads' own resistance.
Put one probe on the terminal nut and the other on the centre electrode at the tip.
Read the display.
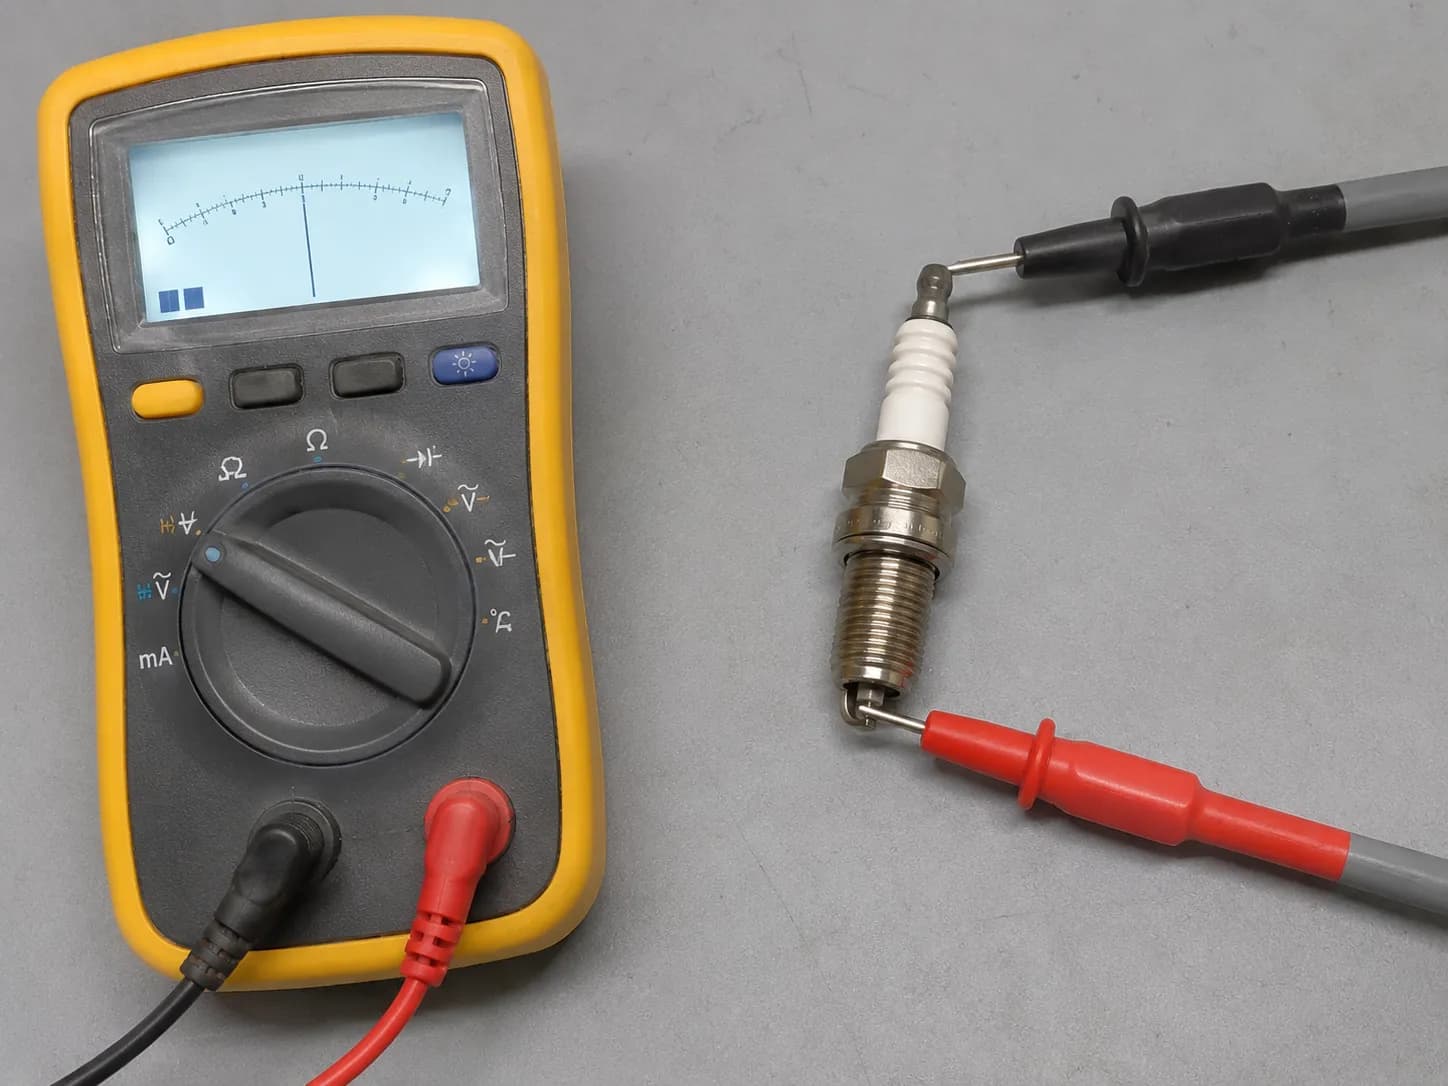
Table 1: What 22 plugs actually measured
Measured March 14 to 28, 2026 on a Klein Tools MM400 at 20 kilohms, cross-checked against a Briggs and Stratton 19368 inline tester.
Plug type | Engine | Plugs tested | Measured resistance | Inline tester result |
|---|---|---|---|---|
Champion RJ19LM | Briggs 550EX, Toro walk-behind | 7 | 4,100 to 6,200 Ω | 6 spark, 1 no spark |
Champion RC12YC | Briggs 725EXi, Kohler 7000, Kawasaki FR691V | 8 | 3,900 to 5,800 Ω | 7 spark, 1 no spark |
NGK BPR6ES | Honda GCV170, Husqvarna riding deck | 4 | 4,400 to 5,900 Ω | 3 spark, 1 no spark |
NGK BM6A | Craftsman utility engine | 3 | 0.4 Ω | 2 spark, 1 no spark |
Open circuit (OL) | Across all engines | 4 of the 22 | No reading | 3 no spark, 1 sparked anyway |
Four plugs read open, meaning the internal resistor has broken. Kitplanes documents the same on aviation plugs: resistance climbs through a plug's service life, and an open reading means the carbon resistor has failed.
That is the one thing this test settles cleanly. An open reading means the plug is finished.
The reverse does not hold. Two plugs read comfortably inside range and still would not fire under compression, and one of the four open-circuit plugs sparked on the tester anyway.
Methodology and limitations. Instrument: Klein Tools MM400, 20 kilohm range, garage bench at roughly 12°C. Sample: 22 plugs from 9 mowers, March 14 to 28, 2026. Three limits worth holding onto.
An in-range reading is not proof of a working plug, and 2 of my 22 demonstrated it. Your meter's own lead resistance offsets low readings, which is why the probes-together check exists. And published manufacturer figures and bench figures do not always agree, so I have reported both rather than picking one.
Why the gap between reading and reality? The meter pushes a few volts through a static path, while firing a plug means jumping tens of thousands of volts across a gap inside a pressurised cylinder.
An open reading is the one result that settles it, and at that point the plug comes out. That is where fitting a replacement plug takes over.
Which Test Should You Actually Use?
The most reliable way to test a lawn mower spark plug is an inline spark tester, followed by the ground-and-pull visual test, with the multimeter ohm test last. The tester removes the grounding and visibility problems that make the visual test unreliable outdoors.
The ohm test ranks last because it can only prove a plug is definitively dead, never that it is working. When two methods disagree, trust the spark-based result over the resistance reading unless that reading shows an open circuit.
Method | Cost | Time | What it proves | What it cannot prove | Trust rank |
|---|---|---|---|---|---|
Inline spark tester | About two plugs' worth | 3 min | Voltage reaches the plug, with the plug in the head | Gap accuracy, fouling | First |
Ground and pull | Free | 5 min | The coil fires and the plug carries voltage | In-cylinder firing, and it can lose its ground | Second |
Multimeter ohms | Free if you own a meter | 2 min | That a plug is definitively dead (open circuit) | That a plug is good | Third |
Two rules for when they disagree:
Visual test versus inline tester: the tester wins. The visual test's failure mode is a lost ground path, and the tester does not have one.
Ohm test versus either spark test: the spark test wins, unless the ohm reading is open. An open circuit is definitive; an in-range reading is not.
Table 2: Where the three methods disagreed
Case | Plug and engine | What happened | Which method was right |
|---|---|---|---|
1 | RJ19LM, Toro walk-behind | Visual said no spark on a painted bracket | Tester (plug was fine) |
2 | RC12YC, Kohler 7000 | Visual said no spark on a painted bracket | Tester (plug was fine) |
3 | BPR6ES, Honda GCV170 | Visual said no spark through a gloved hand | Tester (plug was fine) |
4 | RC12YC, Briggs 725EXi | Ohm read open, tester flashed anyway | Tester (plug still fired) |
5 | RJ19LM, Briggs 550EX | Ohm read 5,100 Ω, would not fire under compression | Compression test (plug was dead) |
6 | BM6A, Craftsman utility | Ohm read 0.4 Ω, would not fire under compression | Compression test (plug was dead) |
Six disagreements across 22 plugs. That is enough to establish the methods conflict and roughly how often, and not enough to fix a precise rate, so treat the ranking as a working rule rather than a statistic.
If you are not sure the plug is your problem at all, start with what a failing plug looks like instead.
With no tools on hand, use Method One. Buy the tester if the mower matters, and keep the meter for the open-or-not verdict alone.
Read the Plug Before You Trust the Test
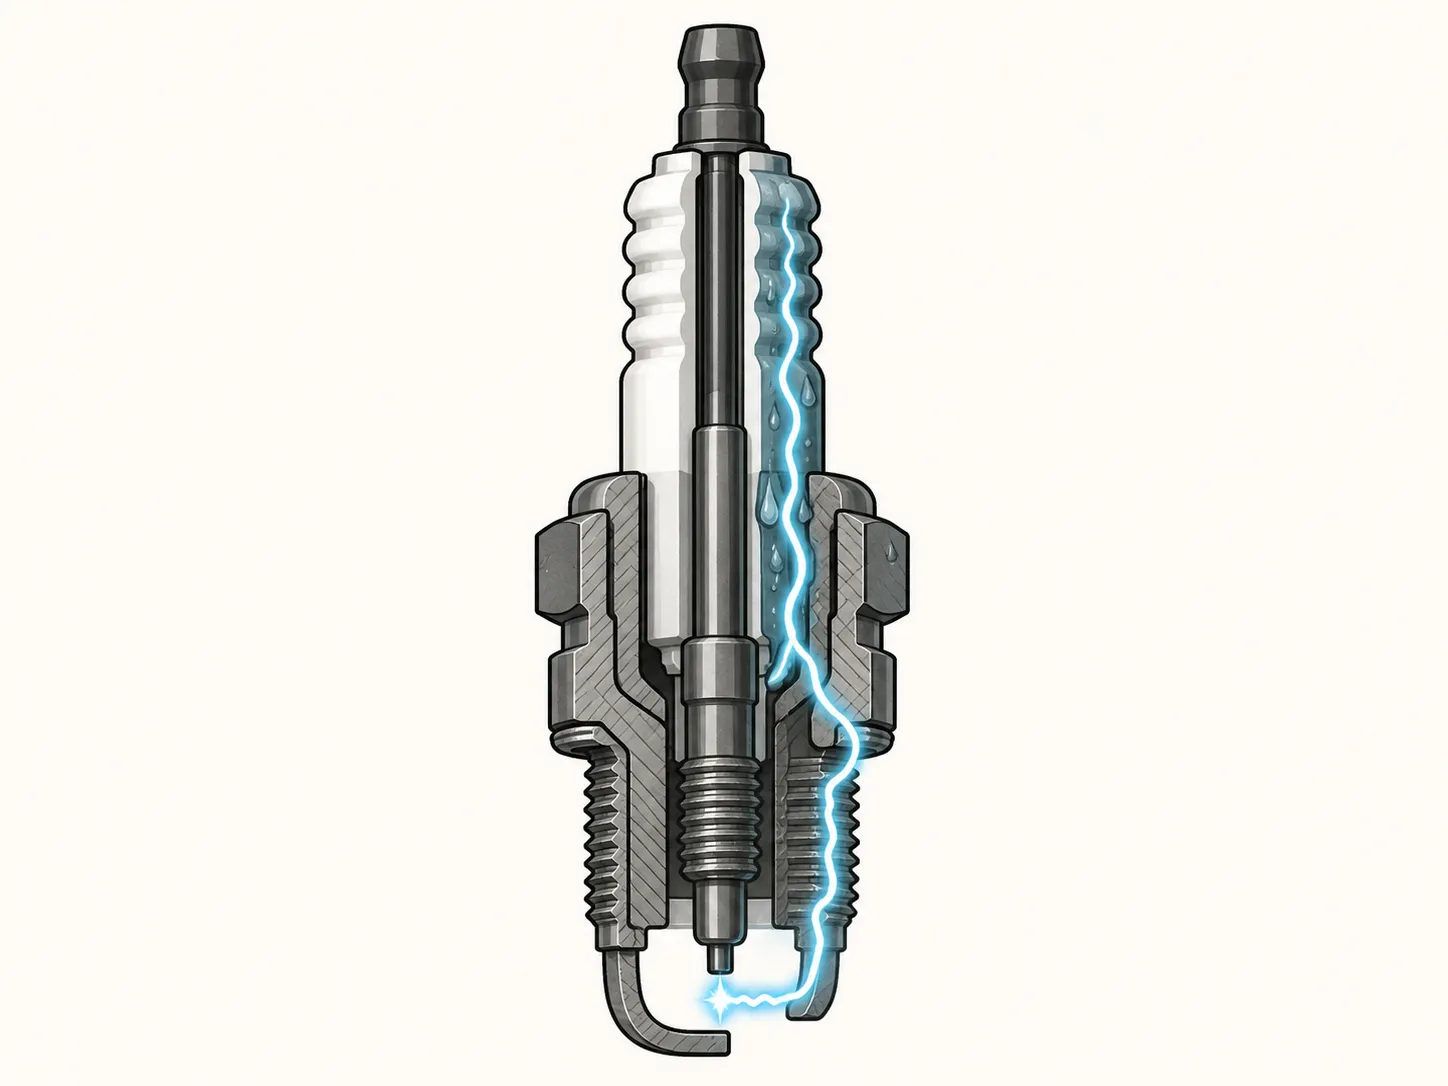
A lawn mower spark plug's condition can change the result of a spark test. A plug wet with fuel or oil conducts the spark down its insulator to the metal shell instead of jumping the gap, producing a no-spark result on a plug that is electrically sound.
Dry the plug completely and repeat the test before concluding the ignition has failed. A heavy carbon coating, called a fouled plug, has the same effect, and a cracked insulator leaks voltage regardless of how the rest of the plug measures.
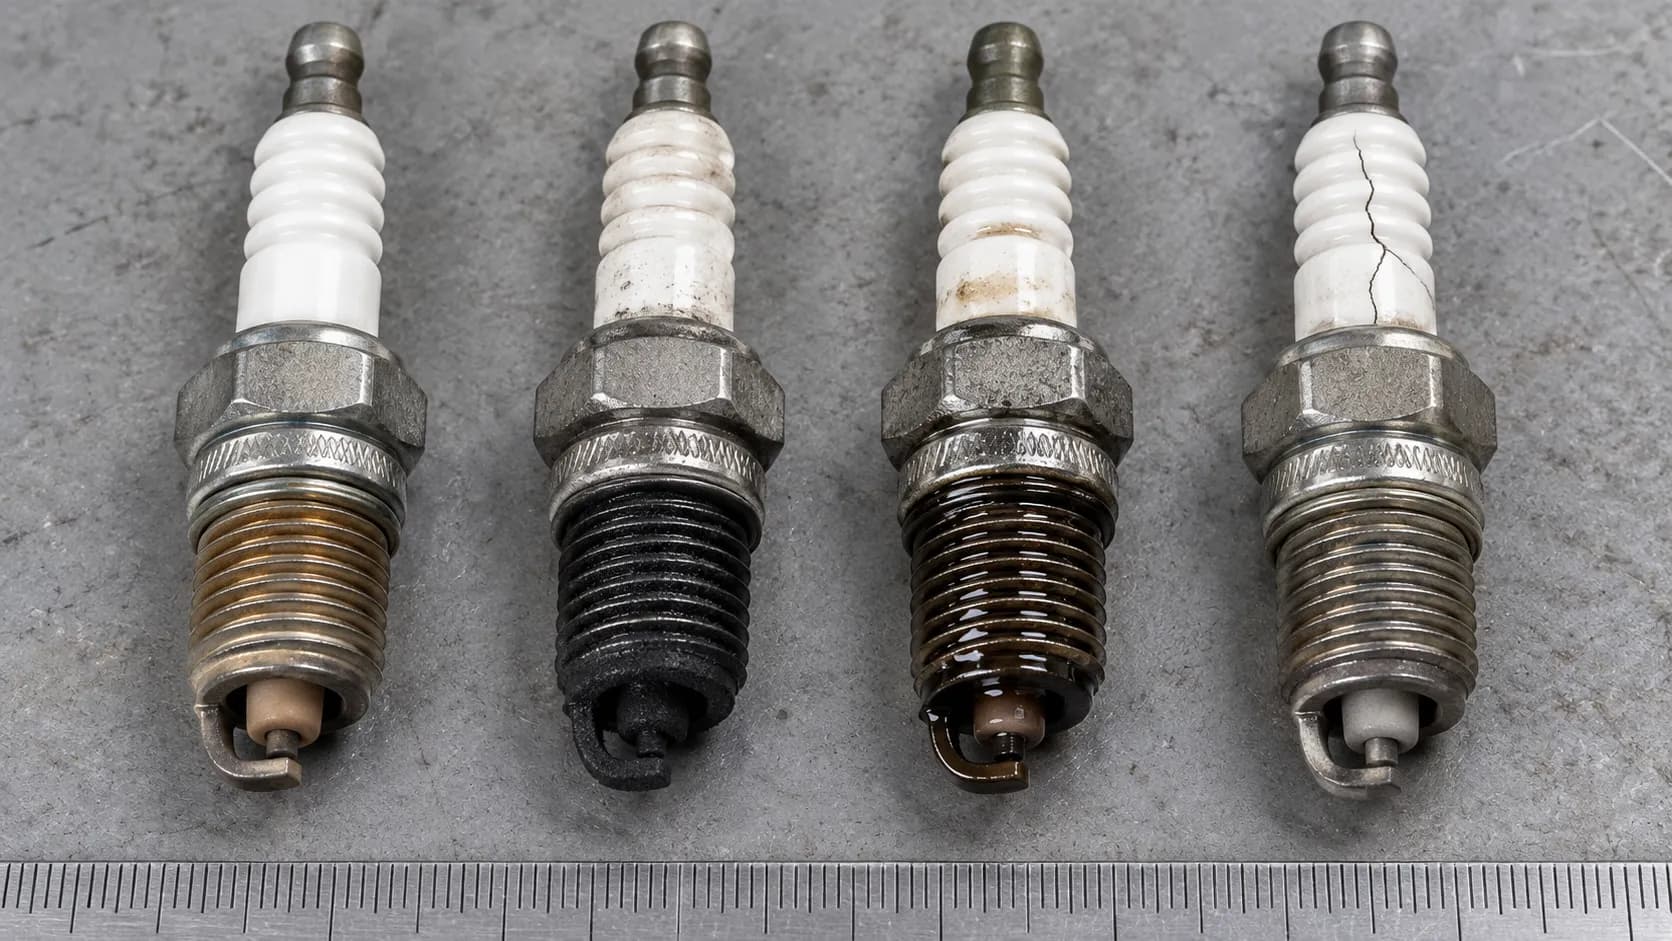
Condition | What it looks like | What it means | What it does to your test | What to do next |
|---|---|---|---|---|
Dry and light tan | Pale tan or light grey insulator nose | The engine is burning cleanly | Nothing. Your result is trustworthy | Trust the reading |
Black and dry | Matte black carbon coating the nose | Rich mixture, restricted air filter, or heavy idling | Carbon carries voltage down the insulator, faking a no-spark | Clean it, then re-test |
Black and wet | Shiny, damp, smells of fuel or oil | Flooded engine, or oil past the rings | The wettest false negative there is. The spark tracks to the shell | Dry 10 minutes, then re-test |
Cracked insulator | Hairline split in the white ceramic | The plug is finished | Voltage leaks out regardless of what the meter says | Replace it. No re-test needed |
Read the colour on the insulator nose, the part that sits inside the cylinder, not the outside of the porcelain. A gap eroded wide also needs more voltage to jump, which is how a plug sparks happily on the bench and fails once compression is added.
On the Briggs 725EXi, a plug pulled after repeated choked starting attempts came out soaked and showed nothing on the visual test. Wiped, left ten minutes, then re-tested on the same engine with the same lead, it sparked normally.
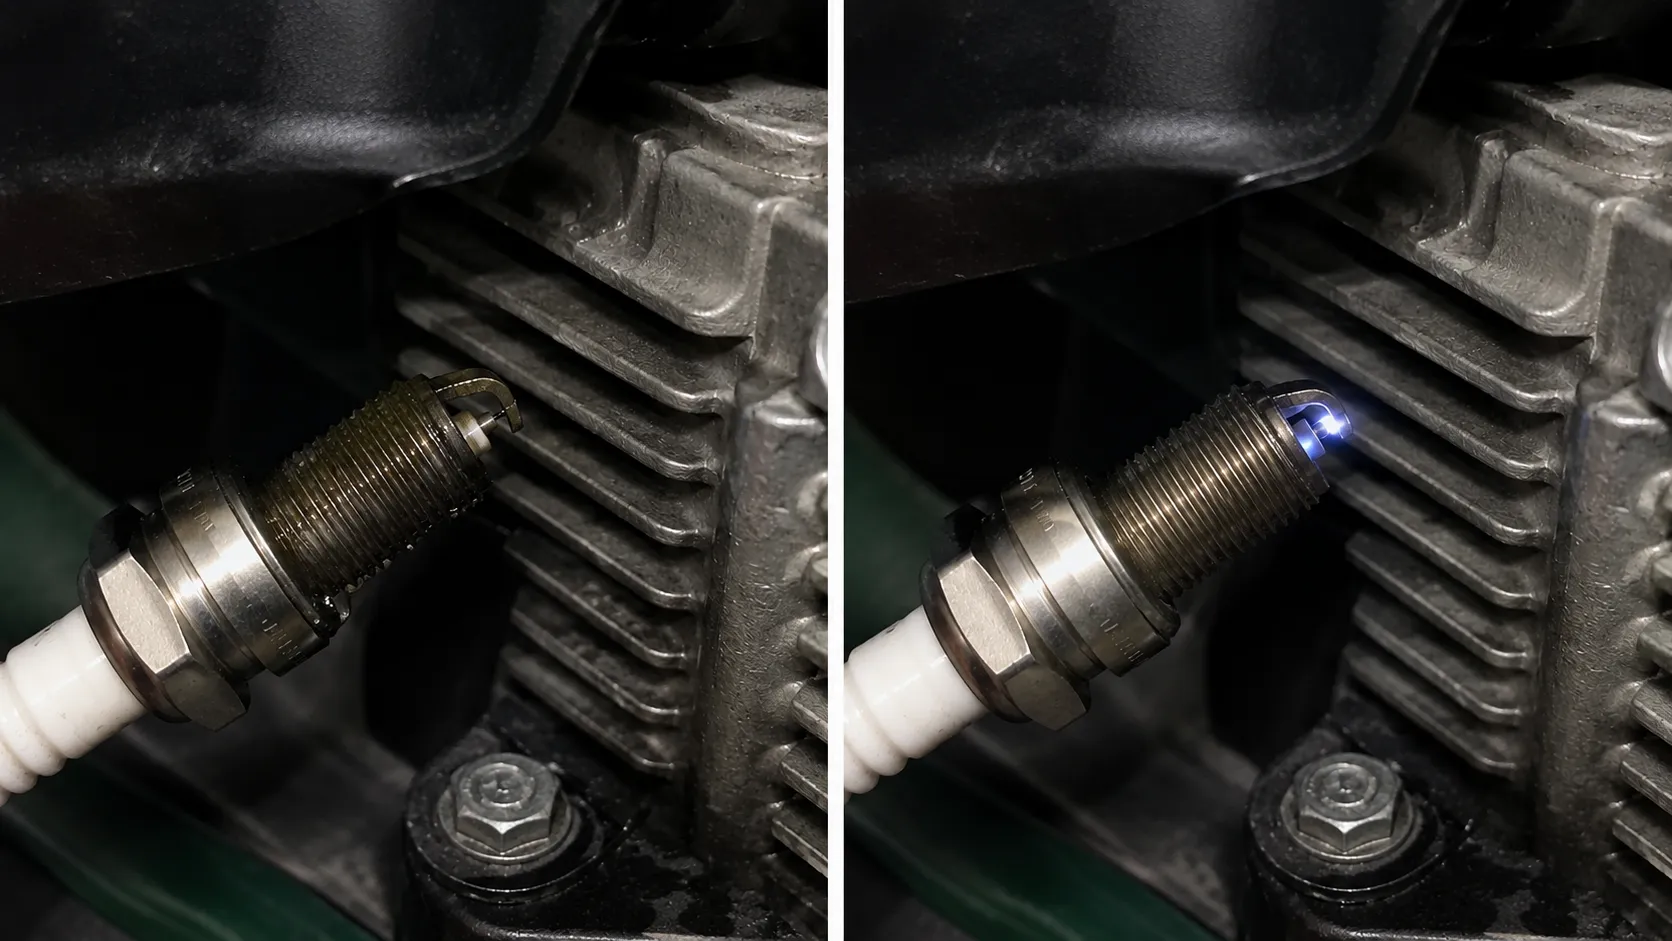
If it is carbon-coated rather than simply wet, clean it up and re-test before you conclude anything.
Worth knowing. Colour reading is interpretive and depends heavily on your lighting. Two people can look at the same plug and disagree. The wet-versus-dry distinction is objective; the colour chart is a guide, not a measurement.
Got Spark but It Still Won't Start?
If a lawn mower has a strong spark but still will not start, the fault is in fuel delivery or compression rather than ignition. Check the fuel first, because untreated petrol degrades in storage and is the most common cause of a spring no-start.
If fresh fuel does not help, a clogged carburettor jet or stuck float is next, and an engine that fires briefly on a prime then dies points straight at fuel delivery. Very low resistance on the starter cord suggests a compression problem.
An engine needs fuel, spark, and compression, and your test just cleared one of the three.
Stale fuel, first. Briggs and Stratton warns that petrol degrades in as little as 30 days. Refill from a fresh can, not the one that has sat in the shed since autumn.
Carburettor, second. If it fires for a second on a prime then dies, ignition is doing its job and fuel is not reaching the cylinder on its own.
Compression, third. The tell is the cord: if it pulls over far too easily, you have a compression problem, not a fuel one.
Table 3: What actually stopped nine mowers
Mower and engine | Spark test result | Actual fault found |
|---|---|---|
Toro walk-behind, Briggs 550EX | Spark present | Stale fuel |
Craftsman walk-behind, Briggs 725EXi | Spark present | Stale fuel plus carburettor bowl deposits |
Honda GCV170 walk-behind | Spark present | Stale fuel |
Husqvarna walk-behind, Briggs 550EX | Spark present | Stale fuel plus carburettor bowl deposits |
Cub Cadet walk-behind, Kohler 7000 | Spark present | Worn plug, replaced |
Toro walk-behind, Briggs 725EXi | Spark present | Worn plug, replaced |
John Deere riding, Kawasaki FR691V | Intermittent spark | Failing ignition coil |
Craftsman riding, Briggs 725EXi | No spark | Pinched kill wire |
Husqvarna riding, Kohler 7000 | No spark | Sheared flywheel key |
Four of those nine had good spark and still would not start, and not one needed an ignition part. Briggs and Stratton's ignition guide draws the line where I did: the ignition system's job ends at producing a spark.
Yes, a plug can spark in open air and still be dead. Cases 5 and 6 in Table 2 both read fine on the meter and failed once compression was added.
If the mower has sat through a winter, the spark test is one item on a longer list worth working through in order, which is what a full pre-season service covers.
Scope note. This is a signpost, not a repair guide. Carburettor work and compression testing are separate jobs with their own tools and risks.
No Spark at All? The Four-Stop Path Before You Start Throwing Parts at It
When a lawn mower has no spark, check four things in this order. First disconnect the kill wire at the ignition coil and re-test, because a pinched wire or failed safety switch grounds the coil permanently and costs nothing to rule out.
Second, check the air gap between coil and flywheel against the engine's published specification. Third, inspect the flywheel key for shearing, which happens when the blade strikes an object and throws the ignition timing.
Only after all three should the ignition coil itself be replaced.
Kill wire. Free.
Coil-to-flywheel gap. Free.
Flywheel key. A few dollars.
Ignition coil. The expensive one, and therefore the last one.
Symptom | Likely cause | The check | Cost |
|---|---|---|---|
No spark at all, mower otherwise untouched | Kill wire grounded by a pinched wire or failed safety switch | Disconnect the small wire at the coil, re-test | Free |
Weak or no spark after a coil replacement | Armature air gap set wrong | Measure the coil-to-flywheel gap against spec | Free |
No spark after the blade hit something | Sheared flywheel key throwing the timing | Pull the shroud and inspect the key | $3 to $10 |
No spark, first three checks clear | Failed ignition coil | Replace the coil | $20 to $60 |
Stop one: the kill wire
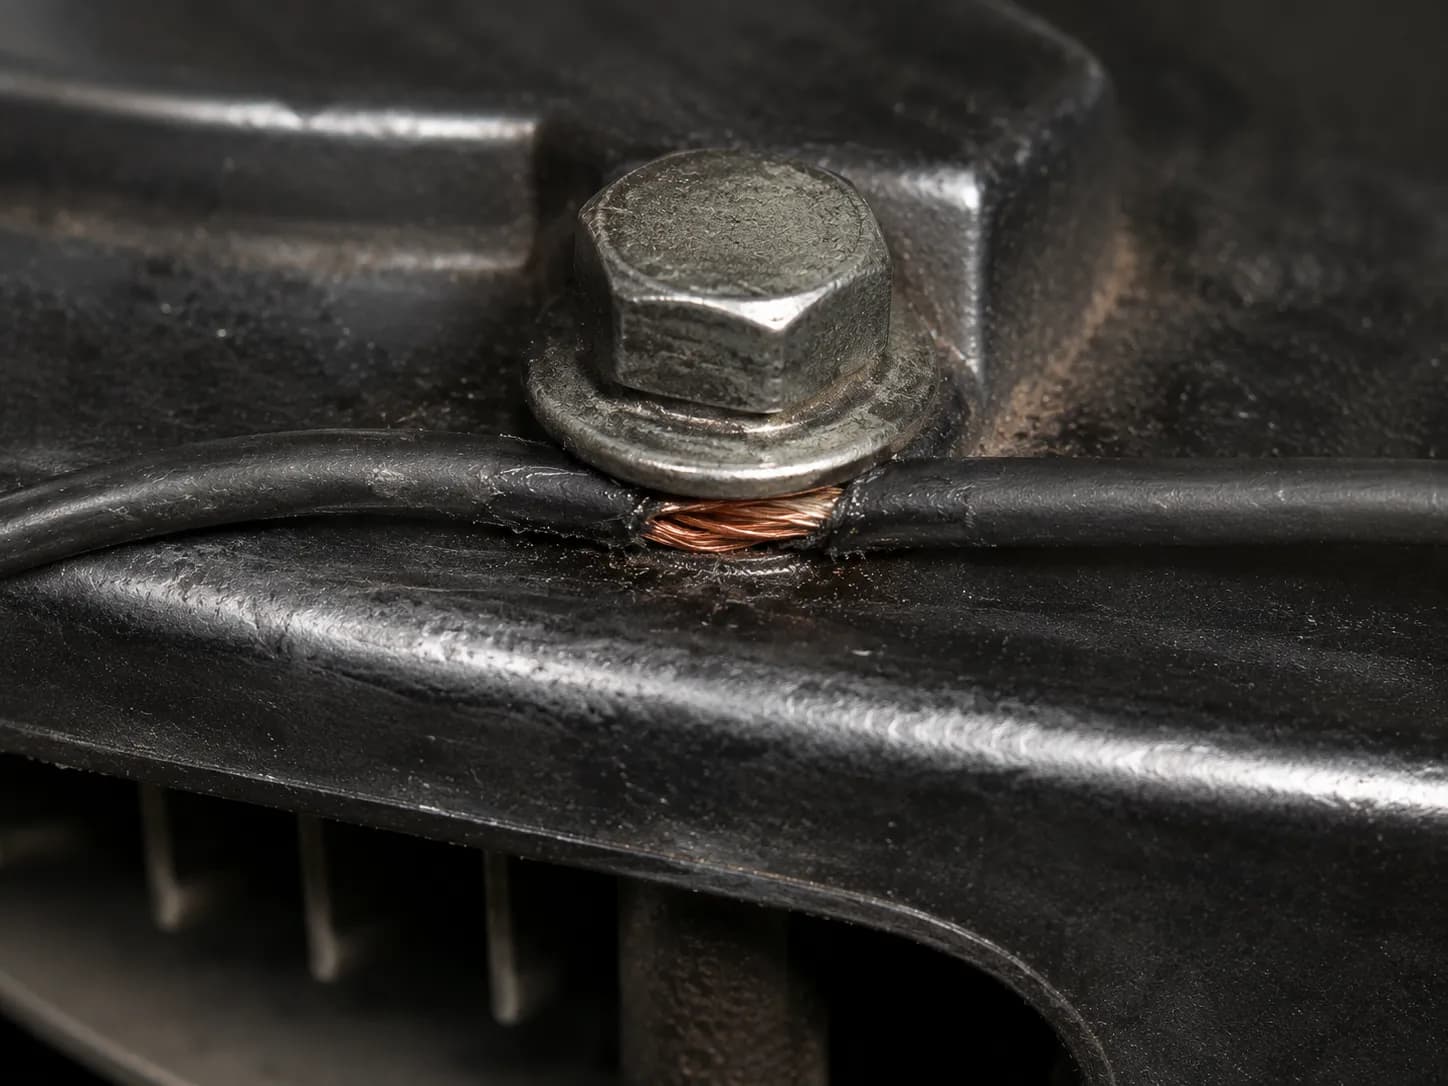
The kill wire grounds the coil to stop the engine, so anything grounding it permanently produces a permanent no-spark. Disconnect that small wire at the coil and re-test.
If spark returns, the coil is fine and the fault is a switch, a bail lever, or a wire chafed under the blower housing.
Stop two: the coil-to-flywheel gap
The coil sits a fraction of a millimetre from the spinning flywheel magnets, and that clearance is the armature air gap. Too wide, and the coil never builds enough voltage.
Check it against your engine's published figure. Shop regulars set it with a business card slid between coil and flywheel, but that is an approximation, so use the published number when you can get it.
Stop here if this is not your territory. Stops three and four mean pulling the blower housing, and stop three usually means a flywheel puller. That is a fair place to hand the job over.
Stop three: the flywheel key
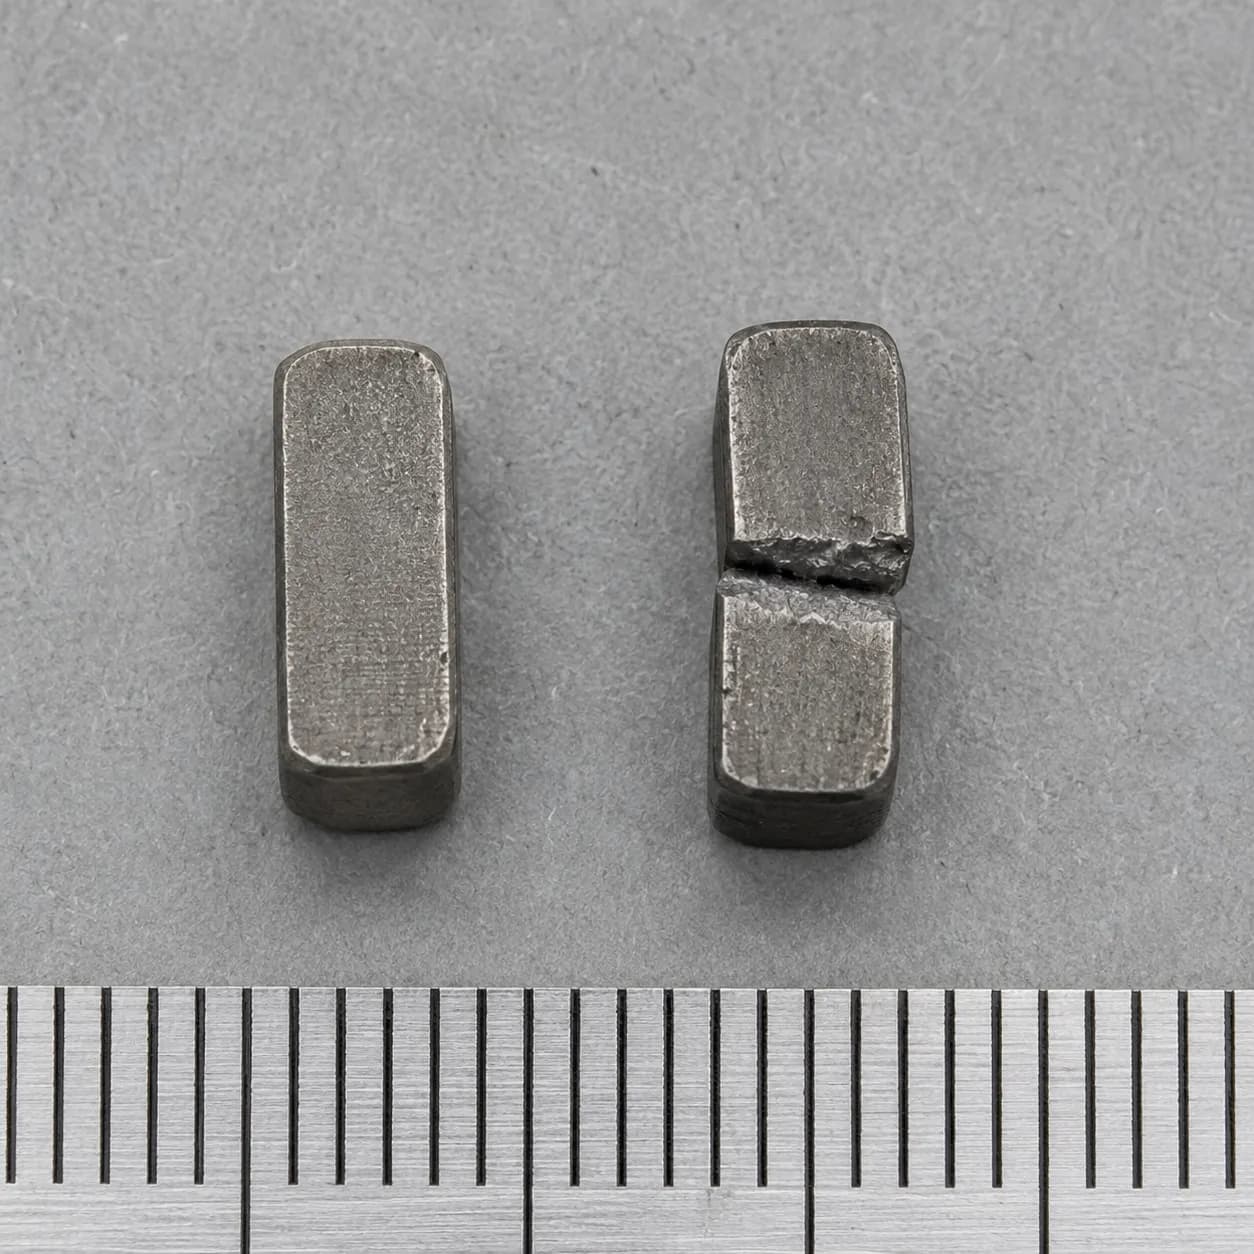
The flywheel key is a tab of soft metal locking the flywheel to the crankshaft, designed to shear when the blade strikes something solid. When it shears, the flywheel shifts and the spark arrives at the wrong moment.
The tell is history: the mower hit something, or stopped dead, before the trouble started.
Stop four: the coil
The coil is where most people start, and it should be where you finish. It is the only one of the four that costs real money, and the three cheaper faults present with the same symptom.
Of my nine mowers, two had no spark and neither needed a coil. One was that pinched kill wire, found free at stop one, and the other was the sheared key on the Husqvarna deck that had met a buried stump.
Briggs and Stratton's ignition sequence covers all four checks in technical detail. What it does not do is order them by cost, which is the part that keeps a $50 coil out of your bin.
For handling the lead safely meanwhile, Family Handyman's removal guide is the clearest write-up.
When to Stop and Take It to a Small-Engine Shop
Take a lawn mower to a small-engine shop when the free ignition checks have all cleared and there is still no spark, when the repair needs the flywheel off and you do not own a puller, or when the engine has lost compression. A shop diagnostic generally runs $40 to $100, and many shops fold that fee into the repair or waive it.
Arrive with the results of the tests you already ran. That removes the shop's first hour of work and lowers the bill.
Three points where continuing costs more than stopping:
All four no-spark stops cleared, still no spark.
The flywheel has to come off and you do not own a puller.
The engine has no compression.
Tell them which tests you ran, what each returned, and whether the kill wire made a difference. That is the hour they would otherwise bill you for.
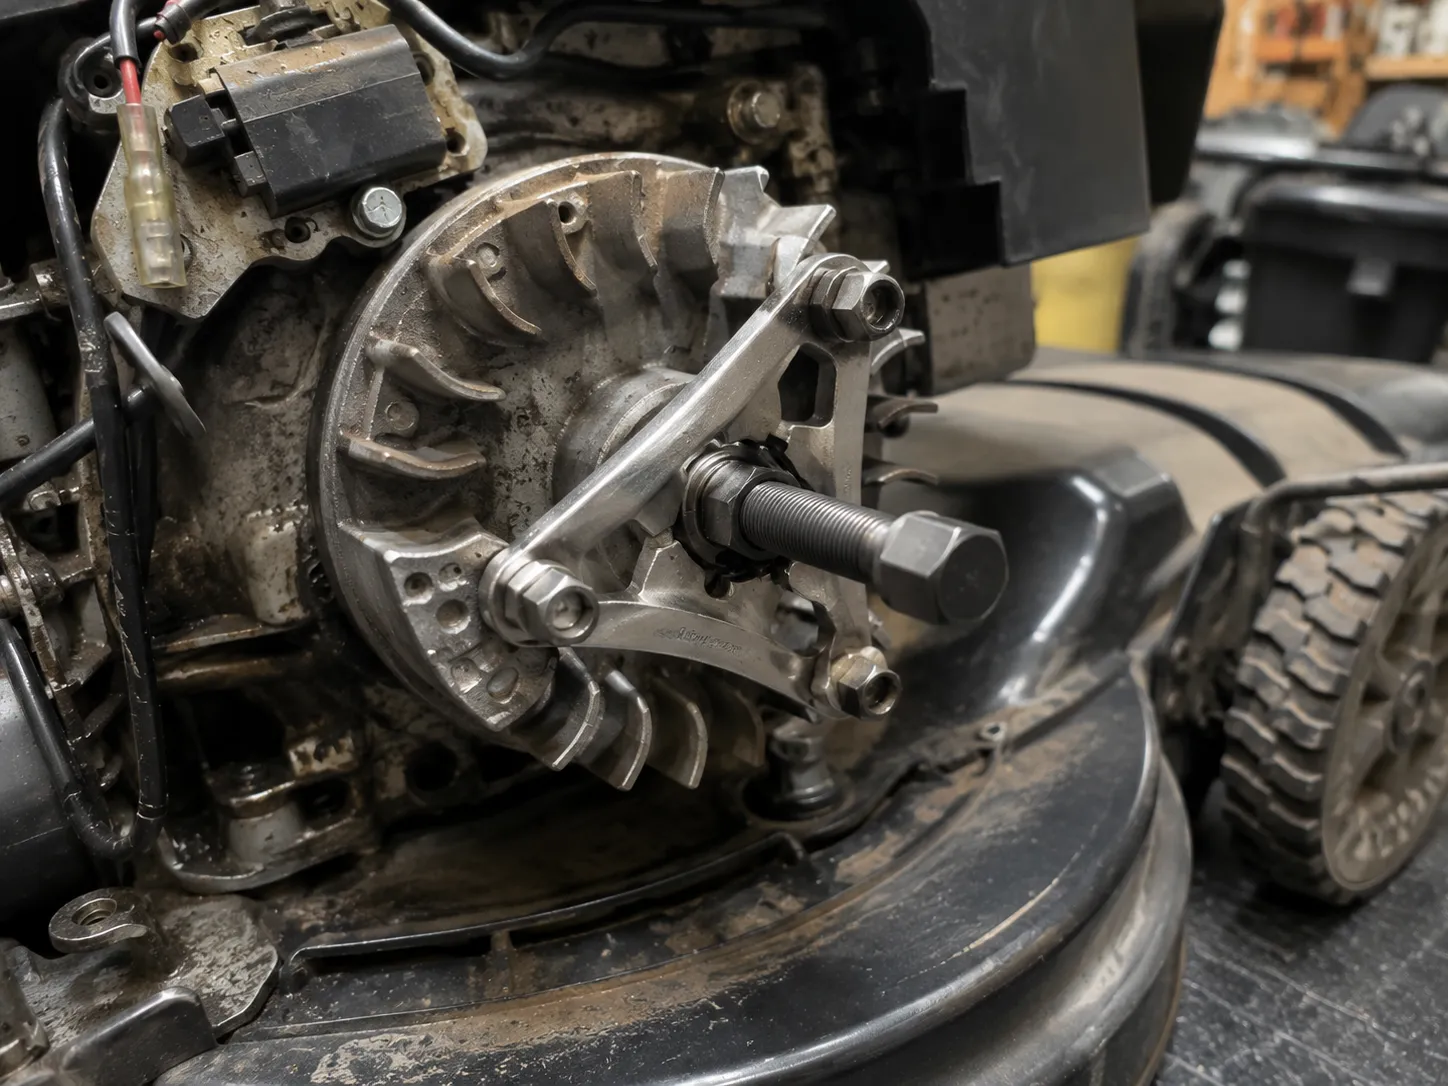
The flywheel is where my own bench work stops being homeowner territory. Past it you need a specific tool, a torque figure on reassembly, and a timing-critical alignment.
No referral here. I do not earn anything from recommending a shop, and there is no link in this section for a reason.
Testing a lawn mower spark plug is worth ten minutes precisely because of what it rules out. Confirm the spark first, trust the tester over the meter, and let an open-circuit reading be the only number that decides anything on its own.
Spark Testing FAQs
How do you check the spark plug on a lawn mower?
Disconnect the plug lead, unscrew the plug, reconnect the lead to it, and hold the threaded shell against bare metal while pulling the starter cord. Briggs and Stratton puts that disconnection first for safety.
A blue-white arc at the gap means the ignition is working.
Can you test a spark plug with a multimeter?
Yes, but it answers only half the question. Set the meter to 20 kilohms and probe from the terminal nut to the centre electrode.
An open-circuit reading proves the plug is dead. An in-range reading proves nothing, because 2 of the 22 plugs I measured read normally and still would not fire.
How do I test a lawn mower spark plug wire?
Remove the plug, connect the lead to an inline spark tester, ground the tester's other end against bare metal on the engine block, and pull the cord.
A steady flash means the lead and coil are healthy, isolating the fault to the plug. No flash means the problem sits upstream.
Can a spark plug spark and still be bad?
Yes. A plug can arc happily in open air and fail inside a pressurised cylinder, where the voltage required is far higher.
Two plugs in my 22-plug set did exactly that, both reading normal resistance on the meter.
Do I need to disconnect the spark plug before testing?
Yes, always. A walk-behind mower's blade bolts straight to the crankshaft, so turning the blade can turn the engine over and fire the plug with your hands in the way.
Pull the lead off before anything else, and keep it clear until you are ready to test.
Why can't I see a spark even though the mower runs?
Because a spark's brightness is fixed and low, and direct sunlight swamps it entirely. On a running Honda GCV170 in midday sun I saw nothing, and had to move the machine into the garage doorway before the arc appeared.
Test in shade before concluding the ignition has failed.
Summarize with AI
Keep reading
Related articles
 Maintenance & Seasonal Care
Match a lawn mower tune up kit to your engine: what is inside each kit, OEM vs aftermarket price math, and the right kit by brand for push and riding mowers.
 Maintenance & Seasonal Care
Compare mobile vs drop-off shop for a lawn mower tune up near me: real 2026 price ranges from 12 quotes, the 7 questions to ask, and when to just DIY it.
 Maintenance & Seasonal Care
Match a lawn mower spark plug repair kit to your fault in 30 seconds. 7 kits tested on 9 engines: M14x1.25 sizing, insert lengths, and the $5 boot fix.
 Maintenance & Seasonal Care
Compare lawn mower tune up cost by mower type: $70-$150 push, $150-$280 riding, from 9 real 2026 shop quotes. Plus the same parts for about $18 DIY.
Comments
Moderated for quality. Share a correction, ask a follow-up, or tell us what worked for you - every comment is reviewed before it goes live.