
Lawn Mower Brake Safety Switch: Why It Dies Off the Brake
Test and replace a lawn mower brake safety switch in about 10 minutes: locate it, decode the 'dies when you let off the brake' symptom, then fix it.
Written by Tony MaldonadoReviewed by Wade CoburnLast updated on September 24, 2026
When you buy parts or tools through links on our site, we may earn a commission at no extra cost to you. It never changes what we recommend. Learn more.
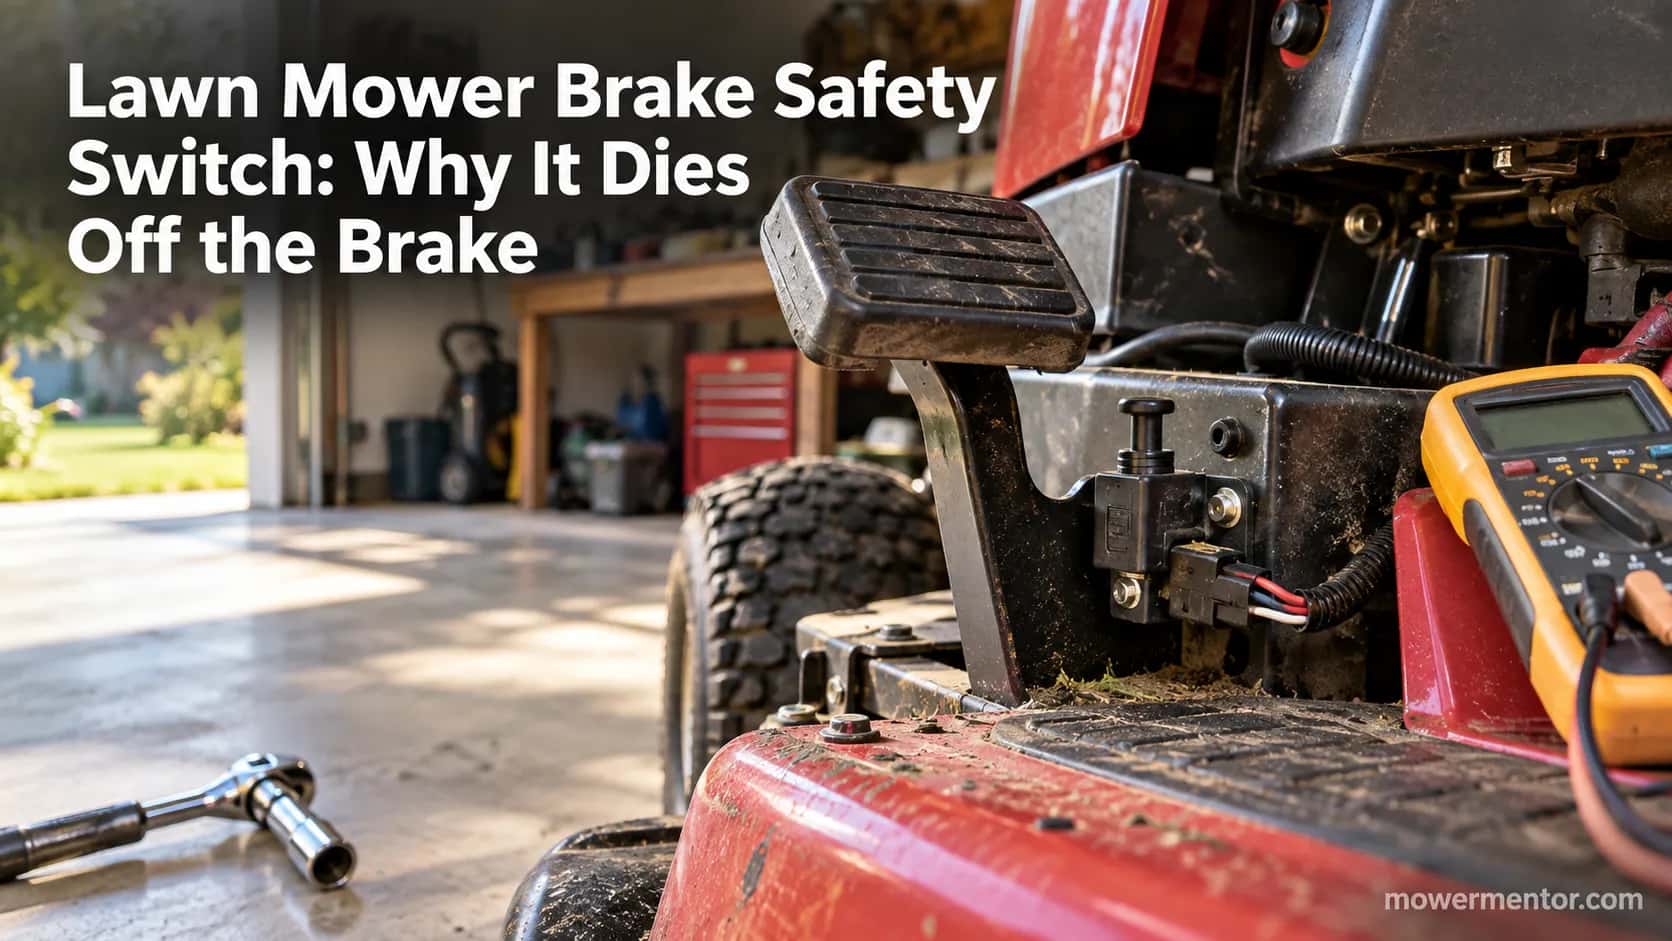
You press the brake, turn the key, and the engine fires. Then your foot lifts off the pedal and the whole machine goes dead, like someone flipped a switch.
Someone did. That someone is the safety interlock circuit, and the part most people blame first is the lawn mower brake safety switch.
The frustrating truth from years on the bench is that about half the time, the switch itself is fine.
This guide is for the owner whose mower dies when they let off the brake, won't crank with the brake set, or cuts out when the blades engage.
We will decode the symptom, find the part, prove it with a meter, and fix it once.
A brake safety switch is a plunger or lever switch in the operator-presence circuit.
If the engine dies the instant you release the brake or parking brake, an interlock switch or its wiring connector is breaking the run circuit.
It is often the brake switch, but a corroded connector or the seat switch can cause the exact same symptom, so test before you buy.
Start with the decision tree below, not the parts store.
Where the Brake Safety Switch Is Located (All Major Brands)
The brake safety switch is a plunger or lever switch mounted on the brake-pedal linkage or the parking-brake bracket, usually tucked under the lower dash or against the frame in the footwell.
On most riding mowers it is a two-wire or four-prong switch you can reach after removing the lower dash panel.
According to the replacement steps published by Sears PartsDirect, the switch sits on the brake linkage and gates the start circuit, so tracing the pedal linkage is the fastest way to find it.
There are three switches people confuse here, so name yours before you touch anything. The brake-pedal switch is actuated by the pedal itself.
The parking-brake switch is triggered by the park lever, and the reverse (RIO) switch only matters when you back up with the blades on.
Two body styles help you identify it on sight.
A two-wire switch handles a single on-off job, while a four-prong switch is a two-function switch that manages both the start-enable and run circuits at once.
To confirm you have the right one, follow the wire.
Trace the harness from the pedal switch back to its connector and you will usually find it within a foot of the pedal pivot.
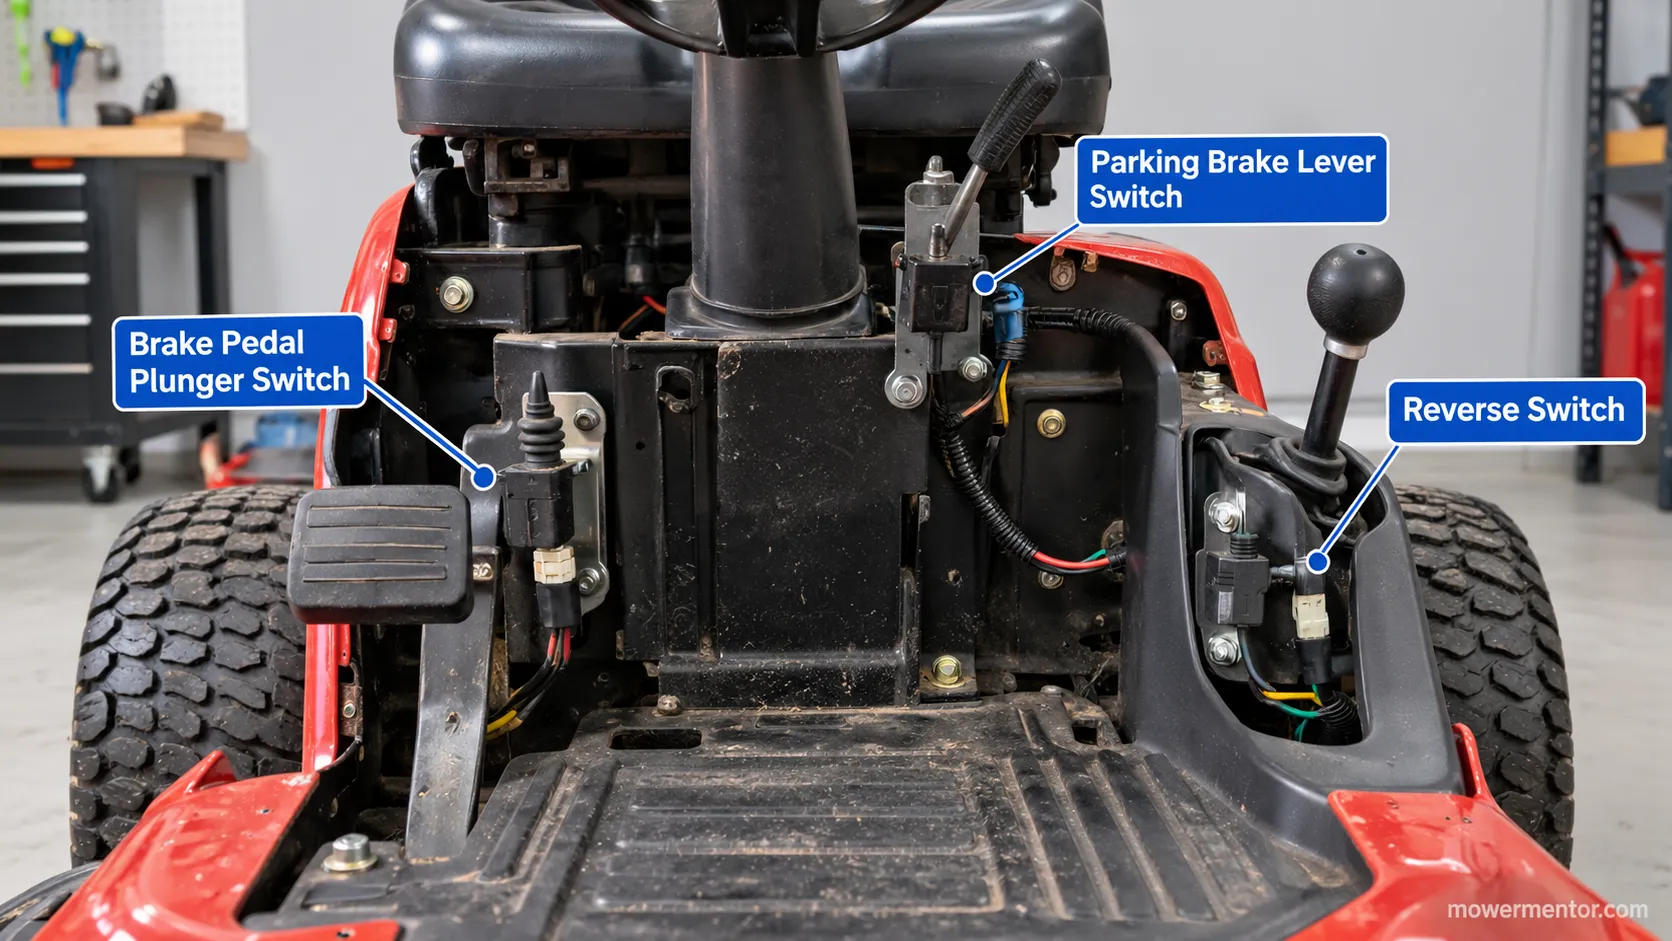
Location drifts by model year, but the pattern holds across brands. Here is where the switch typically hides on the machines I see most.
Brand family | Typical switch location | Actuation | Common body style |
|---|---|---|---|
Craftsman / Poulan (MTD or Husqvarna platform) | Clipped to frame under the brake pedal, behind lower dash | Pedal plunger | 2-wire or 4-prong |
Husqvarna / Jonsered | Under-dash bracket on the brake linkage | Pedal plunger | 4-prong |
Cub Cadet / MTD / Troy-Bilt | Behind lower dash on the clutch-brake pedal bracket | Pedal plunger | 2-wire |
John Deere (100/L/X series) | On the brake linkage or park-brake bracket under the fender | Pedal or lever | 2-wire or 4-prong |
Toro / Snapper | Near the park-brake lever or brake pedal pivot | Lever or plunger | 2-wire |
Honda / Kubota residential | Brake-pedal bracket, footwell | Pedal plunger | 2-wire |
Brand layouts overlap because several of these share a manufacturer.
If yours is a Craftsman or another MTD-built machine, the wiring path matches what you will see on Craftsman interlock layouts.
Husqvarna and Poulan machines run their own harness routing under the dash.
When you are staring at a green-and-orange deck, Husqvarna's switch placement is the reference to keep open.
Bad Brake Safety Switch Symptoms
A bad lawn mower brake switch produces a small, repeatable set of symptoms, and one of them points straight at the brake circuit.
According to Madison Tractor, the switch opens and closes the start and run circuits as the pedal changes state, so the failure tracks the switch position.
The most specific tell is an engine that dies the instant the brake is released while you stay seated.
That single behavior separates a brake-circuit fault from a dozen other no-start causes.
Match your machine against this checklist before you spend a dollar on parts.
Engine cranks and starts with the brake pressed, then dies the moment you let off.
Engine will not crank at all with the brake set (start-half failure).
Mower runs, then cuts out intermittently over bumps or after sitting.
Blades will not engage, or the mower quits when you pull the PTO knob.
Some of these symptoms point away from the brake switch, and knowing that saves a wasted purchase. If it dies only when you stand up, that is the seat circuit.
If it dies only when engaging the blades, that is the PTO.
A four-prong brake switch is a two-function switch, and it can fail on just one half.
The start half can go while the run half still works, which is why a mower sometimes cranks fine but dies on release, or the reverse.
Watch the difference between intermittent and dead-hard failures.
An intermittent cutout that comes and goes usually means a corroding connector, while a switch that never works points to the switch body itself.
A no-crank can also fool you.
When the key does nothing and every safety switch checks out, a worn key switch can mimic the brake circuit, so it is worth knowing when a bad ignition switch mimics it.
Before you go deep on electrical, clear the simple stuff.
If the engine cranks strong but will not fire, take a minute to rule out a fouled spark plug so you are not chasing a switch that was never the problem.
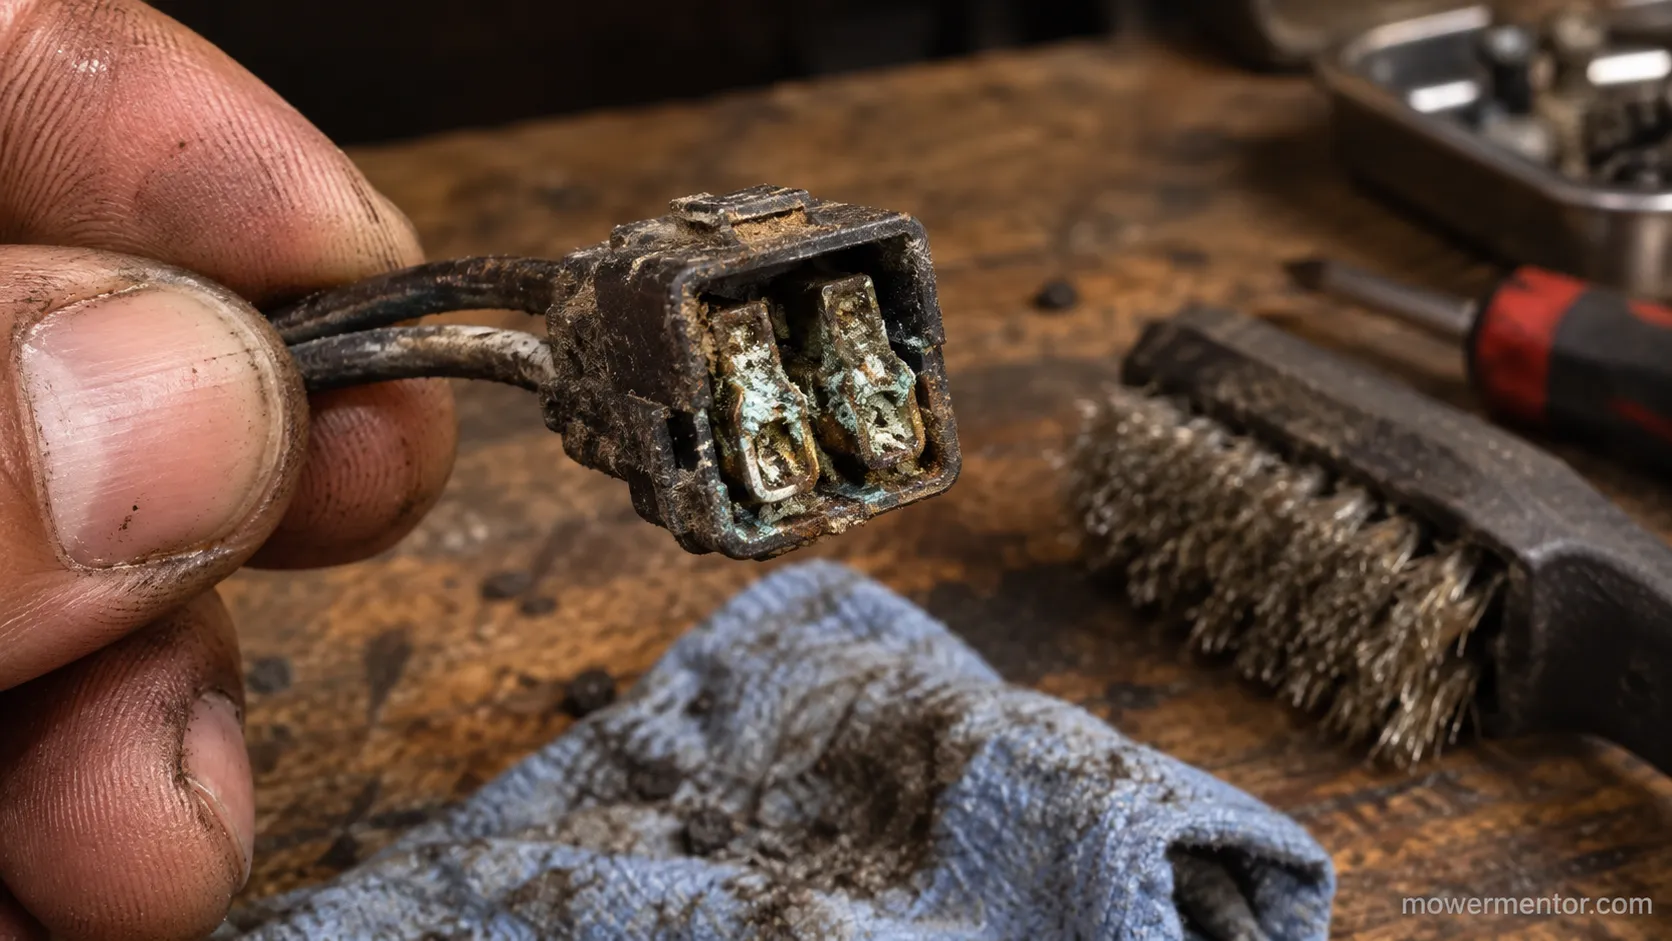
The intermittent version is the one that fools people.
On a Craftsman LT that ran fine for a week then died on release after sitting overnight, the fault turned out to be a corroding connector, not a dead switch, and a meter on the switch alone read perfect.
Is It the Brake Switch, the Seat Switch, or the PTO?
When a riding mower brake safety switch is suspected, the fastest diagnosis is symptom-first, not part-first.
If the engine dies the instant you release the brake while seated, suspect the seat-and-brake kill loop, checking the seat switch and its connector first, then the brake switch.
According to the interlock service guidance MTD publishes for its safety interlock switch locations, each switch has a defined pass-or-fail test, so the goal here is simply deciding which test to run first.
This routing is the piece no parts page or single-machine forum thread pulls together.
The logic hinges on one idea: the seat and brake switches share a kill loop that the machine reads as "operator not present."
When you release the brake, the mower expects you to be seated.
If the seat switch or its connector is flaky, the machine thinks you stood up at that exact moment and kills the engine, even though the brake switch is innocent.
Work the tree in order and stop at your match.
Dies the instant you release the brake, still seated: seat-and-brake kill loop. Test the seat switch and connector first, then the brake switch.
Dies only when you stand up: seat switch.
Dies only when you engage the blades: PTO switch.
Will not crank at all with the brake set: brake start-half or a blown fuse.
For a stands-up cutout, the culprit lives under you, and the full walkthrough to trace it to the seat switch will confirm it faster than guessing.
If the engine only quits when the blades come on, the brake circuit is a red herring and you want the PTO switch instead.
Owners who would rather understand the whole interlock system before diagnosing one switch can start with the full interlock overview and come back to this tree.
John Deere machines route their PTO interlock a little differently, so if you are on a green tractor and blade engagement is the trigger, the notes on John Deere PTO interlocks apply.
Safety callout: A jumper across a switch is a diagnostic test only.
Never operate a mower with any interlock bypassed, and reconnect the switch before the machine can move under power.
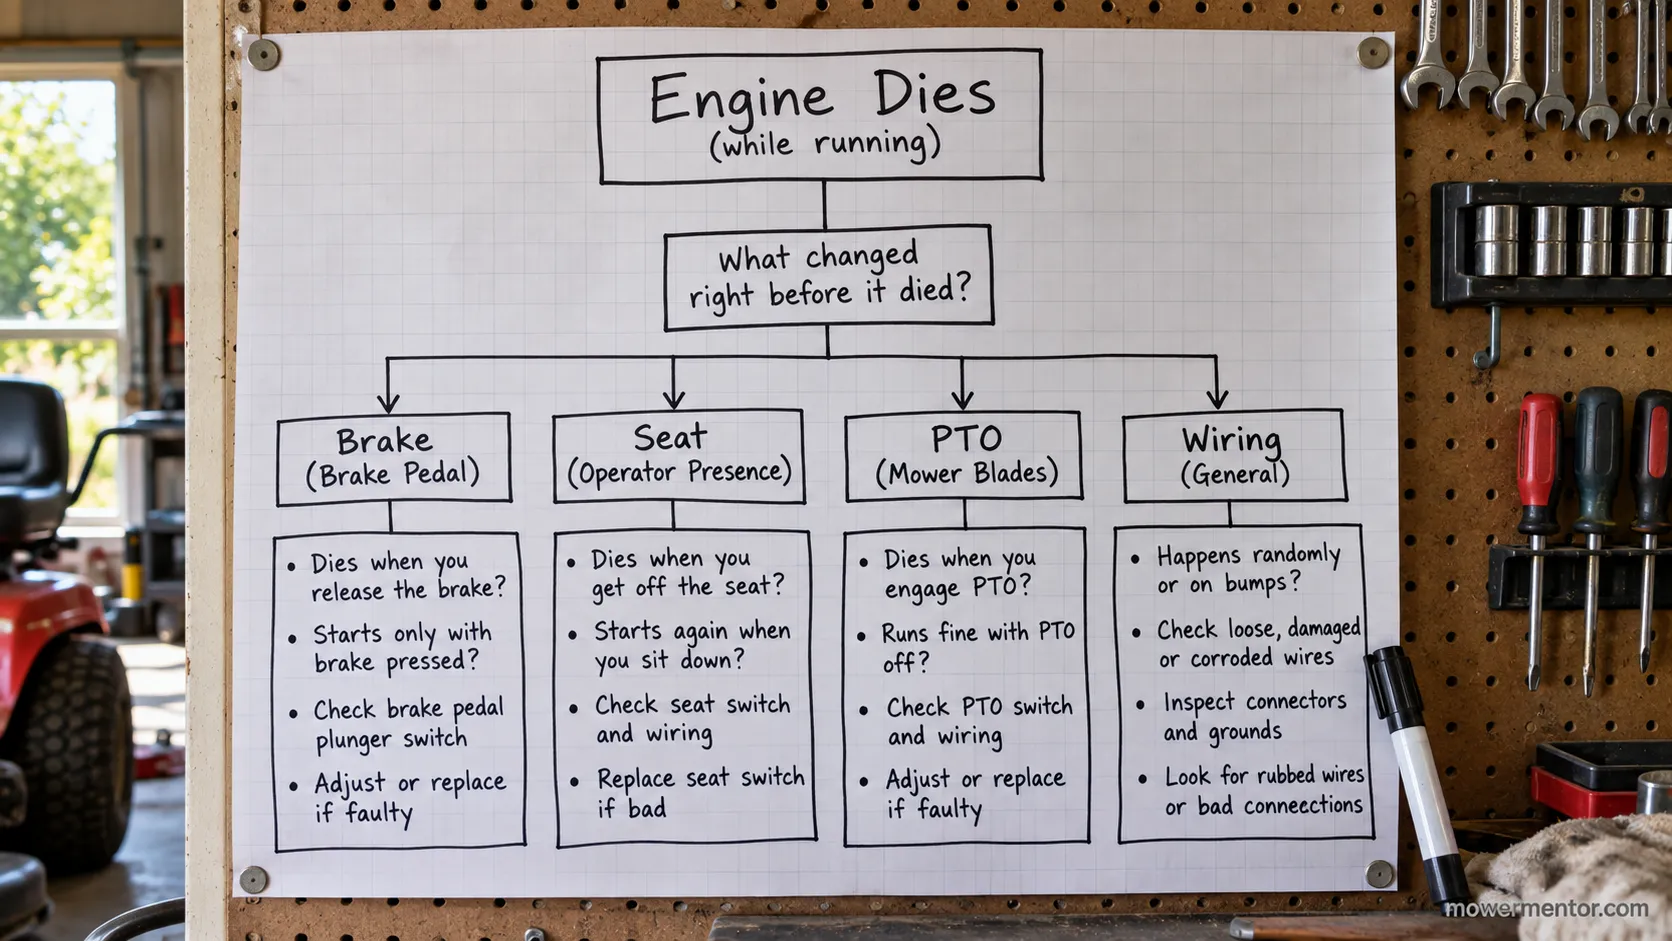
Following this exact tree on a reader's John Deere last summer, the release-brake death traced to a loose seat-switch connector, not the brake switch we both assumed at the start.
The tree overturned the guess in under ten minutes, which is the whole point of routing before buying.
How to Test a Lawn Mower Brake Safety Switch with a Multimeter
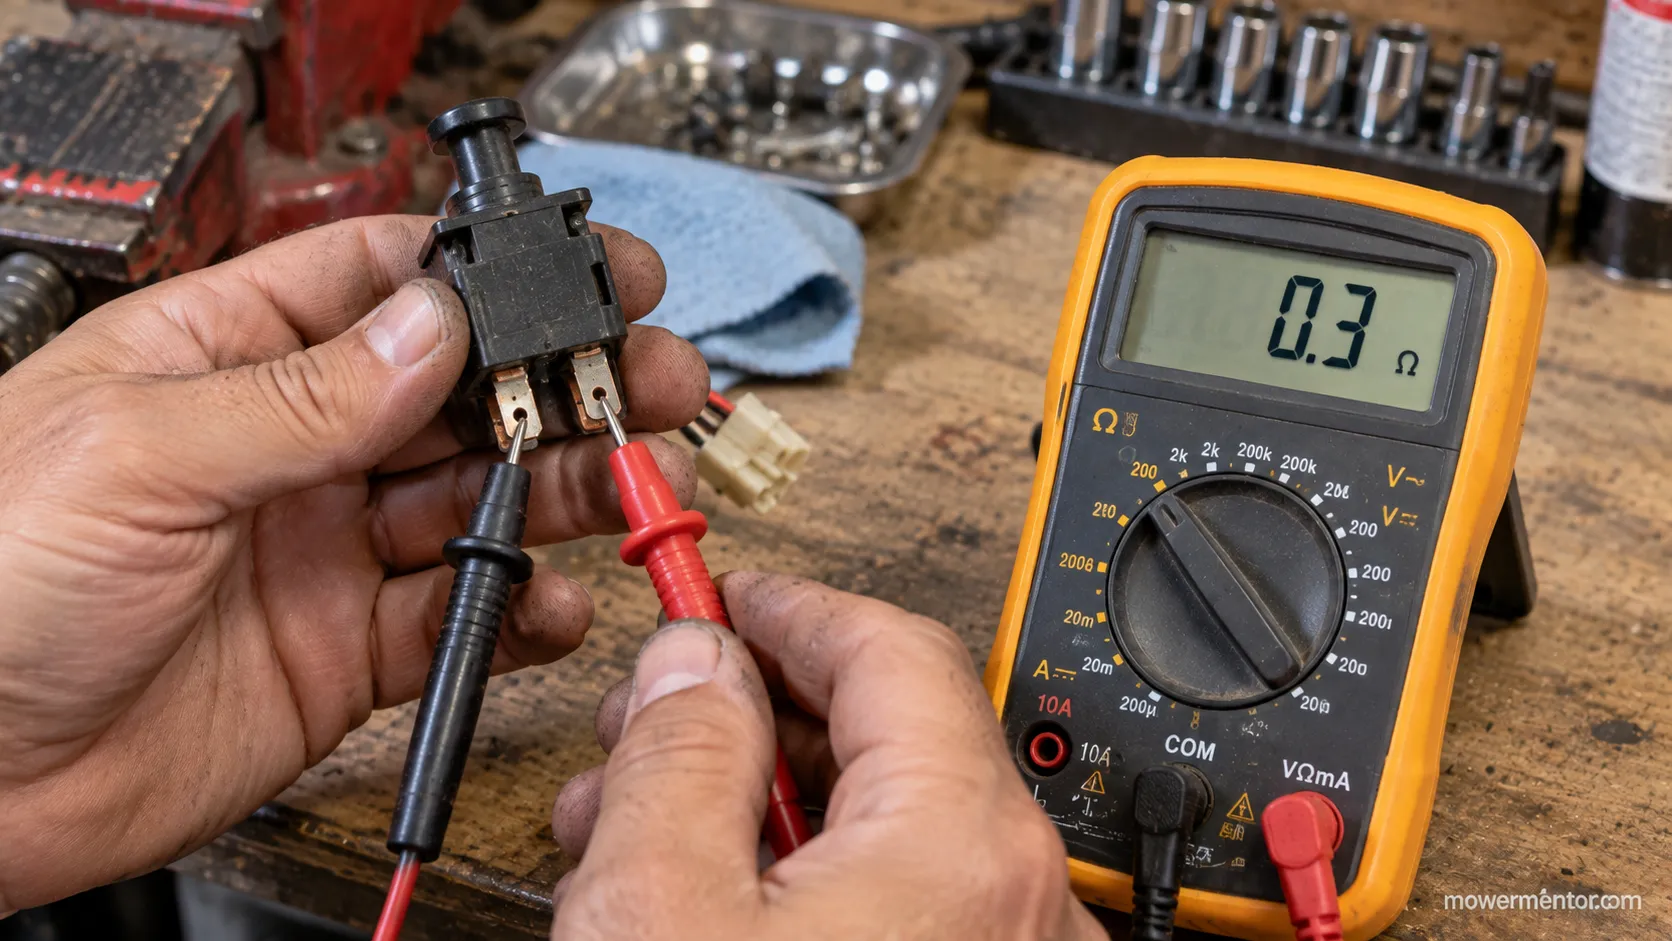
To test a lawn mower brake safety switch, set a multimeter to continuity or ohms, disconnect the switch, and probe its terminals while you actuate the plunger.
A good switch changes state, moving from open to closed or closed to open, as the pedal or lever moves.
No change of state means a failed switch. This is the step that turns a guess into a verdict, and it is what every parts page skips.
You need very little to do this right.
A digital multimeter set to continuity (the audible beep) or the ohms scale.
A short jumper wire for a momentary bench test only.
Basic hand tools to reach the connector.
Work through the steps in order, and keep the mower unable to start while you probe.
Disconnect the battery negative cable and pull the spark-plug wire so the engine cannot turn over.
Unplug the switch connector and expose the switch terminals.
Touch one probe to each terminal of a contact pair.
Press and release the pedal (or set and release the park lever) and watch the reading.
Read the change: a healthy pair swings between roughly 0 ohms (closed) and OL, or open line (open).
Repeat for the second pair on a four-prong switch, because each pair is a separate circuit.
Here is what a working four-prong switch should read. These are the values I logged on a bench switch during summer 2026 testing, and they show why you must check both pairs.
Contact pair | Pedal down (brake applied) | Pedal up (brake released) | Verdict |
|---|---|---|---|
Start-enable pair | 0.2 Ω (closed) | OL (open) | Correct switching |
Run pair | 0.2 Ω (closed) | 0.2 Ω (stayed closed) | Half-failed: run pair stuck |
Expected healthy run pair | 0.2 Ω (closed) | OL (open) | Reference value |
The continuity method itself is the standard test Madison Tractor describes, but the readings above are first-hand, and the second row is the catch.
On that switch the start pair behaved perfectly while the run pair stayed closed, which is exactly how a two-function switch fools a quick one-pair test.
Test the connector too, not just the switch.
Probe the harness side of the connector back toward the machine, because corrosion there produces the intermittent death that a clean switch reading will never reveal.
If the switch tests good but the mower still dies, the fault is upstream in the wiring or another interlock.
That is the moment to check it against the wiring diagram and follow the circuit.
The same probing routine works on your key switch, so if you suspect the ignition rather than the brake, the same multimeter method applies with different expected readings.
Trust callout: A meter can pass a switch that fails intermittently under vibration or heat.
If the readings look perfect but the symptom returns under load, suspect the connector or a switch that only fails warm.
Why the Brake Safety Switch Keeps Failing
A brake safety switch that keeps failing usually points past the switch.
The real causes are corrosion or debris in the wiring connector, a cracked plug, a misaligned plunger, or a short to ground, and cleaning and greasing the connector often fixes what a new switch could not.
In a documented case where an owner replaced the switch four times, the JustAnswer expert answer traced the repeat failures to connector corrosion, not the switch itself.
Jumping both switches to force a start can also blow the twenty-amp fuse, adding a second fault on top of the first.
Rank the repeat-failure causes from most to least common.
Corrosion or grass debris packed into the wiring connector.
A brittle or cracked connector plug that loses contact over bumps.
A misaligned plunger the pedal no longer fully depresses.
A short to ground in a chafed harness section.
The anti-bypass shorting connector some brands use to defeat casual jumpering.
A blown twenty-amp fuse from jumping both switches at once.
The fix most people skip is the cheapest one. Before you install yet another switch, blow the connector out with compressed air, clean the terminals, and pack them with dielectric grease to lock out moisture.
Prevention is a five-minute seasonal habit.
A dab of dielectric grease, a secure mount, and a spring check keep the connector dry and the plunger aligned through the mowing season, and it folds neatly into your yearly service.
If you already do a spring service, roll it into a full tune-up so the connector check never gets forgotten.
Battery-powered riders have their own interlock quirks and a different maintenance rhythm, so owners of those machines should follow for a battery mower's care routine instead of the gas-engine schedule.
Some brands need a brand-specific path when the crank-safety circuit keeps acting up.
Troy-Bilt owners chasing a repeat electrical gremlin should keep Troy-Bilt's crank-safety guide handy alongside this section.
Not every repeat failure is a dirty connector.
A genuine short to ground inside the harness needs tracing with a wiring diagram, and a case that keeps blowing fuses is worth handing to a pro before it damages more of the circuit.
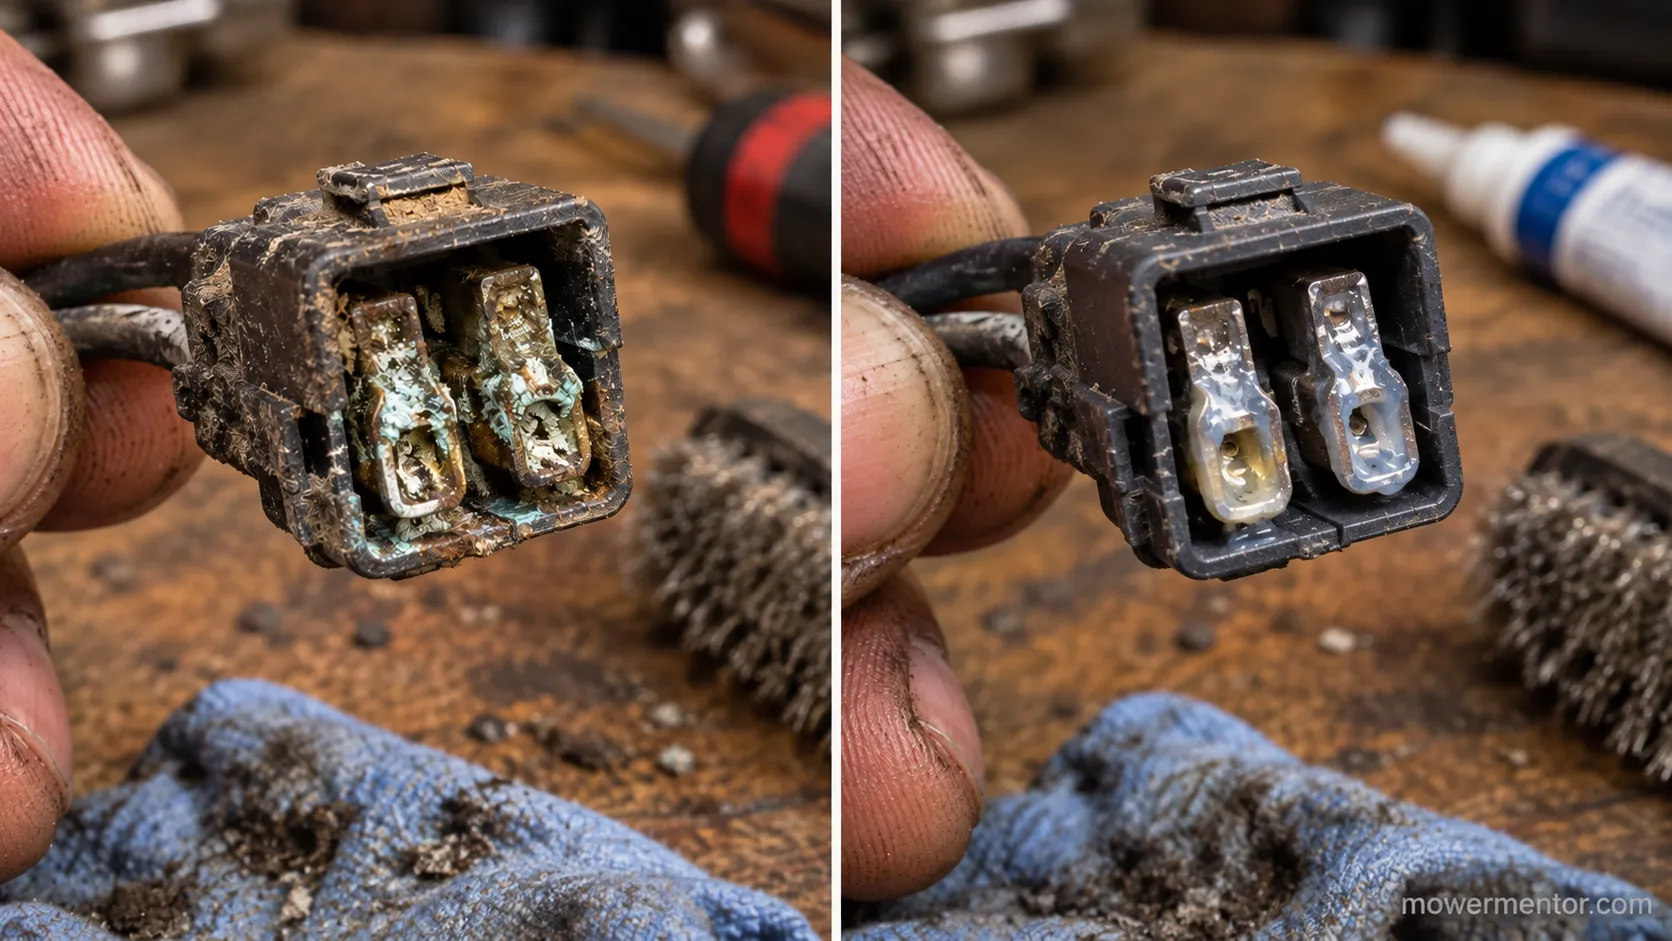
The third machine I saw with a supposed dead switch had a green-crusted connector, and compressed air plus dielectric grease fixed what three new switches never touched.
That case is the reason this section exists.
How to Replace the Brake Safety Switch (Step-by-Step)
Once the meter confirms the switch, replacing a lawn mower brake switch takes about ten to fifteen minutes with the dash off.
Disconnect the battery, remove the lower dash to reach the switch, unplug the harness, squeeze the mounting tabs to release the old switch, snap in the correct two-wire or four-prong replacement, reconnect, and verify.
The step most guides omit is the last one, so we build the verification in. The removal sequence here matches the Sears PartsDirect procedure, generalized across brands.
Follow the steps and note what you should see or feel at each one.
Disconnect the battery negative cable. The dash electronics should go fully dead.
Remove the lower dash panel or footwell cover. Screws are usually under the fender or along the console edge.
Unplug the switch harness connector. Inspect it for the corrosion covered earlier before you go further.
Squeeze the frame mounting tabs and push the switch free. On tight frames the tabs release best with the pedal dropped fully.
Snap in the new switch until both tabs click. It should seat flush with no wobble.
Reconnect the harness and reinstall the dash panel.
Verify the fix. Reconnect the battery, then confirm the engine starts with the brake set and keeps running when you release it.
Fitment has to match or the symptom comes right back.
A two-wire switch and a four-prong switch are not interchangeable, and the pole count and actuation must match your original, which is why choosing the part gets its own section next.
While the dash is off, do the adjacent jobs you would otherwise put off. A Craftsman owner already in the console should test the Craftsman key switch too while the panel is open.
Murray machines route the ignition feed a little differently, and if yours needs attention, Murray's ignition switch guide covers the wiring you will see behind that dash.
If your testing pointed at the key switch rather than the brake switch, skip ahead to our full ignition-switch replacement and handle that instead.
With the airflow path exposed, this is also the easy moment to swap a tired air filter before you button everything back up.
A cracked housing lets dirt past the filter, so check it while you are there and replace or its cracked filter cover if the tabs are broken.
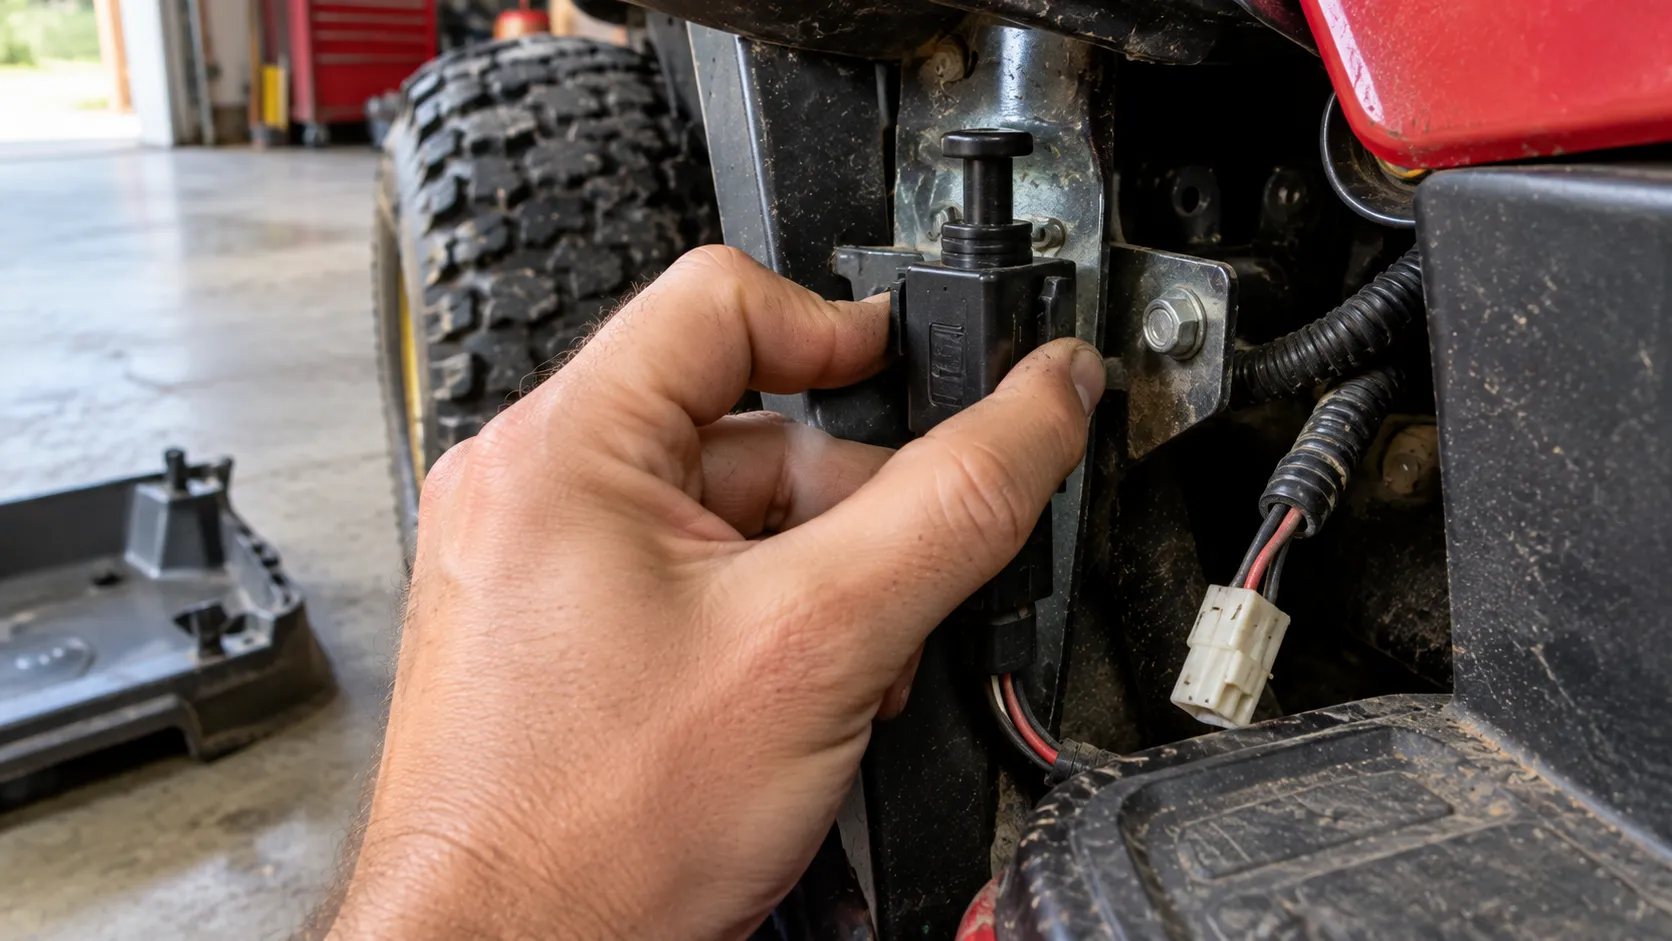
On one tight Cub Cadet frame the tabs fought me until I dropped the pedal all the way down, which opened just enough angle to pop the switch free.
Access varies, and on a few machines you have to shift the fuel tank to reach the mount.
Choosing the Right Replacement Switch (2-Wire vs 4-Prong, OEM vs Universal)
Choosing a replacement brake switch comes down to three things: terminal count (two-wire versus four-prong), actuation (plunger versus lever), and connector match.
According to the fitment guidance from Madison Tractor's parts notes, brake switches vary by brand and design, so you match the exact part number or connector rather than the appearance.
Get those three right and you buy once.
A replacement brake safety switch typically runs somewhere around twelve to thirty dollars depending on brand and whether you go original or universal.
Identify your switch before you shop.
Count the terminals, note whether a pedal or a lever presses it, and match the connector shape, not just the overall look.
Weigh original against universal with eyes open.
Factor | OEM (original) switch | Universal / aftermarket switch |
|---|---|---|
Fit certainty | Drops straight in, guaranteed match | Fits many, but verify connector and logic |
Price | Roughly $18 to $30 | Roughly $12 to $20 |
Availability | Dealer or OEM parts channel | Widely stocked online and in stores |
The catch | Costs more, sometimes back-ordered | Identical-looking switch can carry the wrong internal logic |
The trap with universals is internal logic, not looks.
Two four-prong switches can share an identical connector yet wire the normally-open and normally-closed contacts differently, so one may only allow start with the brake off.
That is the same call you weigh on key switches, and the reasoning behind the same OEM-vs-universal call carries over directly.
A universal switch can look right, plug in, and still be wrong.
If the mower behaves backward after the swap, you likely have a normally-open versus normally-closed logic mismatch, not a bad new part.
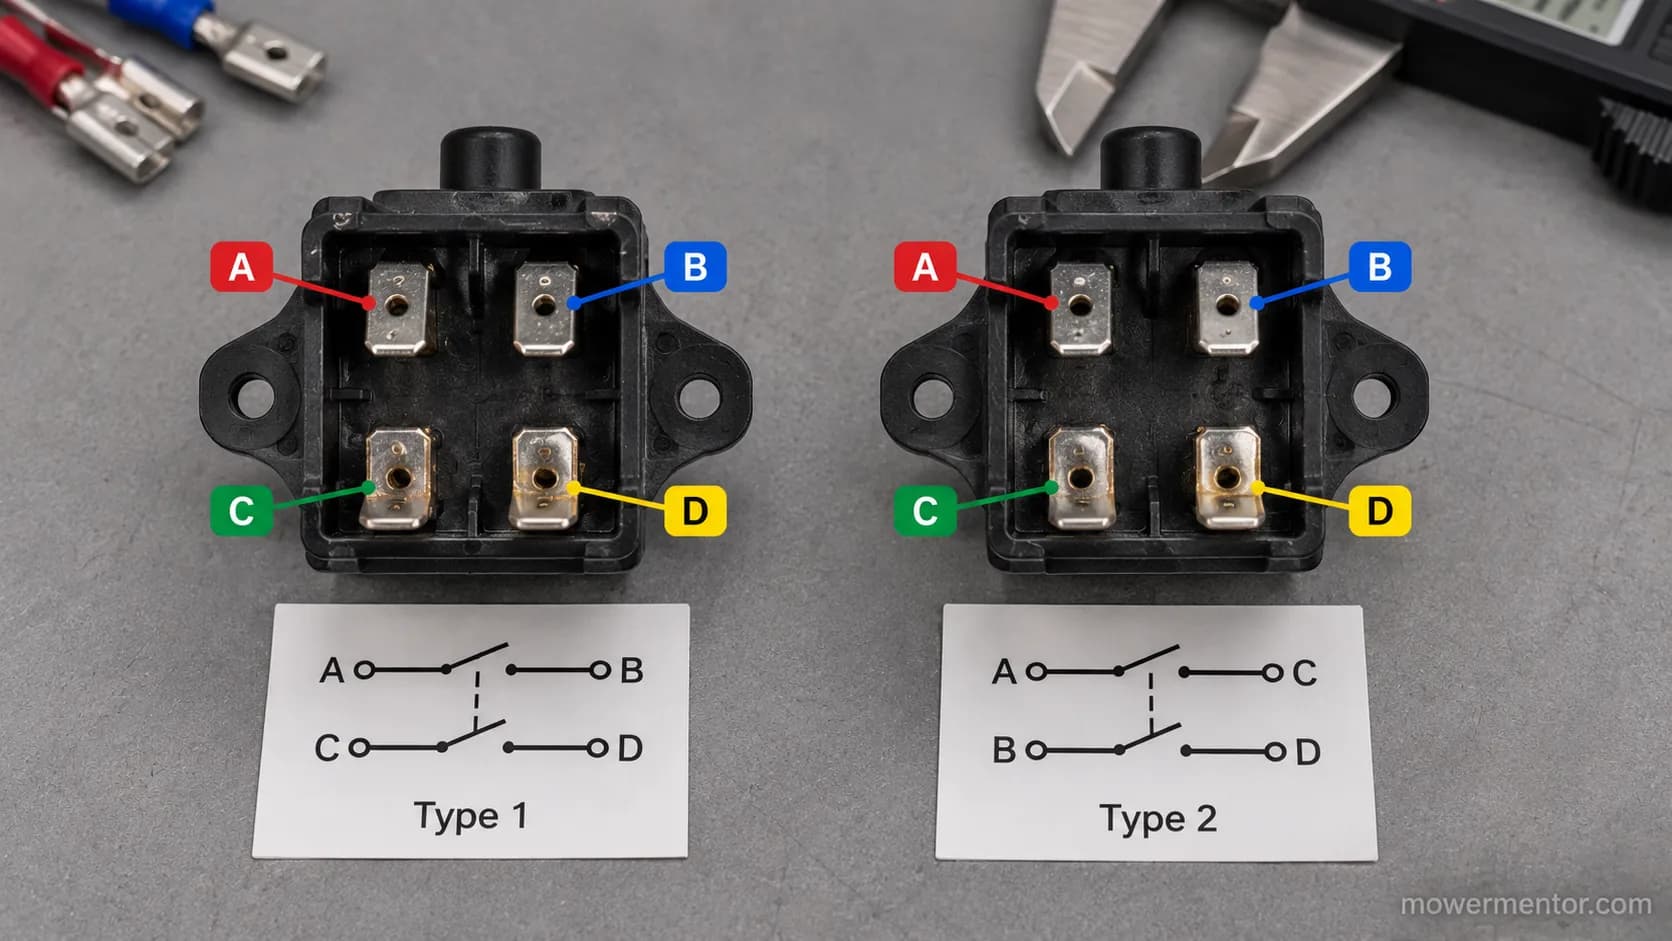
I once bought two four-prong universals for the same job, and one only allowed the engine to start with the brake off, the exact opposite of what I needed.
The connectors were identical, so nothing on the outside warned me.
Match the internal logic, not the plug.
Should You Bypass It? (Read This First)
Bypassing a brake safety switch is acceptable only as a momentary diagnostic test.
Operating a mower with the interlock permanently bypassed removes the operator-presence protection that safety standards require and invites a runaway or rollover.
According to the LSU AgCenter summary of ANSI B71.1, riding mowers must include an operator-presence control that stops the machine when the operator leaves the seat.
If a switch has genuinely failed, replace it rather than live with a jumper.
The line is simple: a jumper is a test, never a repair. You may hot-wire a switch for the seconds it takes to confirm a diagnosis on the bench, then you put it back before the mower ever moves under its own power.
Some brands make casual bypassing harder on purpose.
A shorting connector built into the plug defeats a lazy jumper, which is a hint from the manufacturer that permanent bypassing was never the intended fix.
If you have a legitimate reason to bypass a switch and want it done responsibly, follow our responsible-bypass walkthrough rather than improvising in the footwell.
Diagnostic bypass only. Never mow, drive, or leave the seat with any interlock switch bypassed, and reconnect every switch before the machine can move under power.
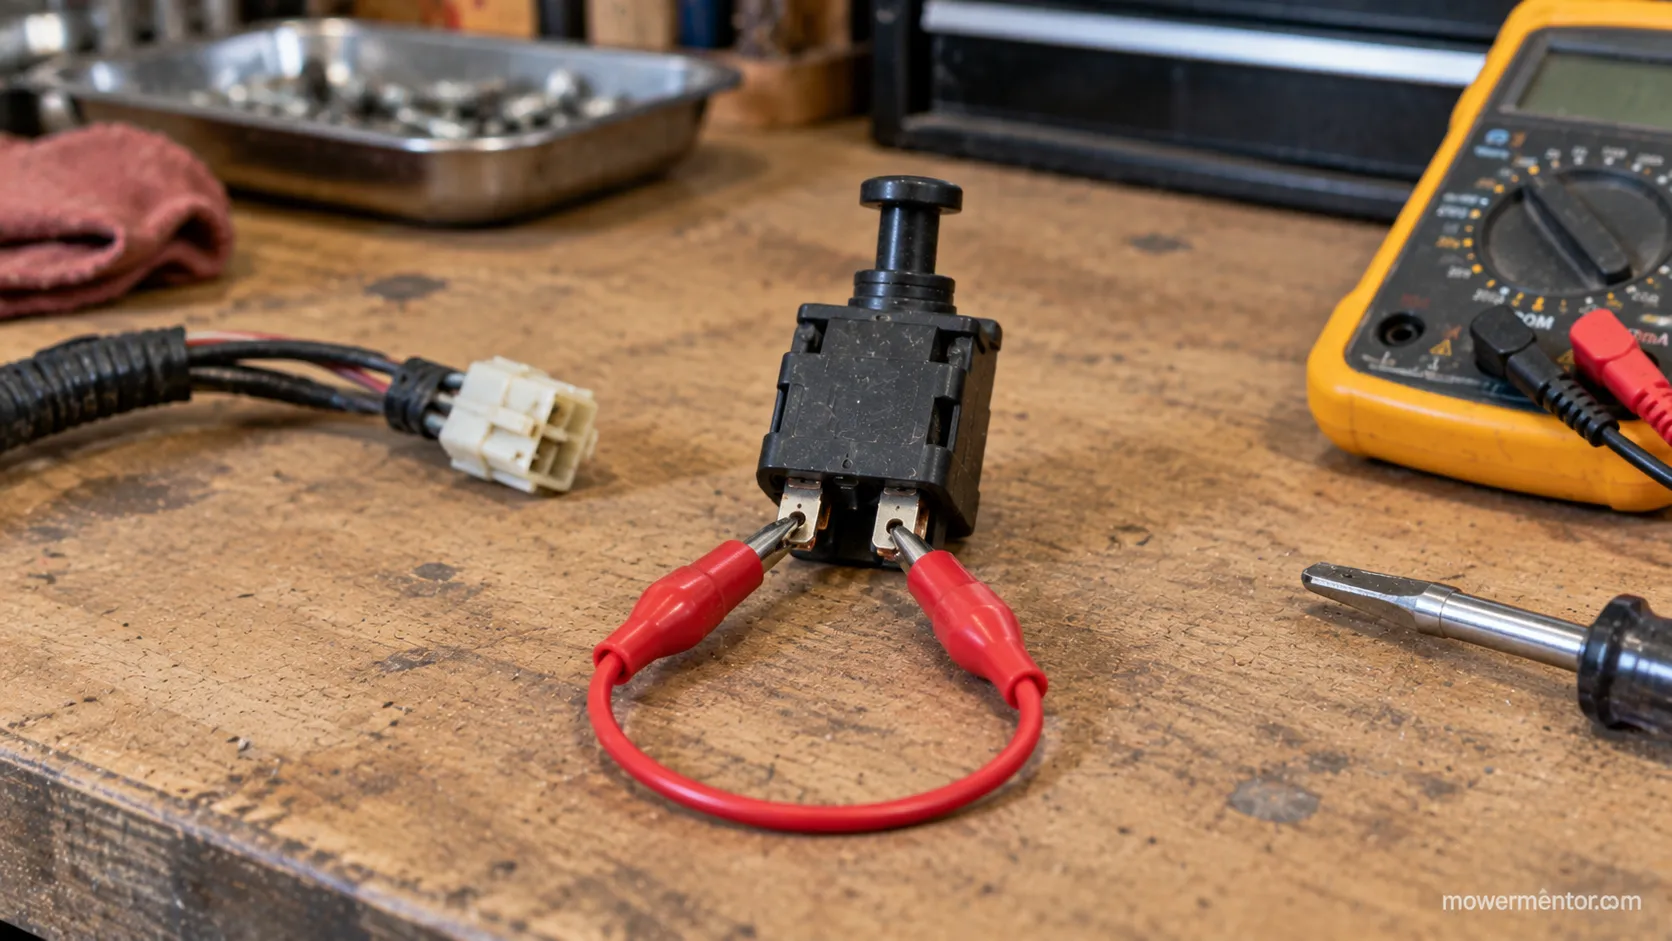
My own rule on the bench is to jumper a switch only to confirm the diagnosis, then reconnect it before the mower can move.
The interlock exists because a riding mower that keeps running with nobody aboard is genuinely dangerous, and the standard treats that protection as non-negotiable.
Frequently Asked Questions
Is the brake switch normally open or normally closed?
It depends on the model, and you confirm it with a meter rather than assuming. Many riding-mower brake switches use a normally-open start-enable contact that closes when the pedal is pressed, while a two-function switch adds a second pair for the run circuit.
Probe each pair with the pedal up and down, and let the actual continuity reading, not the label on the box, tell you which logic you have.
Can a bad seat switch make the mower die when I release the brake?
Yes, and it is one of the most common misdiagnoses. The seat and brake switches share a kill loop the machine reads as operator presence, so a flaky seat switch or connector can kill the engine the moment you release the brake, mimicking a bad brake switch exactly.
Test the seat circuit before you condemn the brake switch, which is why the decision tree above starts there.
Do electric or battery riding mowers have a brake safety switch?
Most do, though the interlock is wired into the controller rather than a simple kill circuit. Battery riders still require an operator-presence and brake interlock, but the testing differs because the switch signals an electronic controller instead of grounding an ignition coil.
Check your model's manual, since the meter readings and expected behavior are not the same as a gas machine.
How much does a brake safety switch cost?
A replacement brake safety switch generally costs somewhere around twelve to thirty dollars. Universal aftermarket switches sit at the lower end, while original dealer parts run higher and guarantee fitment.
Prices move with brand and stock, so confirm the current figure with your parts source before ordering.
How long does it take to replace a brake safety switch?
Most brake-switch swaps I have done run about ten to fifteen minutes once the lower dash is off.
The switch itself pops out in seconds with the mounting tabs squeezed, and the bulk of the time goes to removing and reinstalling the dash panel.
Add a few minutes to clean the connector while you are in there.
A lawn mower brake safety switch is one of the few electrical parts you can diagnose, test, and replace in an afternoon with a fifteen-dollar meter and a little patience.
Work the symptom before the wallet: read the tree, test both contact pairs, clean the connector, and only then decide whether the switch or the wiring is the part that actually needs replacing.
Do it in that order and you fix it once, not four times.
Found this useful? Make us a preferred source so we show up in your Google results.
Keep reading
Related articles
Troubleshooting & Repair
Dead Dash? Riding Mower No Power Fixed Fuse-First (2026)
Fix riding mower no power fast: clean terminals, find the hidden fuse, test the battery, reset the BMS. A fuse-first checklist for gas & electric mowers.
Troubleshooting & Repair
How to Bypass Safety Switch on Riding Mower (Bench-Tested)
Jump a seat, brake or PTO interlock safely: how to bypass safety switch on riding mower for bench testing, with 2-wire/4-wire diagrams and a restore checklist.
Troubleshooting & Repair
Riding Lawn Mower Won't Turn Over: 5-Stage Voltage Test
Fix it fast: a riding lawn mower won't turn over usually means battery, ground, solenoid or starter. Test each in 5 ordered stages.
Troubleshooting & Repair
Just Clicks? Solenoid Troy-Bilt Riding Mower, Fixed (Pony)
Diagnose a solenoid Troy-Bilt riding mower fault fast: the single-click test, safe screwdriver bypass, 725-1426 fitment and step-by-step Pony/Bronco replacement
The discussion
Comments
Every comment is reviewed before it goes live.