Cub Cadet Riding Mower Starter Solenoid: 3 Tests, 1 Part
Test a Cub Cadet riding mower starter solenoid 3 ways, find it on XT1/XT2/ZT1, read the wiring diagram, and replace part 925-1426A yourself.
Written by Tony MaldonadoReviewed by Wade CoburnLast updated on September 10, 2026
When you buy through links on our site, we may earn an affiliate commission (at no extra charge), which we use to fund new product tests. Learn more.
Read it your way
Short on time? Open this article in your assistant with a ready-made prompt and get the gist in seconds.
Found this useful? Make us a preferred source so we show up in your Google results.
Your Cub Cadet turns the key and answers with a click, or with nothing at all, and every search result tells you to buy a cub cadet riding mower starter solenoid before you have proven a single thing. That reflex wastes money.
A dead ground or a tired battery makes the exact same click.
So this guide shows you how to confirm the part with a screwdriver and a meter first, then locate, wire, and swap it if it truly failed.
A bad solenoid usually gives one sharp click, rapid chattering, or dead silence with no crank.
Confirm it in under a minute: bridge the two large posts with an insulated screwdriver. If the starter spins, the solenoid is the fault.
On the XT1 and XT2 the solenoid hides under the battery, so the battery comes out to reach it.
The classic part is the three-post 925-1426A. Many newer machines use the four-post 725-06153A instead, so verify by model and serial.
Budget roughly $15 to $30 for the part and about 15 minutes for the swap.
The Quick Answer: Is Your Cub Cadet Solenoid Actually Bad?
A Cub Cadet starter solenoid fails in one of three audible ways: a single hard click, a rapid machine-gun chatter, or total silence when you turn the key to start. The fastest confirmation costs nothing.
With the mower parked, the brake set, and the blades off, bridge the two large solenoid posts with an insulated screwdriver. If the starter spins, the solenoid's internal contacts are the fault.
If nothing happens, the problem is upstream in the battery, the cables, or the starter, and a new solenoid will not fix it.
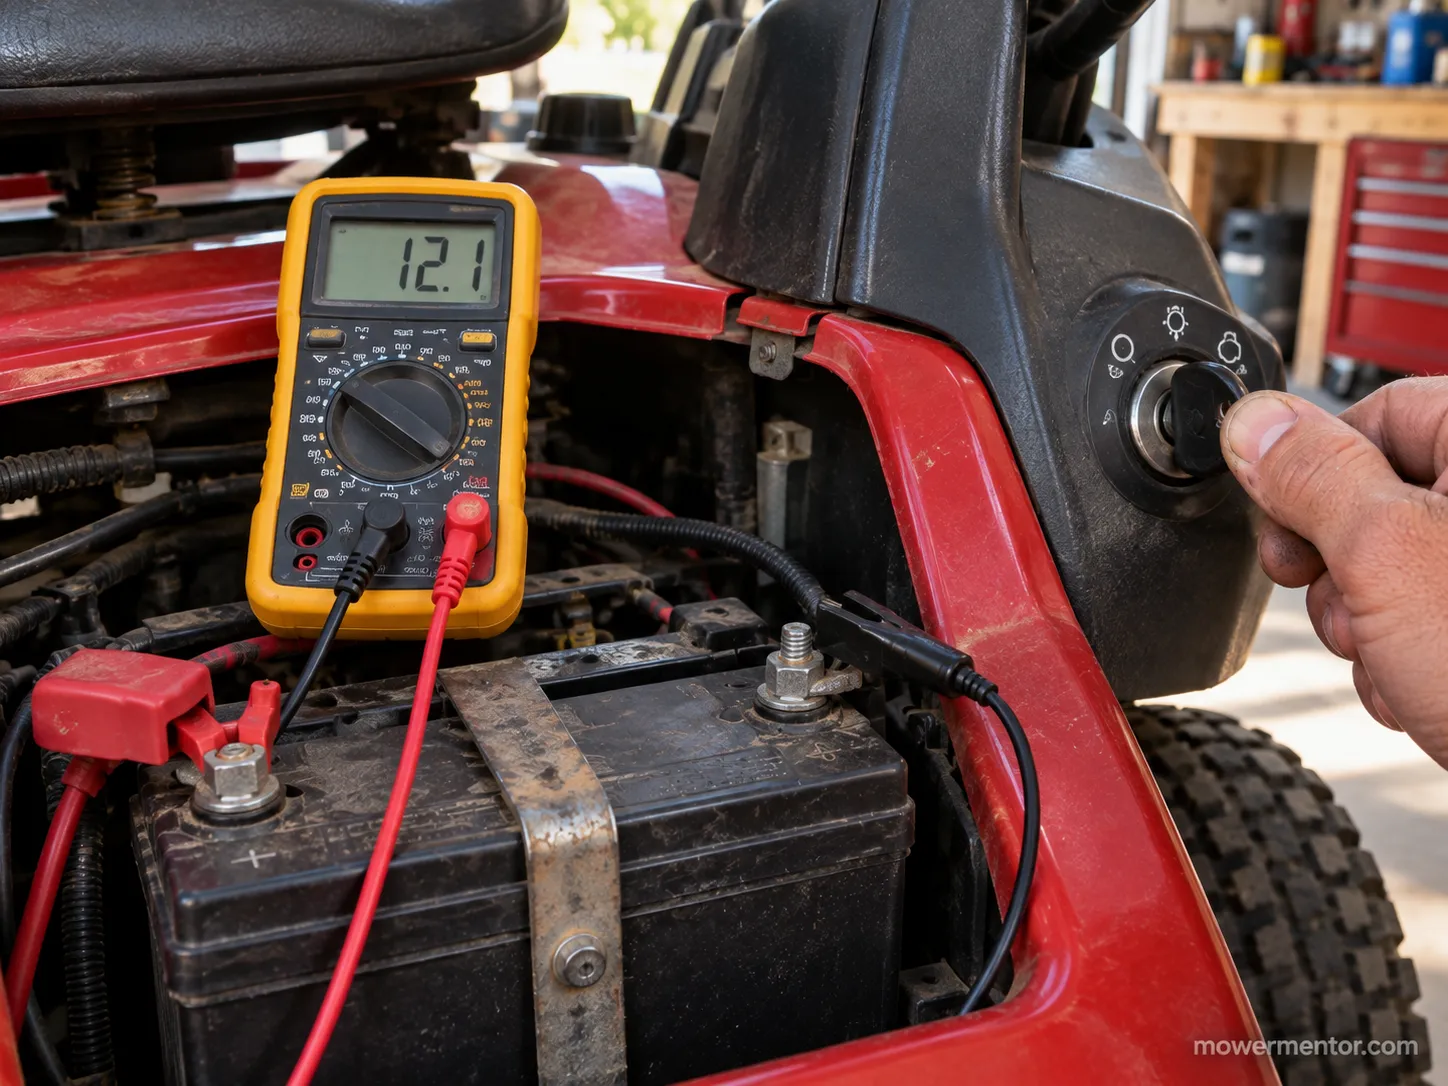
On our own Cub Cadet XT1 LT46 this spring, the key produced a fast chatter and no crank.
The meter read 12.1 volts at rest, yet that number collapsed the instant we cranked, which is the classic signature of contacts that can no longer carry current under load.
Here is the honest part almost no seller mentions: the click is a battery or ground problem first and a solenoid problem second.
Do not buy anything until the tests below point at the part.
Bad-solenoid symptom shortlist:
One loud, single click, then silence.
Rapid clicking or chattering that will not settle into a crank.
Dead silence with a known-good, fully charged battery.
Starts fine some days, refuses on others, with no pattern.
What the Starter Solenoid Does, and Why Cub Cadets Kill Them
The Cub Cadet starter solenoid is a high-current relay that sits between the battery and the starter motor.
Per Cub Cadet's own part listing, the classic 925-1426A is a 12-volt, three-post unit rated for the heavy starter draw, roughly 80 amps, mounted at ninety degrees and grounded through its own steel bracket.
A small trigger wire from the ignition and safety circuit energizes a coil, the coil snaps two big contacts closed, and battery power floods to the starter.
When any one of those three parts gives up, the mower stops cranking.
Three failure modes cover almost every dead solenoid. Understanding what a starter solenoid is at the component level makes the difference between the failures obvious.
Burned or pitted contacts. The big internal contacts arc every start and eventually erode, so the coil still clicks but no current passes.
An open coil. The trigger winding breaks, and you get silence with good battery voltage present.
A corroded bracket ground. Because this solenoid grounds through its mounting foot, rust or paint under that foot starves it, and the symptom mimics a dead part.
That last mode is the quiet villain. The difference between single and rapid clicking usually traces back to whether the coil is pulling in cleanly or fighting a weak ground.
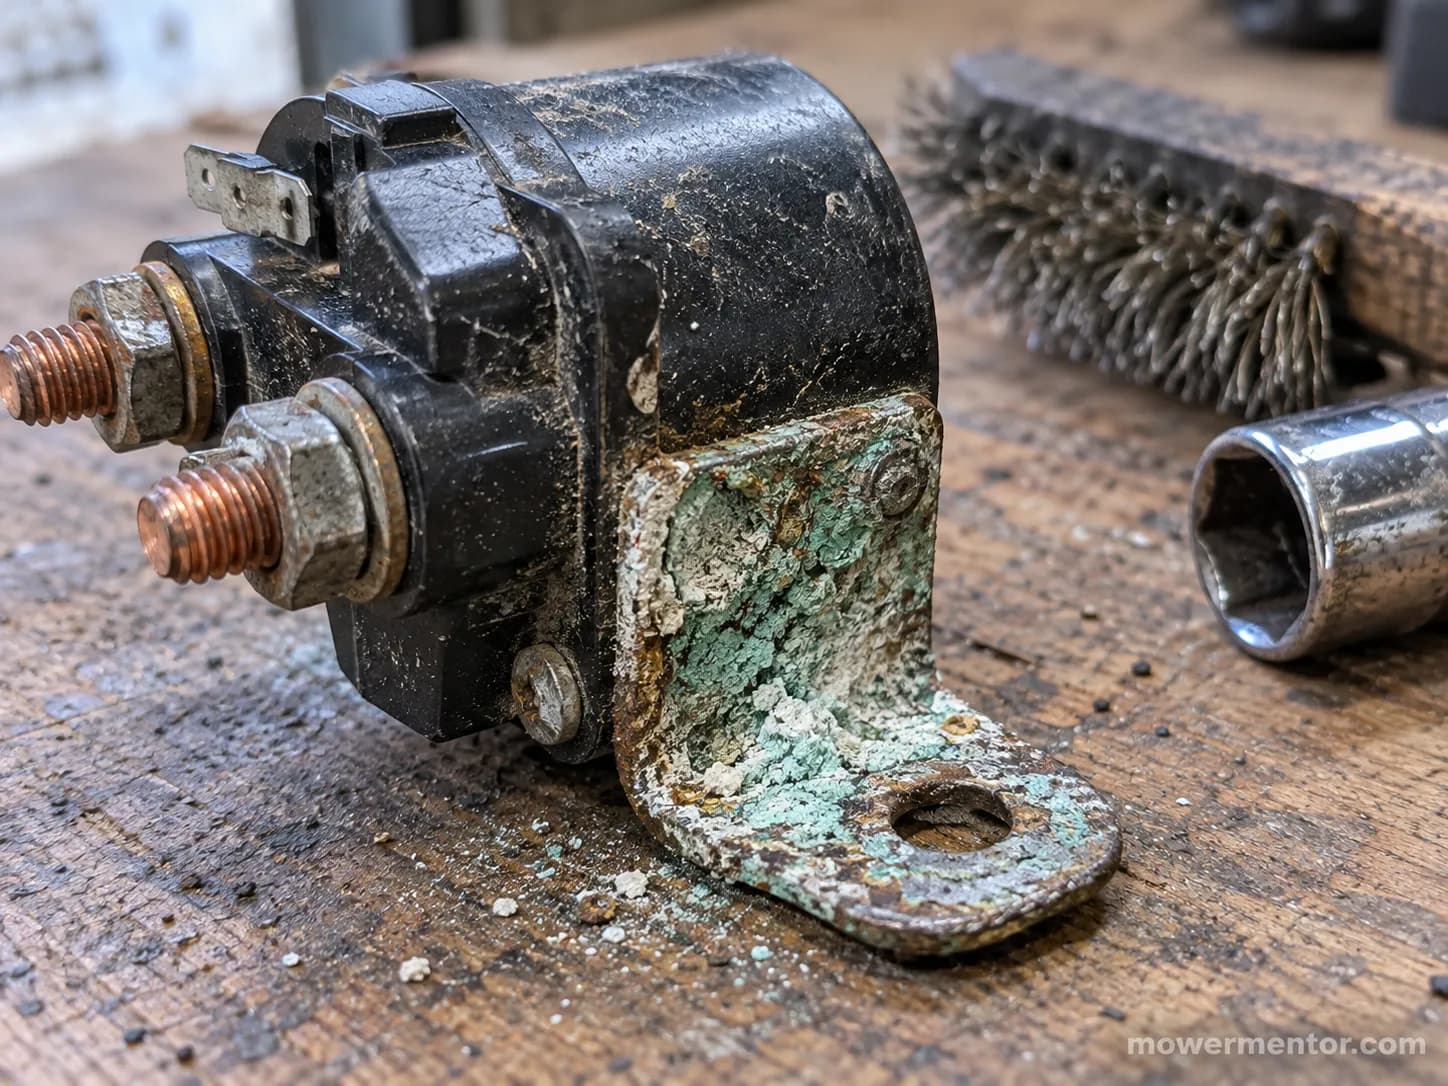
When we pulled the failed unit off our XT1, the coil itself was fine. The mounting foot wore a green crust, so the ground, not the part, had been the real weak link all along.
Where Is the Starter Solenoid on a Cub Cadet? (XT1, XT2 and Ultima ZT1)
On most Cub Cadet lawn tractors the starter solenoid sits low near the battery, and on the XT1 and XT2 it is pinned directly under the battery box on the frame rail.
According to Tractor Supply's fitment list, the replacement solenoid covers the XT1, XT2, Enduro, RZT-SX, and Ultima ZT1 through ZT5 machines running Kohler 7000 and 5400 series or Kawasaki FR, FS, and FX engines.
On the Ultima ZT1 zero-turn the solenoid lives under the seat pan beside the battery.
To reach it on the lawn tractors, you lift the seat, disconnect and remove the battery, and only then does the small black box become accessible.
Model | Where the solenoid sits | Access reality |
|---|---|---|
XT1 (LT and GT) | On the frame under the battery box | Remove the battery to reach it |
XT2 (LX and GX) | Under the battery tray, on the fender frame | Remove the battery to reach it |
Ultima ZT1 | Under the seat pan, beside the battery | Lift the seat, clear the battery |
Identify it by sight: a small black block with two large studs and one thin spade terminal, wearing the thick red battery cable on one large post.
If you need to move on to the motor it feeds, our guide to testing the starter it feeds picks up there.
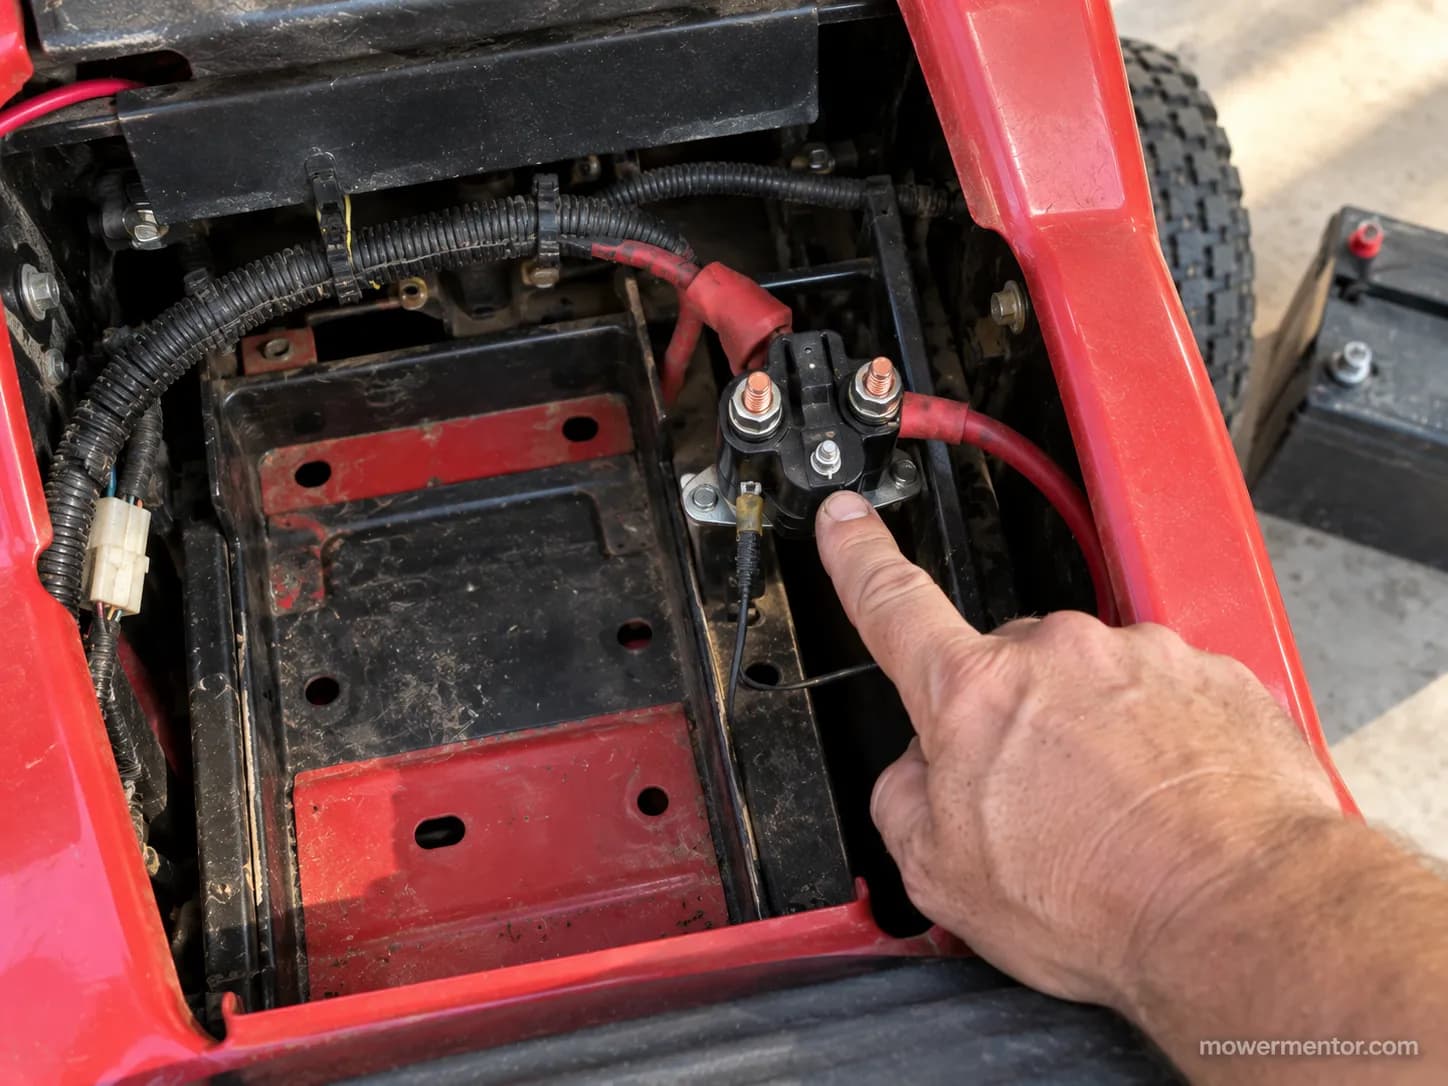
Layouts shift slightly by model year, so match your machine to the photo before you start turning wrenches.
If your mower is completely dead with no click anywhere, step back to our Cub Cadet no-start walkthrough before you touch the solenoid.
How to Test a Cub Cadet Starter Solenoid
Testing a Cub Cadet starter solenoid takes two tools and about five minutes: an insulated screwdriver for the fast bypass, and a multimeter for three confirming checks.
The bypass answers the big question immediately.
Park the mower, set the brake, disengage the blades, wear eye protection, and expect a spark, then bridge the two large posts with the screwdriver blade.
If the starter spins, the solenoid contacts are dead and the part is your fix.
If the starter stays silent, the fault is the starter, the cables, or the battery, and the meter checks below tell you which.
Safety first: The bypass throws real sparks near the battery and fuel, so only do it with the brake set, the blades off, and your face clear of the posts.
Run the screwdriver bypass in this order:
Confirm the mower is in park with the brake locked and the blades disengaged.
Find the two large posts, one wearing the red battery cable, the other feeding the starter.
Lay the insulated screwdriver blade flat across both large posts at once.
Watch the starter: a strong spin means the solenoid is bad, and no spin sends you upstream.
Then confirm with three meter checks. The continuity thresholds follow Fluke's continuity method, where a steady beep near zero ohms means a good path and an open line reads OL.
Trigger voltage. Set the meter to DC volts, probe the small spade terminal to ground, and turn the key to start. You should see near battery voltage, around 12 volts.
Output continuity. With the coil energized, check across the two large posts. A good solenoid closes to near zero ohms, and a bad one stays open.
Coil and ground continuity. Check from the trigger terminal to the mounting bracket. An open reading means a burned coil or a starved ground.
On our XT1 the trigger terminal saw a healthy 12.2 volts on crank, yet the output post held a flat 0 volts.
The coil pulled in on command, but the contacts never closed, which is a textbook failed solenoid.
Meter check | Good solenoid | Our failed unit | Verdict |
|---|---|---|---|
Trigger voltage on crank | About 12 V | 12.2 V | Coil is being commanded |
Output across large posts (energized) | Near 0 Ω, closes | Open, 0 V passed | Contacts dead |
Trigger to bracket ground | Continuity, low Ω | Intermittent | Ground and coil suspect |
This is where the voltage-drop trap catches people.
A solenoid can read a confident 12 volts at rest and still fail the moment real starter current flows, because the eroded contacts cannot carry load.
A resting number that looks fine is not a pass. For the meter-by-meter walkthrough, see the full multimeter method.
Can I Just Jump the Two Big Posts With a Screwdriver?
Yes, and it is the single fastest test you can run, but treat it as a diagnostic, not a driving mode.
Bridging the two large posts sends battery power straight to the starter and bypasses every safety switch, so the mower can lurch if it is in gear.
Keep it in park with the brake locked, do it once to confirm the contacts, then fix the part. For the safe technique in detail, read jumping it safely with a screwdriver.
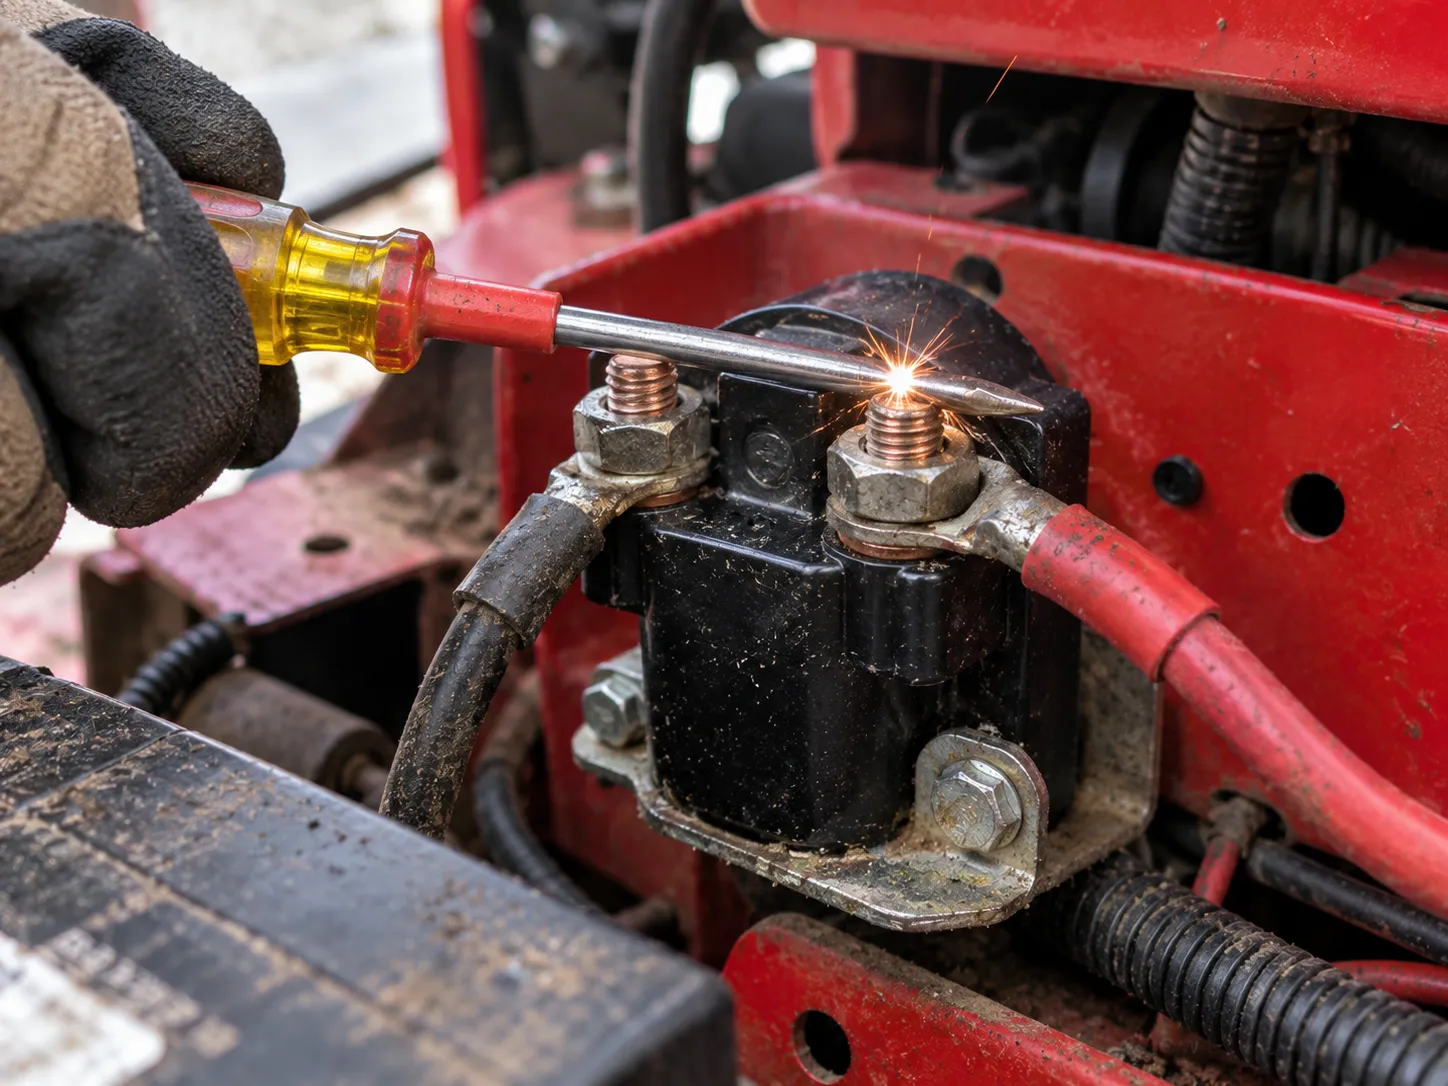
If yours only clicks and you are not sure whether the battery or the solenoid is guilty, our battery-versus-solenoid click diagnosis separates the two in a few steps.
Cub Cadet Starter Solenoid Wiring Diagram (Three-Post, Labeled)
The Cub Cadet starter solenoid wiring diagram is simple once the posts are named: two large posts carry the heavy current, one small spade carries the trigger signal, and the steel bracket carries the ground.
On the three-post 925-1426A, large post A takes the thick red cable straight from the battery positive, large post B feeds the starter motor, and the thin spade takes the trigger wire from the ignition and safety-switch string.
There is no dedicated ground wire, because the mounting bracket grounds the coil to the frame. Get those four connections right and the new part works on the first turn of the key.
          [ + BATTERY ]                                               [ STARTER MOTOR ]
                   |                                                                        |
                   |  thick red cable                                               |  heavy cable
                  v                                                                        v
        (  LARGE POST A  )======[ COIL ]======(  LARGE POST B  )
                                                          |
                                          small spade terminal
                                                         |
                                     trigger wire from ignition +
                                          safety-switch string
                                                         |
                      [ MOUNTING BRACKET = GROUND to frame ]
Terminal legend:
Large post A: Battery positive, thick red cable.
Large post B: Output to the starter motor.
Small spade: Trigger from the key and safety switches.
Bracket: Ground path to the frame, no separate wire.
Some aftermarket and newer units use a four-post design with a dedicated ground terminal instead of relying on the bracket.
If yours has four terminals, the extra post is ground, and the full three-pole and four-pole diagrams show both layouts side by side.
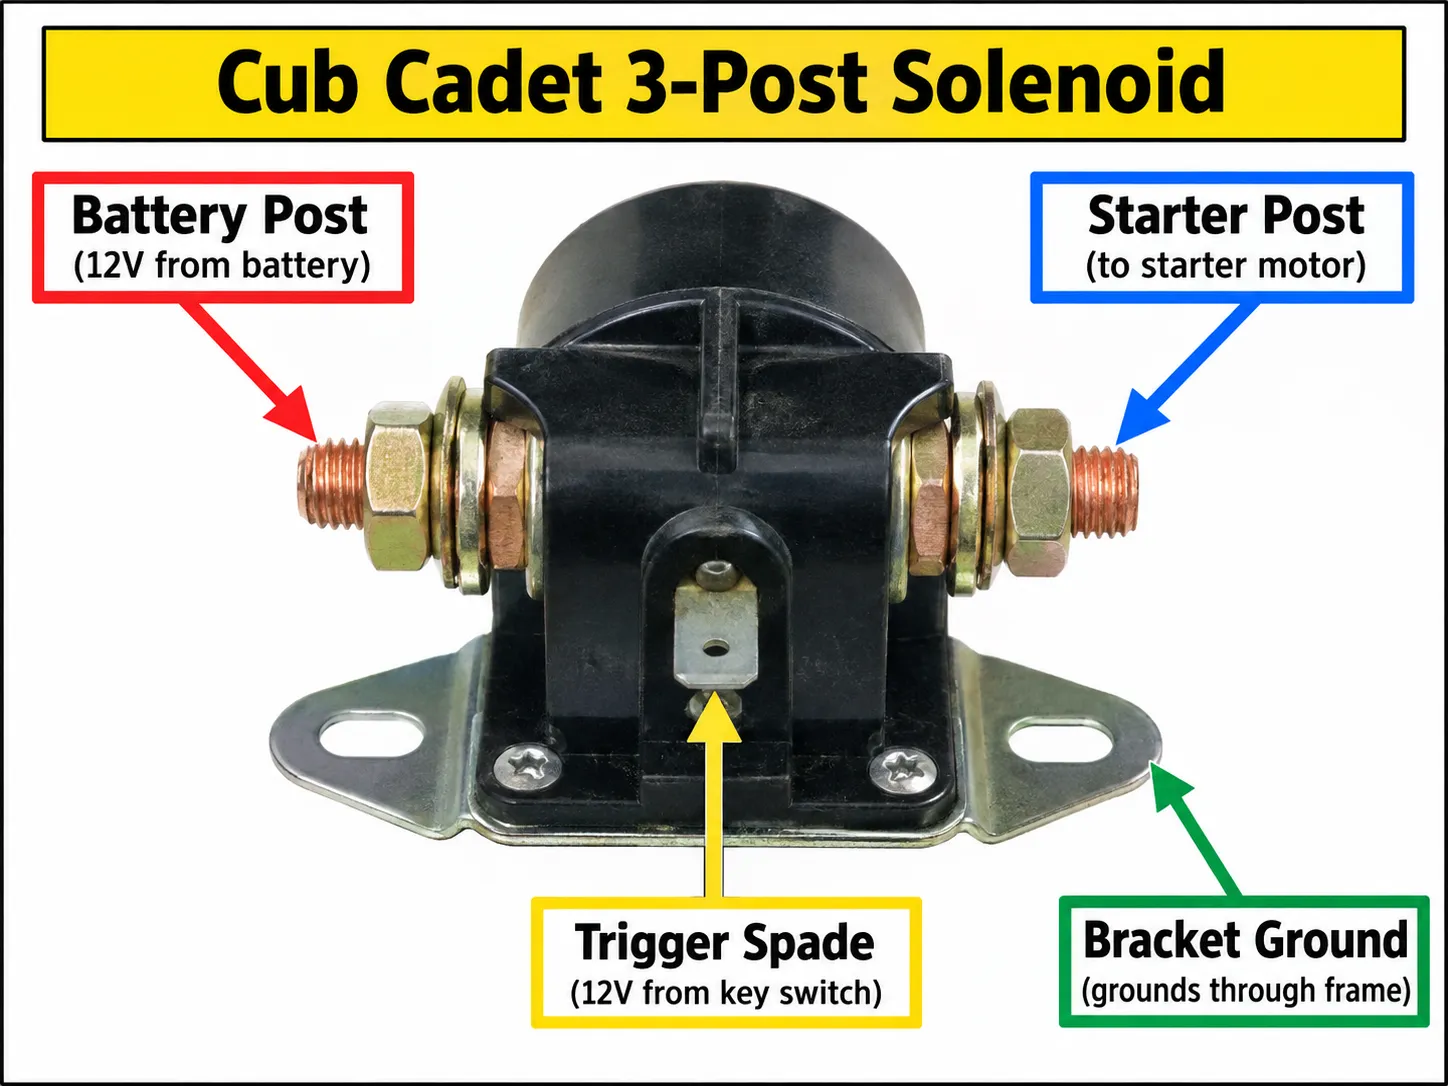
When we traced our XT1 harness before pulling anything, the trigger spade turned out to share the safety-switch string, which is exactly why a bad seat switch can imitate a dead solenoid.
Before you disconnect a single wire, photograph your setup, because a shared ground fault is easy to chase through tracing a no-crank to ground.
How to Replace the Starter Solenoid (Step by Step)
Replacing a Cub Cadet starter solenoid is a fifteen-minute job once you can reach it, and the disconnect order matters more than the part itself.
Work in this sequence: disconnect the battery negative first, photograph and label the wires, remove the battery to expose the solenoid, unbolt the old unit, clean the mounting surface to bare metal, transfer the wires to the matching posts on the new solenoid, torque the bracket down, and reconnect the battery positive last.
The one step people skip, cleaning the ground surface, is the step that decides whether the fix actually holds.
Tools and parts:
Socket set and a wrench, commonly 10mm.
A wire brush or emery cloth.
Dielectric grease.
The correct replacement solenoid for your machine.
Then follow the swap in order:
Disconnect the battery negative terminal first, always.
Photograph the wiring, then label each wire before anything moves.
Remove the battery to expose the solenoid underneath.
Unbolt the solenoid bracket from the frame.
Wire-brush the mounting seat down to bright bare metal.
Transfer each wire to the matching post on the new solenoid.
Bolt the new unit down, then add a film of dielectric grease on the terminals.
Reconnect the battery positive last, and test-crank.
Our first swap did not fix a thing until we wire-brushed the bracket seat.
The replacement had been grounding through old paint, so the mower kept chattering with a brand-new part bolted in.
If you want a generic version of this procedure for any mower, the general replacement walkthrough covers it.
And if the swap does not help, signs the starter itself is failing is the next stop.
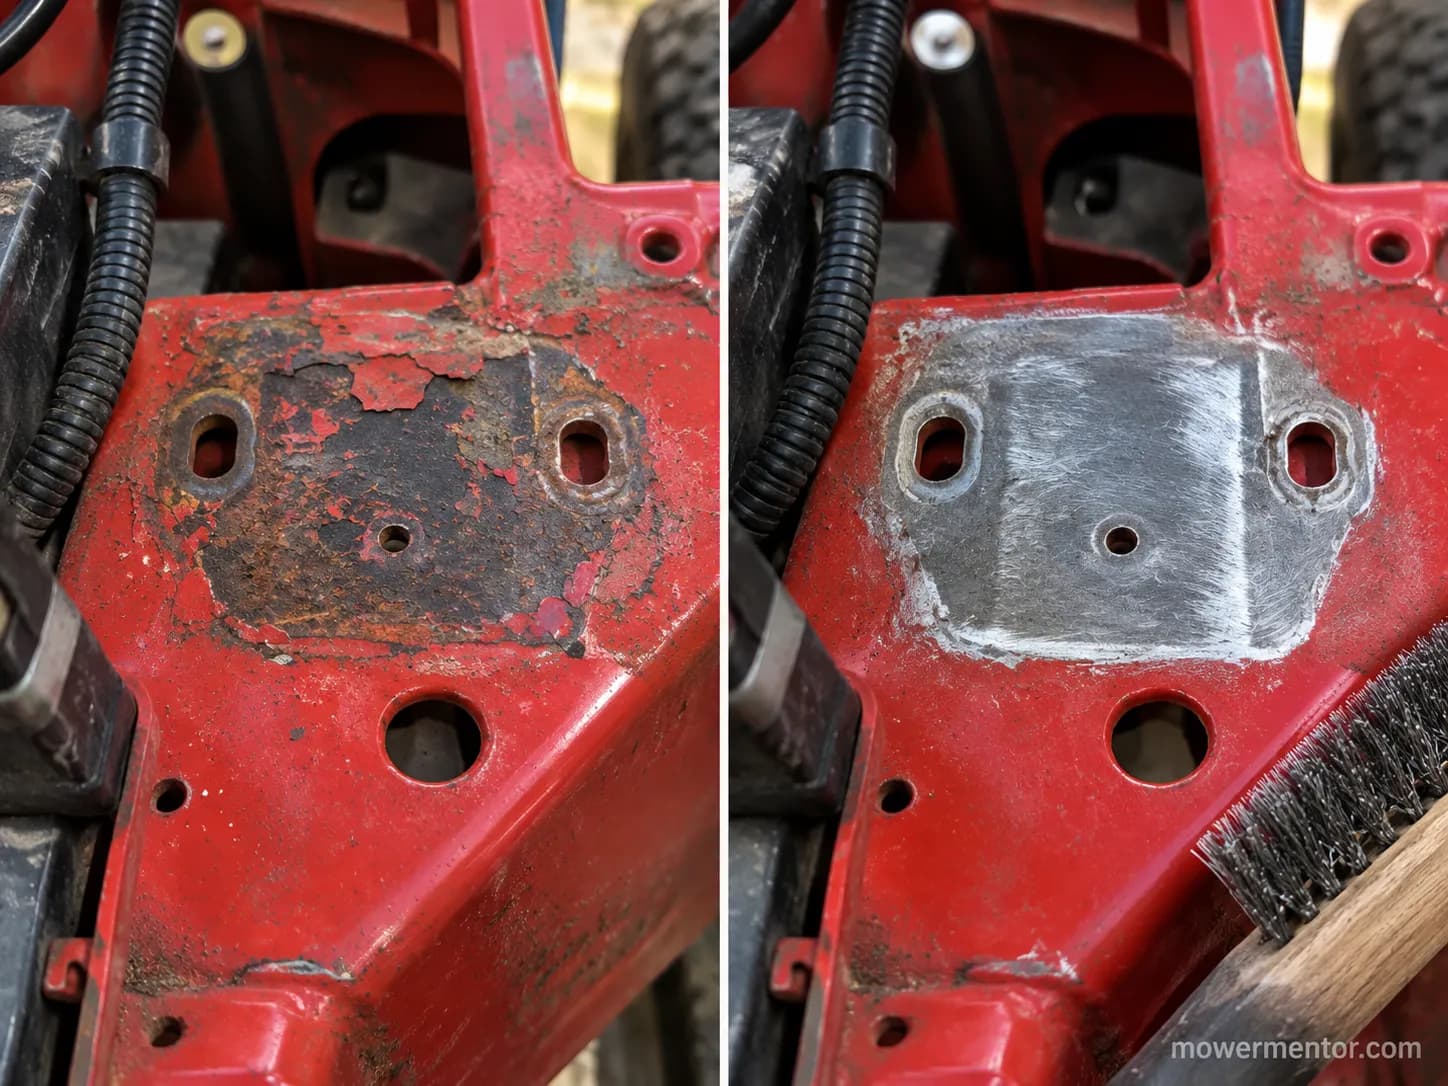
Reverse the disconnect order and you risk arcing across the frame, so keep it negative first, positive last.
The part runs about $15 to $30 and the whole job takes fifteen to twenty minutes, which makes this one of the cheapest wins on the machine.
While you are in there, a full riding-mower tune-up is worth scheduling. The deeper version, a real small-engine service, covers what a spray-can shortcut misses.
Owners of battery-powered machines can skip all of this and read caring for a battery mower instead.
Which Cub Cadet Riding Mower Starter Solenoid Fits Yours (Part 925-1426A)
The classic Cub Cadet starter solenoid is the OEM 925-1426A, a three-post unit that replaces the older 725-1426, 725-1426A, 725-1426P, and 925-1426 numbers across many MTD-based Cub Cadet tractors.
There is a catch worth knowing before you order: a large share of current XT1, XT2, and Ultima ZT1 machines use the four-post 725-06153A instead, which is a 100-amp unit with a dedicated ground terminal.
The two are not interchangeable, because the terminal count and wiring differ. The binding rule is simple: match your terminal count and verify by model and serial before you buy.
Part | Terminals | Rating | Typical fit (verify by model and serial) | Notes |
|---|---|---|---|---|
OEM 925-1426A | 3-post slide | 12 V, about 80 A, 90° mount | Many LT, LTX, and older XT tractors | Replaces 725-1426, 725-1426A, 725-1426P, 925-1426 |
OEM 725-06153A | 4-post | 12 V, 100 A | Many current XT1, XT2, Enduro, RZT, ZT1, ZT2 | Dedicated ground post, not a 3-post substitute |
Reputable aftermarket | Match your OEM | Equivalent | Whatever your confirmed OEM number covers | Confirm the OEM numbers stamped on the listing |
Cub Cadet's OEM page lists the 925-1426A supersessions, and a MaxPower cross-reference confirms the same numbers on a common aftermarket unit at a lower price.
Before you order an aftermarket part, confirm the OEM numbers match what your machine actually uses.
A Messick's parts listing cross-checks the supersession chain by model and serial.
That is the same verify-first discipline behind finding parts by cross-reference on any component.
We fitted an aftermarket 925-1426A equivalent next to a genuine OEM unit on the bench.
The post spacing matched, but the trigger spade sat about 3mm off, close enough to connect and worth knowing before you assume a perfect drop-in.
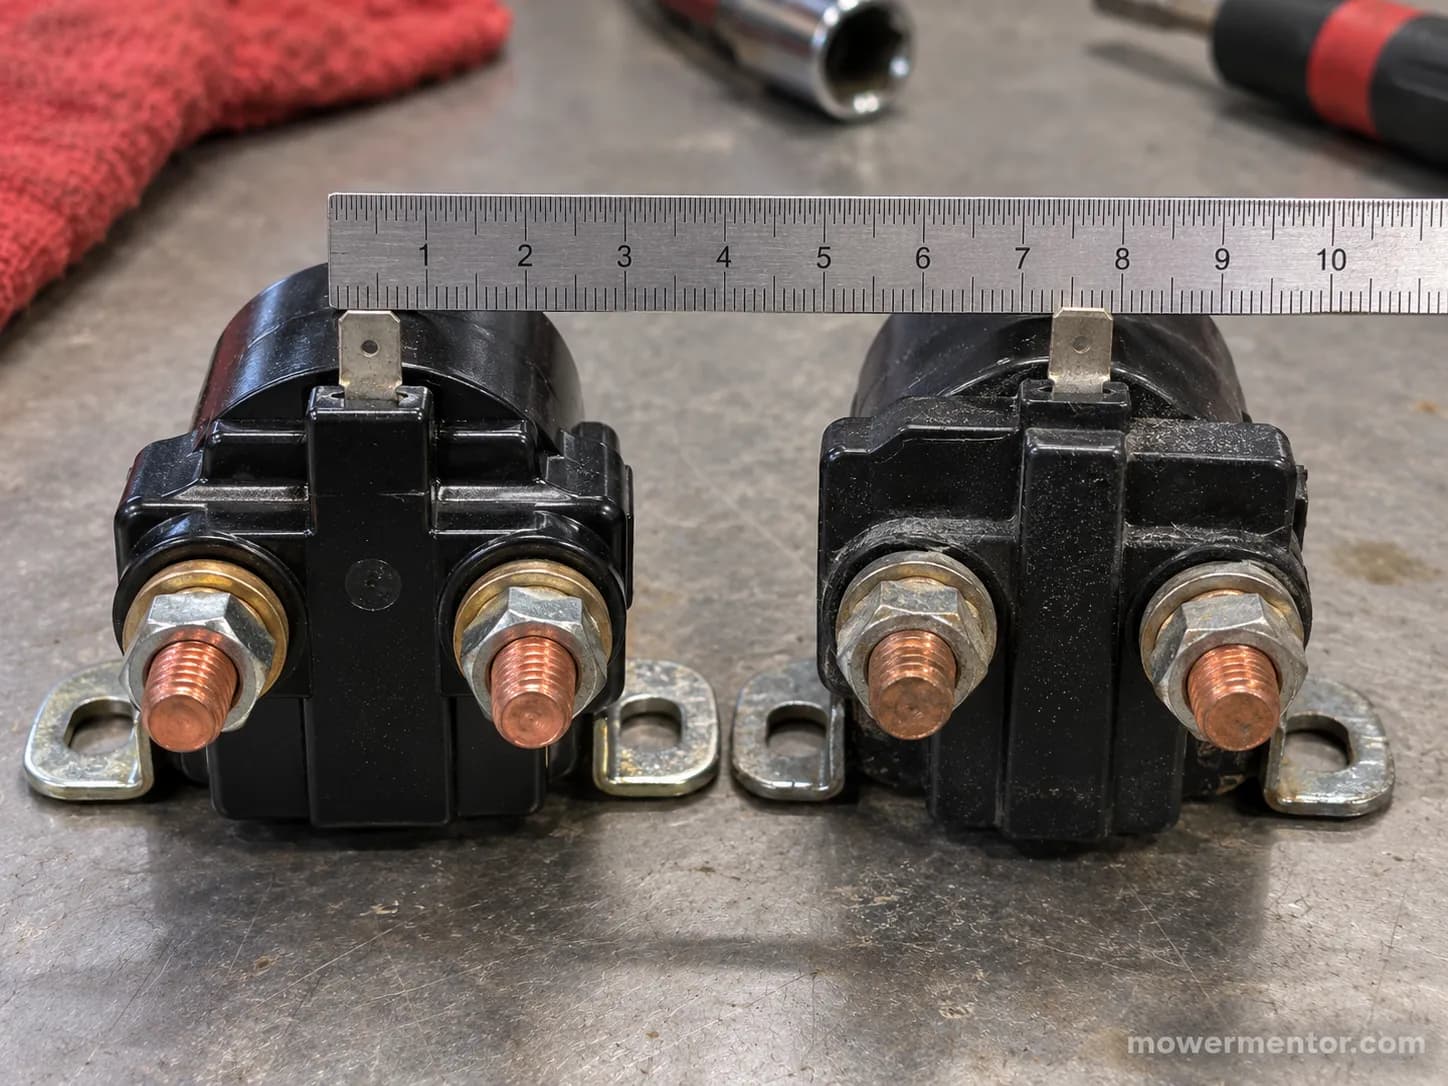
If your testing pointed at the battery rather than the solenoid, spend the money there instead and read picking the right Cub Cadet battery.
And if you are matching a nearby engine cover while you shop, matching a cover to your housing uses the same verify-by-model logic.
If Replacing the Solenoid Didn't Fix It: What to Check Next
If a new Cub Cadet starter solenoid still clicks or does nothing, the real fault is almost always a weak battery, a corroded ground, the starter motor, the ignition switch, or a safety switch. The tell is in how it behaves on the bypass versus the key.
If it cranks when you bridge the posts but stays dead on the key, the trigger circuit is guilty, not the solenoid, because the bypass skips every safety switch.
Our own "new solenoid still clicks" case turned out to be a seat switch: the mower cranked fine on the screwdriver bypass and refused on the key, which points straight at the safety string.
What it does after the swap | Likely culprit | Where to go next |
|---|---|---|
Cranks on bypass, dead on key | Ignition or safety switch | Test the trigger circuit |
Rapid clicking under load | Weak battery or corroded ground | Load-test the battery, clean grounds |
Whines or spins without engaging | Starter motor | Inspect the starter |
Single click, no crank, good battery | Ground path or new part faulty | Recheck the bracket ground |
If it clicks rapidly, our rapid-versus-single-click diagnosis narrows it fast. For the whole starting circuit end to end, the complete electrical decision tree maps every branch.
And if it cranks but will not fire, read when starting fluid helps before you keep spraying.
If you have already swapped the part twice, stop swapping.
Test the ground and the battery under load, because a second solenoid rarely cures a fault the first one did not.
Frequently Asked Questions
How much does it cost to replace a Cub Cadet starter solenoid?
The part runs about $15 to $30 in 2026, with reputable aftermarket three-post units near $15 and genuine OEM closer to $28. Doing it yourself keeps the total at parts only.
If you pay a shop, add roughly $60 to $120 for a half-hour to an hour of labor, which is why this is such a common first DIY repair.
Can you start the mower with a bad solenoid?
Only as a one-time test, not as a driving habit. Bridging the two large posts with an insulated screwdriver sends power straight to the starter and bypasses the safety switches, so the mower can lurch if it is in gear.
Use it to confirm the diagnosis, keep the machine in park with the brake set, then replace the part.
How long does a starter solenoid last?
A solenoid often lasts many seasons, but lifespan depends heavily on the ground and on heat. The aftermarket unit we installed this spring has held one full season so far with clean grounds and steady starts.
A corroded bracket or a chronically weak battery shortens that life sharply.
Is an aftermarket solenoid as good as OEM?
An aftermarket solenoid is fine as long as the OEM numbers match your machine and the mounting ground is clean. The bigger risk is buying the wrong terminal count, not the brand.
Confirm three-post versus four-post against your model, and a good aftermarket unit performs like the original.
The Bottom Line
A cub cadet riding mower starter solenoid is one of the cheapest and fastest repairs on the machine, but only when you prove it is the part before you spend a dollar.
Bridge the two large posts to confirm the contacts, back it up with three meter checks, and rule out the ground and battery that fake the same click.
If the tests convict the solenoid, match the correct part by terminal count and model, clean the mounting seat to bare metal, and swap it in about fifteen minutes.
Do it in that order and you fix the mower once, instead of throwing parts at a click that a clean ground would have cured.
Your next move is the screwdriver bypass, out in the shed, before anything goes in a cart.
Read it your way
Short on time? Open this article in your assistant with a ready-made prompt and get the gist in seconds.
Found this useful? Make us a preferred source so we show up in your Google results.
Keep reading
Related articles
Troubleshooting & Repair
Lawn Mower Ignition Switch Replacement (Steps + Cost)
Do your own lawn mower ignition switch replacement: photo steps, wire-by-terminal transfer, fitment help, and a DIY-vs-shop cost table to save $100+.
Troubleshooting & Repair
Which Lawn Mower Ignition Switch Fits? (Prong Guide)
hoose the right lawn mower ignition switch by prong count (4/5/6/7), universal vs OEM fit, and key compatibility, plus which one fits your mower.
Troubleshooting & Repair
How to Start a Lawn Mower With a Bad Ignition Switch
Confirm it's the switch, then learn how to start a lawn mower with a bad ignition switch: a safe solenoid bypass to get moving, plus how to fix it for good.
Troubleshooting & Repair
How to Test a Lawn Mower Ignition Switch (5/6/7-Pin)
Learn how to test a lawn mower ignition switch with a multimeter: get continuity tables for 5, 6 & 7-pin switches plus a no-multimeter test-light method.
The discussion
Comments
Every comment is reviewed before it goes live.